How to delete a protected EFI system partition with Windows 11, 10, 8, or 7
As you probably know, in order to be able to store files on a hard drive, it needs to be prepared first: it needs to be initialized, partitioned, and formatted just the right way. If you've bought an external drive in a store, the preparation has probably been already done by the drive manufacturer. However, what if you want the drive to be prepared differently? For example, you may want to re-format the drive, or change the partitions that it has. The way to do such tasks in Windows is to use the Disk Management tool that comes preinstalled with Windows.
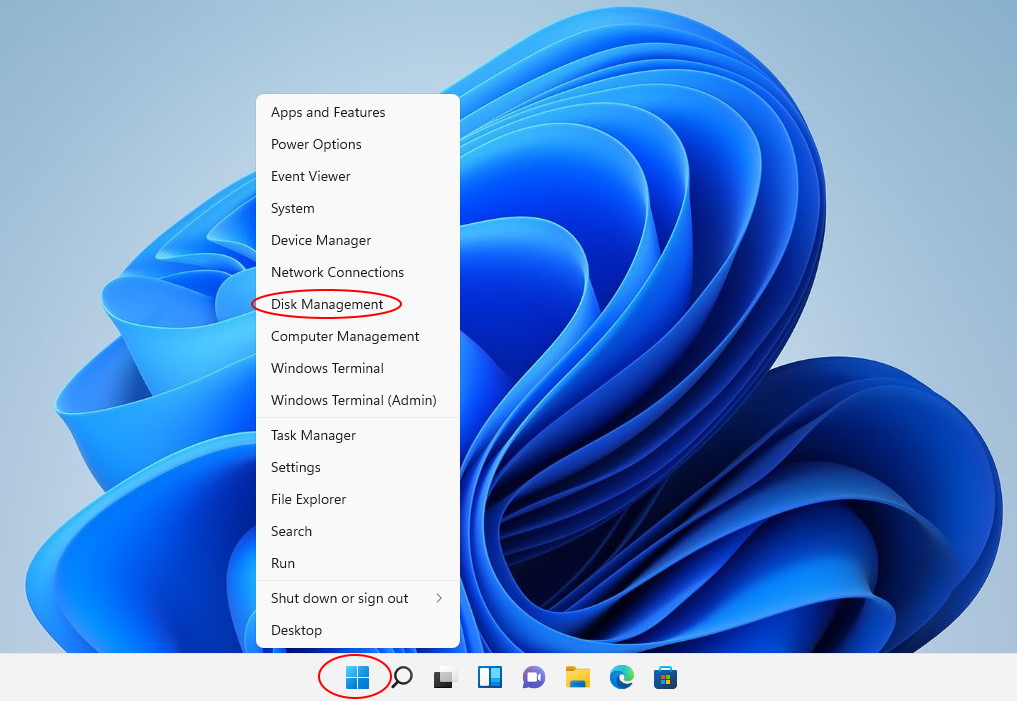
It's easy to open Disk Management, but the procedure is slightly different in different versions of Windows. If you have a newer version of Windows, such as Windows 11 or 10 right-click on the Start Menu, and choose Disk Management from the menu displayed. (If you have Windows 7, run Windows Explorer, right-click on Computer, choose Manage from the menu, then select Disk Management under Storage.)
Before you continue, first things first: Disk Management is a very powerful tool, and with great power comes great responsibility! If you are not very experienced with computers, you can look, but better not touch and let someone more knowledgeable to do the job. Because with Disk Management it's very easy to destroy your partitions and lose your files, if you don't know what you are doing.
![]() Password-protect and hide personal files and folders with Folder Guard for Windows 11,10,8,7.
Password-protect and hide personal files and folders with Folder Guard for Windows 11,10,8,7.
User rating: ![]() 4.7 / 5
4.7 / 5
Purchase
or
download a free trial.
Read more...
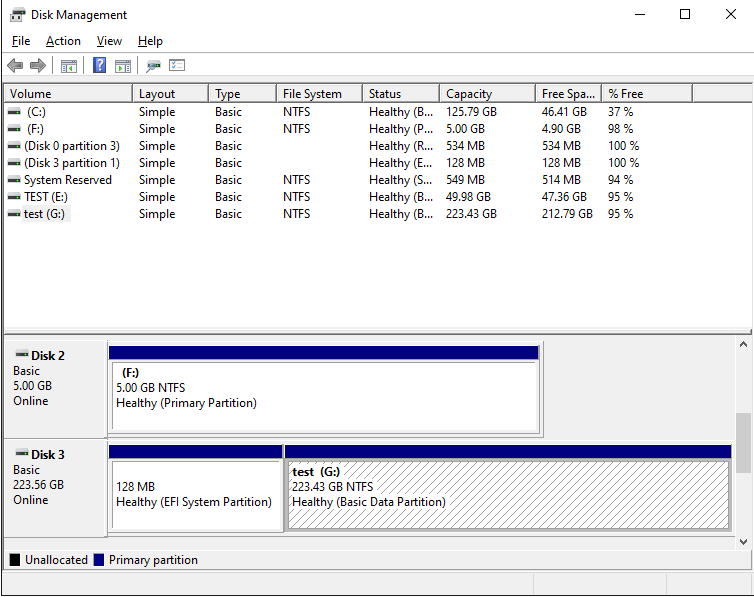
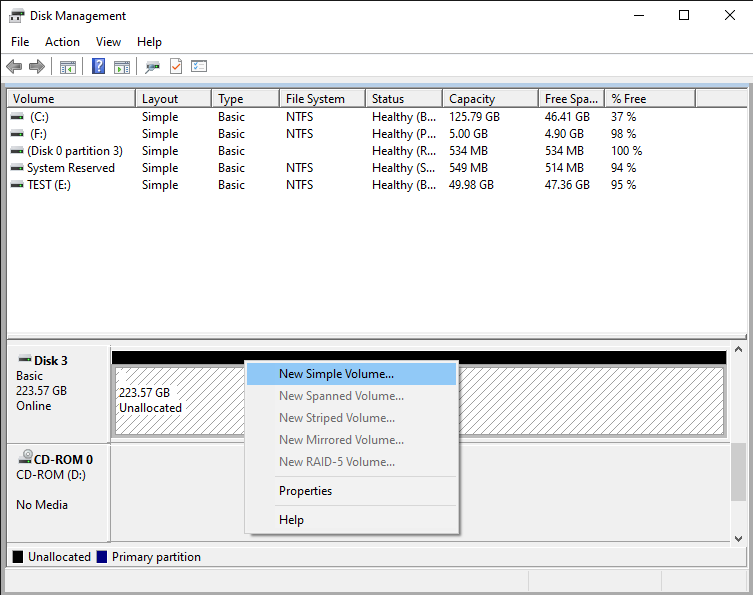
The most important thing when using the Disk Management tool is to make sure you can identify the disk you want to manage in the list. Usually you can do it by the total size of the disk displayed, although it may be confusing. For example, in this example, a hard drive that's described as a 240 GB drive by the manufacturer, is shown to have only 223.56 GB by Windows. (Apparently, the disk manufacturers and Windows have a different understanding of what a "gigabyte" is.) Also, if you have several disks of the same size attached, it may get even more confusing. If in doubt, better unplug all external drives except for the one you actually want to work with, to make sure you are not accidentally erasing data on a wrong disk!
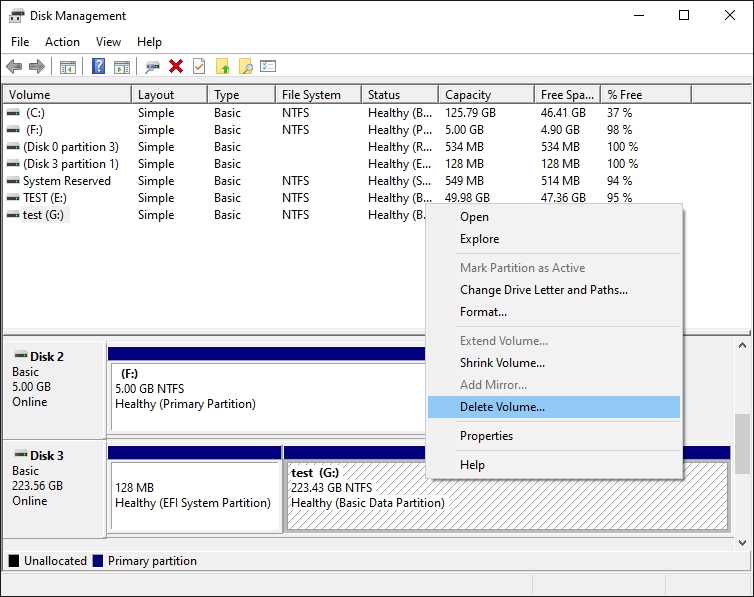
In our case, the 240 GB disk (shown as 223.56 GB disk in the list) is Disk 3 (let's remember this number, we will need it a bit later.) It has two partitions, one is a 128MB EFI partition that has no drive letter assigned, and another NTFS partition of the size 223.43 GB, that has the label test and the drive letter G:. Although these two partitions looks similar, they are treated very differently by Windows. If you right-click on the normal NTFS partition, you should see the normal menu that lets you perform various tasks on that partition, including the Delete Volume command:
However, if we right-click on the first EFI partition, the menu we get is completely disabled:
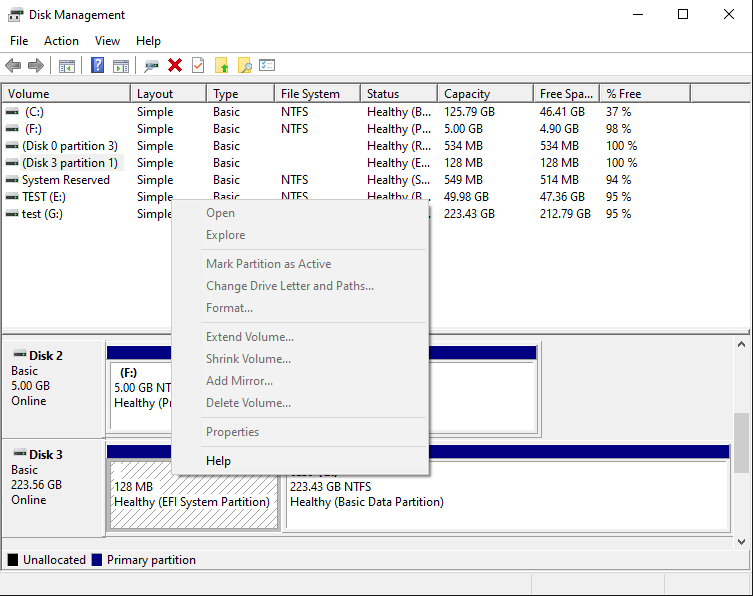
As you can see, the system partition is protected in such a way that even the powerful Disk Management tool cannot do anything to it. Note that it's not because the partition is EFI, it's because the tool that created that partition had marked it in a way that prohibits other tools to tamper with it. However, what if we want to delete the EFI system partition and re-initialize the disk from scratch?
While the Disk Management tool is helpless in this situation, fortunately Windows offers another tool, DISKPART, that can do things to the disks that Disk Management can't. The tricky part is, that DISKPART is a command-line tool, that requires us to type commands into its command prompt to make it do what we want.
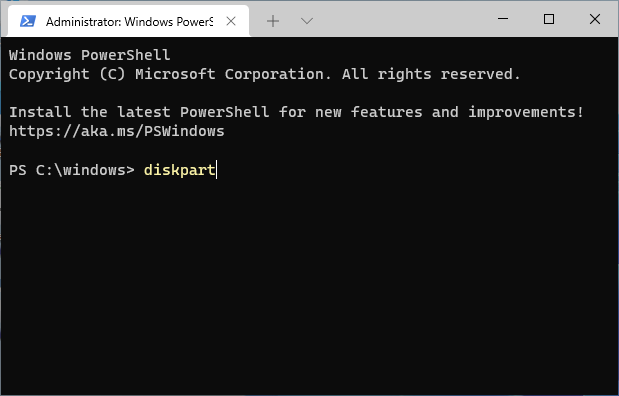
The procedure of getting to the DISKPART tool is slightly different in different versions of Windows. First, you need to open Windows command prompt in the "administrator" mode. In the recent versions of Windows you can simply right-click on the Start button and choose one of the command offered:
- Windows Terminal (Admin)
- Power Shell (Admin)
- Command Prompt (Admin)

If you have an older version of Windows such as Windows 7, you can open the command prompt in the administrator mode as follows: click the Start button and enter cmd in the search box; make sure that cmd is highlighted on the menu displayed, but do not press the Enter key yet; instead, press the Ctrl and Shift keys together, and while keeping them depressed, press Enter. The Ctrl+Shift combination should force the command prompt to open in the "administrator" mode.
When the command prompt window opens, start the DISKPART tool by entering the diskpart command into the command prompt window:
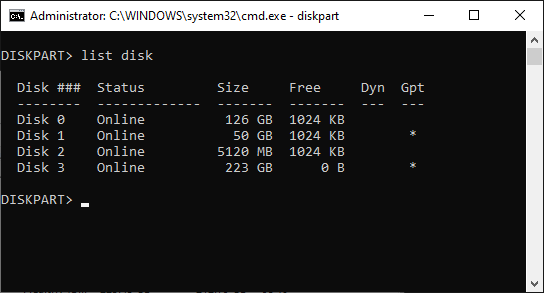
This should display the DISKPART command prompt. The first command we should use is list disk that should display the list of the disks currently connected to the computer:
![]() Encrypt and password-protect files with Encryptability encryption software for Windows 11,10,8,7.
Encrypt and password-protect files with Encryptability encryption software for Windows 11,10,8,7.
User rating: ![]() 4.5 / 5
4.5 / 5
Purchase
or
download a free trial.
Read more...
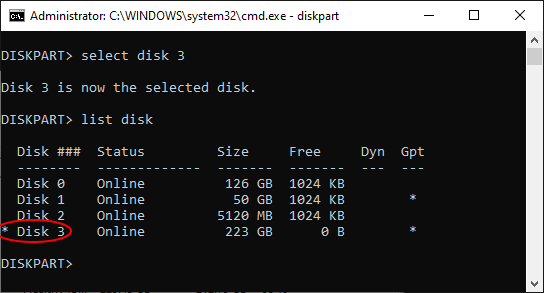
Again, it's very important to properly identify the disk we want to work with in the list. Our 240 GB disk is still listed as Disk 3 with the capacity 223 GB. (Notice that it is listed as having 0B free. This is because all available disk space is currently allocated for the two partitions we've discussed above.) Once we are sure that this is the disk we want to re-initialize, we need to select it, by entering the command select disk 3 (yes, that's how selection is usually done when using the command line tools!). Then, let's use the list disk command again, to confirm that the disk in question is indeed now selected:
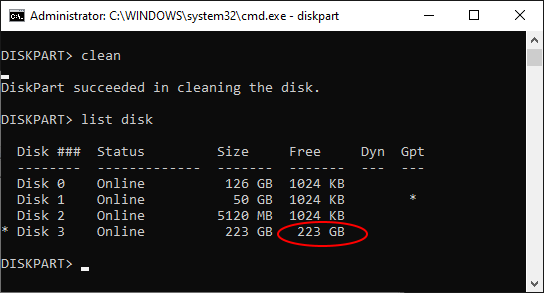
After double-checking that Disk 3 is now selected (it should have the star character * in front of its label), it's time to finally issue the command that will erase everything on the disk 3, including the protected partition. The command that does that is clean. Note that this command erases everything on the selected disk, all partitions, protected or not. If you still have files on other partitions of disk 3 that you want to keep, you should exit now and backup those files, because after using the clean command all such files will be erased without a trace!
After the clean command is done (it should take no more than a few seconds), we get a fresh disk with all partitions erased. We can exit the DISKPART command prompt (by typing exit into its command line), and go back to the Disk Management tool (see above how to open it.) When it starts, it automatically detects the presence of the clean disk and prompts us to initialize it:
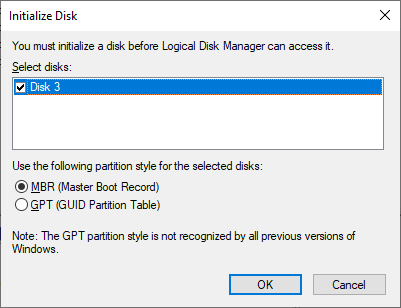
Press OK and the newly cleaned disk will appear in the list. The difference is, the protected EFI partition is gone! (The normal NTFS partition that used to be on the disk 3, is gone, too.) The disk is now ready for you to start creating partitions, formatting them, and do other things as needed:
Note that if you are trying to erase the system disk that hosts the C: drive where Windows itself is installed and running, then even the powerful DISKPART command can't work: Windows simply refuses to erase the drive from which it is running. To erase such a disk, you need to physically remove it from the computer, attach it to another computer as an external drive, and then use DISKPART on that computer to erase the disk.
Happy disk managing!
If you want to link to this article, you can use this HTML code: <a href="https://www.winability.com/delete-protected-efi-disk-partition/">How to delete a protected EFI system partition with Windows 11, 10, 8, or 7</a>
Read more
- How to disable Adobe's ability to scan all of your organization's documents for generative AI.
- [SOLVED] How to disable Taskbar Thumbnail Preview in Windows 11.
- How to restrict access to Microsoft Store app with Folder Guard.
- Tired of the Your password has expired and must be changed prompts? Here is how to stop them.
- How to move Pictures and other folders to Virtual Encrypted Disk.
- How to disable Fast Startup if you use encryption software.
- How to restore Videos, Pictures, and other folders in This PC in Windows 11.
- How to create a local user account in Windows 11 or Windows 10.
- How to enable or disable test signing mode in Windows.
- Email or SMS text messaging are NOT secure for two-factor authentication.
- Estimate how much you could save on electric bill with ActiveExit software.
- How to delete partition on Windows 11 or Windows 10.
- Forget VeraCrypt password? Here is how to recover it.
- Why do my desktop icons keep moving?
- How to create a private folder in Windows 11 and 10.
- How to restrict access to Windows Settings with Folder Guard.
 Suspending all contact with fascist Russia
- How to keep desktop icons from moving by running Icon Shepherd from command line.
- How to restrict access to Task Manager with Folder Guard.
- Take ownership of your files after access denied due to NTFS permissions.
- How to reprogram or disable CAPS LOCK key.
- Encryptability vs Folder Guard: which one to choose?
- Troubleshooting software removal problems using MSI files.
- Encryptability: Compare Personal and Business Licenses.
- How to add Group Policy and Local Security Policy to Windows 11 and 10 Home edition.
- [SOLVED] File is too large for the destination file system.
- Forget your WI-FI password? Find it in Windows 11 and 10 settings.
- What is FAT32 maximum file size limit?
- How to create a secret folder in Windows 11 and 10.
- How to easily password-protect Windows Linux folders with Folder Guard.
- Force DISKPART to delete EFI system partition in Windows 11 and 10.
- How to make Windows 11 and 10 recognize a cloned hard drive again.
- How to stop Windows 11 and 10 from using thumbnail preview icons for folders.
- How to hide pictures from the Photos app in Windows 11 and 10.
- How to save Windows Spotlight photos to your computer.
- How to move the OneDrive folder to an encrypted drive.
- Windows 10 fails to upgrade? Here is how to fix it.
- How to stop Microsoft Edge from opening PDF files.
- Preventing installations of specific programs with Folder Guard.
- Folder Guard licensing explained.
- Speed up the updates of the network folders.
- Make your Windows laptop work as a Wi-Fi access point.
- How to stop automatic Windows Update in Windows 10 and 11.
- [SOLVED] Windows cannot connect to the printer. Access is denied.
- Migrating encrypted data from TrueCrypt to USBCrypt.
- “The Microsoft account service is unavailable right now. Try again later.”
- Using DiffMerge as the external tool of AB Commander to compare plain text files.
- How to repair the icon cache and/or thumbnail cache in Windows 11 and 10.
- Transferring images between your PC and an Android device: Part 2.
- Transferring images between your PC and an Android device: Part 1.
- Case study: Using SoftDetective to suppress Corel Guide sign-in prompt.
- Using junction points to change the iTunes backup folder location.
- How to tell if my Windows computer is 32- or 64-bit?
- How do I stop Windows from rearranging my desktop icons?
- Organize your photo library with the Rename tool of AB Commander.
- Windows does not offer the NTFS format option? Here is how to bring it back.
- How to encrypt Firefox profile, bookmarks, and cookies.
- Restarting Windows 11, 10, and Windows 8 in the safe mode.
- Integrating AB Commander with Universal Viewer.
- How to delete a protected EFI system partition with Windows 11,10, 8, or 7.
- Using Folder Guard to protect from the social engineering attacks.
- How to erase Windows login password if you forget it.
- How to unhide a folder hidden with Folder Guard.
- How to repair Windows desktop icons with AB Commander.
- Slow network in Windows 7 Virtual PC? Speed it up!
- How to show drive letters first in AB Commander and Windows Explorer.
- What is my IP address?
- Why can’t I copy large files over 4GB to my USB flash drive or SD card?
- Test the strength of your password with USBCrypt.
- How to set up an external text editor for AB Commander.
- How to restrict Internet Explorer from downloading programs from the Internet.
- Personal vs business license for USBCrypt.
- Use Folder Guard to restrict access to Control Panel.
- Compare MySecretFolder and Folder Guard.
- Hide folders and make files invisible with Folder Guard.
- WINEXIT vs ActiveExit: automatically log off users from Windows.
- How to protect folder with password in Windows 11 and 10.
- How to restrict access and lock external drives with Folder Guard.
- How to password-protect Dropbox folder with USBCrypt.
- How to set up Folder Guard to stop downloading from the Internet.
- Is (Wipe the content) the same as (Secure Delete)?
- How to encrypt and protect the system C: drive with USBCrypt.
- Make it easier to return your lost encrypted drive.
- USBCrypt for users of Microsoft Office.
- How to start programs elevated from a batch file.
- How to make elevated programs recognize network drives.
- How to disable or enable hibernation.
- Using names and labels to organize USBCrypt drives.
- How to password-protect a USB flash drive.
- Always have a backup of your important files.
 Stand with Ukraine