Transferring images between your PC and an Android device: Part 2
Previously we've discussed how to copy or move the images that you take with an Android phone or a tablet to your main photo collection on the PC. In this second part of the article, we will discuss the transfer of the photos in the opposite direction, from the PC to an Android device.
Why to transfer the photos from a PC to a tablet, you might be wondering? Because the tablet is a very good device to showcase the photos! If you take photos with a digital camera and store the photo images on your PC, you would probably want to transfer them to the tablet, and organize them in albums, to make navigating and displaying them to your friends a breeze.
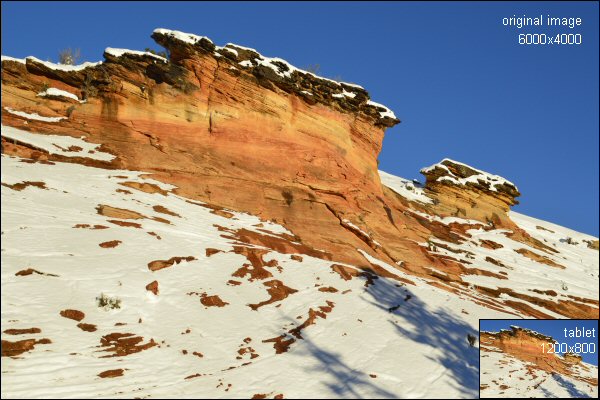
You could probably use your Android device software or Windows Explorer to simply copy the image files from the PC to the Android device, but doing so would be inefficient and wasteful. Consider the images that you take with your digital camera: they are probably of a rather high resolution, much higher than the resolution of your tablet or the phone screen. For example, if your camera takes 12 megapixel images, the resolution of the images is around 4000x3000 pixels. Or, the resolution of a 24 megapixel image is about 6000x4000 pixels. What is the screen resolution of your tablet? Most probably, its around 1200x800 pixels, or even less (look up your device specs in its documentation). It means that all those megapixels that your digital camera stores in the image files will be wasted when displayed on the tablet or a phone:
You can safely reduce the resolution of the images for viewing them on the tablet, and you wouldn't notice any difference in their appearance. Another reason to reduce the resolution of the images before transferring them to a phone or a tablet is to save the storage space of your device. The storage capacity of your phone or a tablet is probably not too large, somewhere between 16GB and 64GB for a typical device in use these days. Considering that a large part of the storage is probably used by the apps, maps, music, and other files that you have there, you probably don't have much storage to devote to the photos, right?
Let's do some number crunching: how many full-resolution images can you put within a 1GB of storage space on the device? If an average size of a full-resolution image file is 10MB, and taking into account that 1GB is 1024MB, dividing 1GB by 10MB we get the answer: about a hundred files. If you use your digital camera often, your photo collection is probably much larger than that. That why you want to reduce the image resolution before transferring them to the device: it would let you put many more images onto your tablet or a phone.
OK, enough theory, let get down to business. Starting with version 9.3, AB Commander includes a command specifically designed for such a task: Resize Images. However, this command is much smarter than your average image resizer: it can also synchronize the image files: if you add new images to your master image collection, it's smart enough to process only the new images, without resizing the previously processed images every time. It can also skip resizing the images that are already of a lower resolution than you requested. Finally, it can rotate the images according to their Exif orientation tags, to make sure they are displayed correctly on your device:
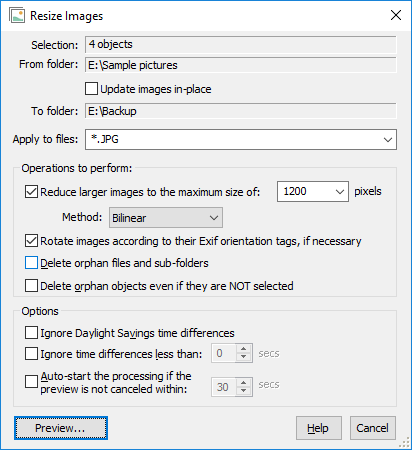
Before using this command, you may want to set up a "staging" folder for the images you want to be transferred to the tablet or a phone. Why would you need it? Because you are going to reduce the resolution of the images before transferring then to the device (see above that's a good idea), but you want to keep the full-size originals, too, that's why you need a separate folder for the reduced-resolution images before you transfer them to the device. Also, you probably don't want all of the images to appear on the device, you want only the best ones to go there. And you probably want to create a few separate albums on the device, to keep images that belong to different topics separately, nicely organized.
Besides, if your Android device appears as a virtual folder when you connect it to the PC, then you must put the images into a staging folder first, before transferring them onto the device: the Resize Images command cannot work with the virtual folders, it can work with the real folders only. (See the 1st part of this article for the discussion of the differences virtual and real folders.)
Where should you create the staging folder? Almost anywhere. (As long you can remember where it is later on.) For example, create a Temp folder on the C: drive, and then create a subfolder there, naming it, for example, Photos for the tablet. Of course, you can use AB Commander to navigate to the folder and use its New Folder command on the Tools menu for that.
Next step is to create a few more subfolders in the staging folder: each such subfolder will become an album when you transfer it to the Android device. Navigate to each subfolder in turn, and then copy the photos from the folder where you keep the master photo collection to the staging subfolders. Use the Quick Viewer of AB Commander to quickly preview the images while you are deciding which ones are good enough for the tablet.
CAUTION: Keep in mind that if you use the mouse to drag and drop the files, and the staging folder is located on the same hard drive as the master folder where you keep the originals, then dragging the files with the mouse causes them to be moved rather than copied! Since you want to copy (rather than move the files), keep the Ctrl key depressed while dragging the files with the mouse, to enable the copy mode.

After copying the images from the master photo collection to the staging folder, it's time to reduce the resolution of the images to match the resolution of the screen of the Android device. Open the Resize Images window from the staging folder, and select the Update images in place option. (Since the staging folder contains the copies of the original images, it's OK to use this option, because only the images in the staging folder would be modified.)
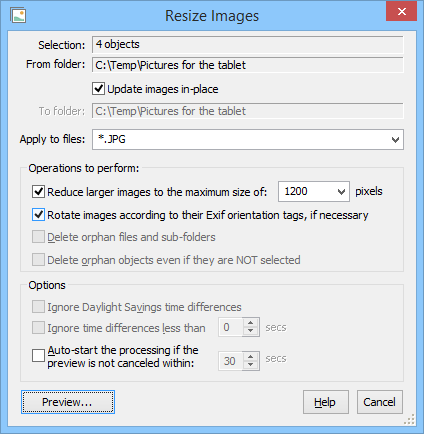
When you press the Preview button, it will analyze the images in the folders you've selected, detect the ones that need to be resized or rotated, and present you with a list of files it's going to process for your review. When you approve, it will process the images. When all is done, the files in the staging folder will be ready for copying over onto the Android device. Where exactly to copy them? It depends on the device, and the version of Android that it has, you may need to experiment a bit to find the right location for the images. (See Part 1 of this article for more information on how to locate the photo folder on your Android device.)
![]() Take control of your files and folders with AB Commander file manager for Windows 11, 10, 8, 7.
Take control of your files and folders with AB Commander file manager for Windows 11, 10, 8, 7.
User rating: ![]() 4.8 / 5
4.8 / 5
Purchase
or
download a free trial.
Read more...
That's it for the initial transfer of the images. What if you want to add some more images later on? Copy them into the staging folder, and run the Resize Images command in place again. It will skip the images it had previously resized, and only process the new images. When done, copy the images from the staging folder onto the Android device again.
That's how it works for the Android devices, but what about the iPads, iPhones, or the Windows tablets, you might ask? Not much different! The procedure for the Windows devices is basically the same, but in case of an iPad or an iPhone you need to use iTunes to synchronize your staging folder with the device. The preparation of the staging folder and resizing the images remains the same.
Happy file managing!
AB Commander User's Guide • Download • Purchase
If you want to link to this article, you can use this HTML code: <a href="https://www.winability.com/how-to-synchronize-images-between-pc-and-android-device/">Transferring images between your PC and an Android device: Part 2</a>
More information
- What people are saying about AB Commander...
- A FREE 30-day license is included
- What's new in the new version
- End User License Agreement (EULA)
- Space Investigator
- Using DiffMerge as the external tool of AB Commander
- Is "Wipe the content" the same as "Secure Delete"?
- How to start programs elevated from a batch file
- How to make elevated programs recognize network drives
- How to disable hibernation
- How to set up Notepad++ as the external text editor for AB Commander
- Integrating AB Commander with Universal Viewer
- How to repair Windows desktop icons with AB Commander
- How to show drive letters first in AB Commander and Windows Explorer
- Organize your photo library with the Rename tool of AB Commander
- How to move images from an Android device to PC
- How to synchronize images between a PC and an Android device
- Using junction points to change the iTunes backup folder location
- Always have a backup of your important files
AB Commander 25.6

User rating:
![]() 4.8 / 5
4.8 / 5
Buy AB Commander
from $49.97 $39.97
Download free trial
More information:
AB Commander Home Purchase AB Commander Download AB Commander Documentation Support
 Stand with Ukraine
Our software:
Folder Guard Encryptability USBCrypt AB Commander MySecretFolder ActiveExit StartFinity IconShepherd SpaceInvestigator SoftDetective TweakUAC
Is WinAbility.com safe?