Using junction points to change the iTunes backup folder location
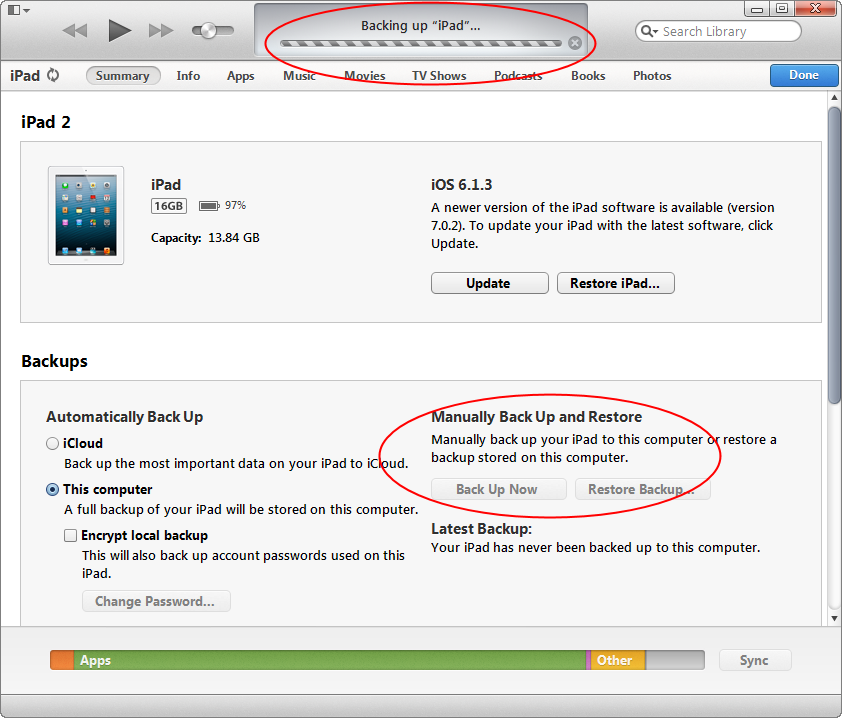
If you use iTunes on a Windows computer to manage your iPad, iPhone, and/or an iPod, you've undoubtedly noticed that every time you connect the device to the computer, the first thing the computer does is it makes a backup of the device to the computer. (If it does not make the backup automatically, you have the option to create the backups manually, too.):
If you are a responsible PC user, you know that keeping the backups of your files and devices is a good thing. You probably have a dedicated external drive to which you periodically copy your important files, documents, photos, videos, and so on, to make sure you would still have them when (not if) the hard drive of your computer dies and takes everything it has with it. So, you would probably want to keep the iTunes backup files on that external device, too. Is it possible to set up iTunes for that?
Unfortunately, the current version 11.1 of iTunes does not appear to provide a way of changing the location of the backup files it creates. (If you are reading this and using a later version of iTunes that does provide such an option, please let us know.) iTunes always creates the backups in the following folder on your hard drive:
C:\Users[User]\AppData\Roaming\Apple Computer\MobileSync\Backup
This folder is located on the C: drive, where your Windows and most programs are installed. If you've upgraded your C: drive to an SSD, chances are its size is relatively small, wouldn't it be nice to move the iTunes backup folder to another drive, and free up quite a few GB of space on the C: drive?
Since there is no way to configure iTunes to use a different folder for its backup files, we have to use some other method. One way of solving this problem is to move the Backup folder to a different drive and then replace the original folder with a junction point, connecting it to the new folder located on a different drive.
What is a junction point ![]() , you might be wondering? Without going into the technical details too deep, you can think of it as a low-level shortcut, redirecting all traffic from one location to a different folder.
, you might be wondering? Without going into the technical details too deep, you can think of it as a low-level shortcut, redirecting all traffic from one location to a different folder.
How to create a junction point? Windows itself does not offer such a command out of the box, so we need to use a third-party utility for that. Our file manager and Explorer replacement AB Commander offers an option to create the junction points, so let's use it.
First of all, it's a good idea to do a full backup of your computer, including the C: drive, just in case something goes wrong. Then shut down iTunes and don't start it until the move is over. Also, download and install AB Commander, if you have not done so yet. (No credit card required, the download comes with a free 30-day license built-in.)
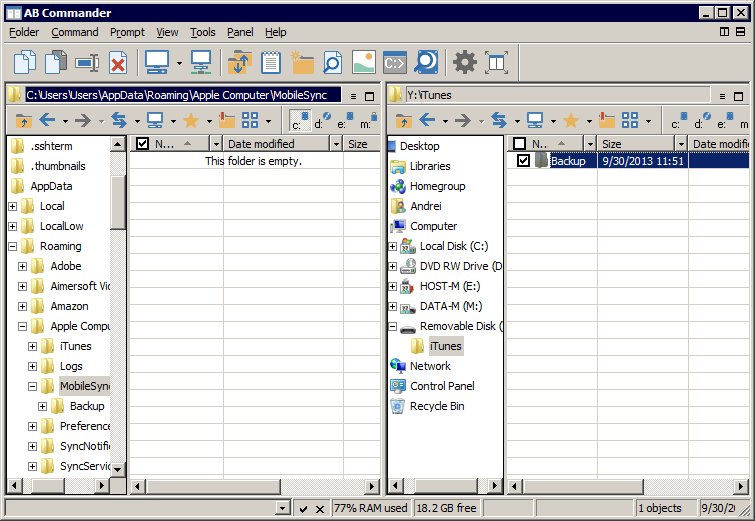
Let's make sure we can locate the original iTunes backup folder with AB Commander:
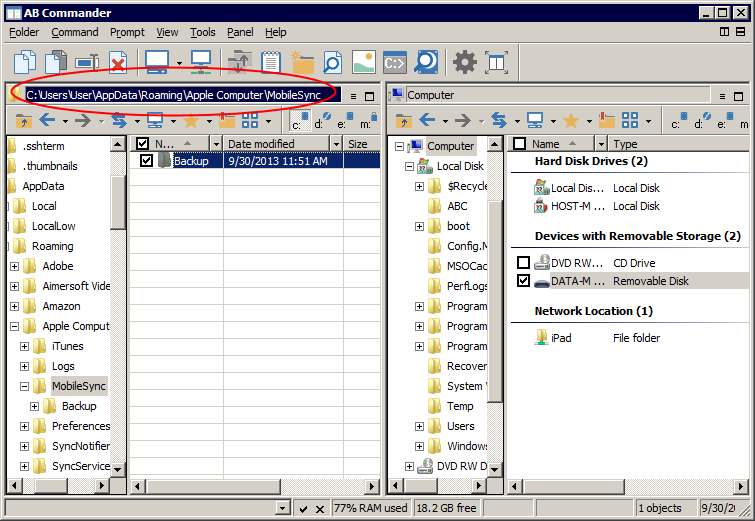
Of course, replace [User] with your actual user name to get the location on your own computer. Also, if you can't navigate to the AppData folder because it does not appear in the file listings, turn on the display of the hidden files and folders using Windows Control Panel - Folder Options command, and then press F5 to refresh the file listing in AB Commander.
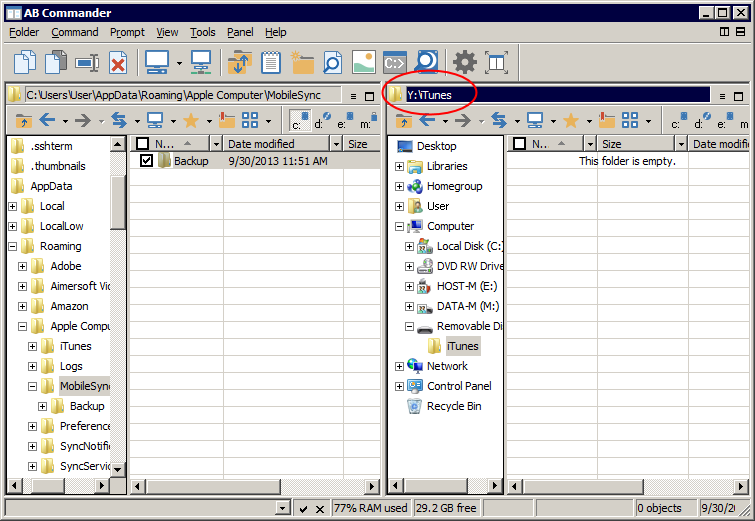
Once the original backup folder is located, decide where you want it to be moved. In this example, we will move it to the drive Y:, into the folder Y:\iTunes\Backup. If you want to move the iTunes backup folder to a different place, adjust the following instructions accordingly. Note that in order for the junction point to work properly, both the original and the target drives must be the local (rather than network) drives, and they both must be formatted with the NTFS file system. To actually move the folder with AB Commander, make the second panel display the content of the target folder, which in our example is Y:\iTunes:
Switch back to the left (source) panel, select the Backup folder, and press the Move button on the toolbar, or choose Command - Move from the menu:
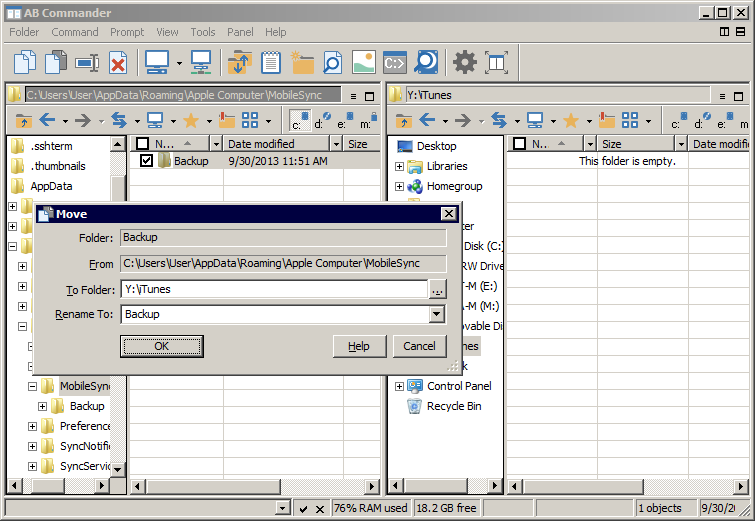
Most probably you don't need to change anything in this window, it's preset with the source and destination folders for you, based on the selections you made before. Press OK and wait for the folder to move. (Since it's likely to have a few GB of data, it may take a minute or two, depending on how fast the disks are.)
At this point, the Backup folder itself has been moved to the new location, but the iTunes program cannot use it yet. We need to redirect all files that it might have saved in the Backup folder to its new location. For that, we will create a junction point. In AB Commander, switch to the left panel and choose Tools - New Junction Point from the menu:

Verify that the Current folder area shows the path to the original folder where the Backup folder used to be, that the Create junction point area contains the name Backup (the same as the name of the folder that used to be there), and finally, that the Target folder area contains the new location of the backup folder.
If everything looks right, press OK to create the junction point. It will look just like a regular folder, except for the little shortcut icon in the corner, indicating that it's actually a junction point:
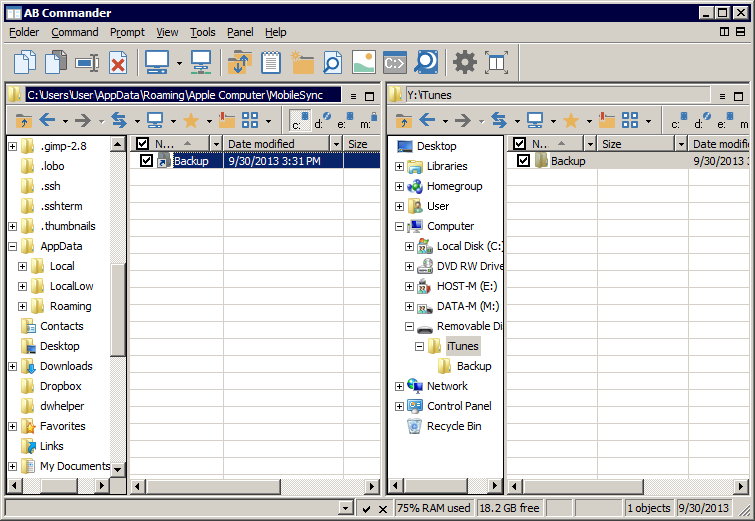
That's all! Now it's a good idea to restart the computer, to make sure iTunes would re-initialize with the new information after the restart. Now you can launch iTunes and do a backup of your device. The files in the target folder (Y:\iTunes\Backup in our example) should be updated or created, rather than on the original C: drive.
If the drive Y: is an external drive that you can detach from the computer, make sure you've attached it to the computer before starting iTunes. What if you forget to attach the drive? No big problem, iTunes would just display an error message like this:
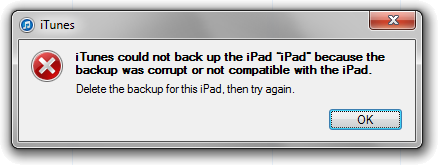
Just attach the external drive Y: and try again, the error should disappear and the iTunes backup should start working as usual.
AB Commander User's Guide • Download • Purchase
If you want to link to this article, you can use this HTML code: <a href="https://www.winability.com/using-junction-points-to-change-the-itunes-backup-folder-location/">Using junction points to change the iTunes backup folder location</a>
More information
- What people are saying about AB Commander...
- A FREE 30-day license is included
- What's new in the new version
- End User License Agreement (EULA)
- Space Investigator
- Using DiffMerge as the external tool of AB Commander
- Is "Wipe the content" the same as "Secure Delete"?
- How to start programs elevated from a batch file
- How to make elevated programs recognize network drives
- How to disable hibernation
- How to set up Notepad++ as the external text editor for AB Commander
- Integrating AB Commander with Universal Viewer
- How to repair Windows desktop icons with AB Commander
- How to show drive letters first in AB Commander and Windows Explorer
- Organize your photo library with the Rename tool of AB Commander
- How to move images from an Android device to PC
- How to synchronize images between a PC and an Android device
- Using junction points to change the iTunes backup folder location
- Always have a backup of your important files
AB Commander 26.1

User rating:
![]() 4.8 / 5
4.8 / 5
Buy AB Commander
from $49.97 $39.97
Download free trial
More information:
AB Commander Home Purchase AB Commander Download AB Commander Documentation Support
 Stand with Ukraine
Our software:
Folder Guard Encryptability USBCrypt AB Commander MySecretFolder ActiveExit StartFinity IconShepherd SpaceInvestigator SoftDetective TweakUAC
Is WinAbility.com safe?