Changing the USBCrypt settings |
|
Changing the USBCrypt settings |
|
When you run USBCrypt using its Desktop icon or Start menu, you can see that its main window contains the Settings button:
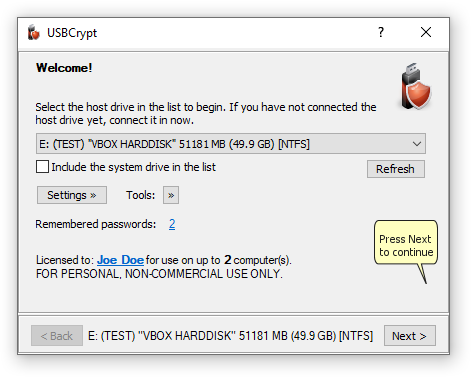
You can press the Settings button to open the USBCrypt Settings window:
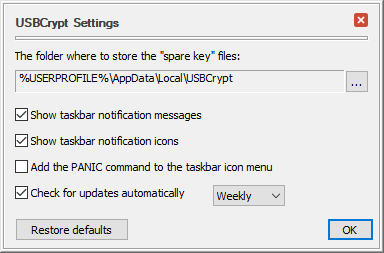
This window contains the following areas:
This is the folder on your computer where USBCrypt stores the "spare key" files. (And also where USBCrypt is looking for the "spare key" files when you want to reset a password). You can open this folder to examine its contents or move the "spare key" files to a different folder by clicking on the button to the right of the folder area and using the commands on the menu that opens.
If this option is selected, it allows USBCrypt to display notification messages in the bottom right part of the screen) when a Virtual Encrypted Disk has been started or stopped, and in some other cases. You may want to clear this option if you find such messages unnecessary or distracting.
If this option is selected, USBCrypt adds its notification icons to the Windows taskbar notification area (next to the system clock, in the bottom right corner of the screen). You may want to clear this option if you prefer not to see the icons and want to leave more room for other icons in the notification area.
If this option is selected, USBCrypt adds the PANIC command to its notification icon menu that you can use to quickly stop any Virtual Encrypted Disks and "forget" any passwords you've previously chosen to remember. However, since using the PANIC command may potentially cause the loss of the unsaved information, you may want to clear this option to protect yourself from accidentally invoking the PANIC command.
If checked, this option causes USBCrypt to periodically connect to our web site to check for the availability of a newer version. If this option is not selected, then USBCrypt will display a message reminding you to check for the updates manually.
Press this button if you want to restore the options shown on this screen to their default settings, as they were right after you've installed USBCrypt.
In addition to using the Options window, you can also press the Tools button to display a menu of several commands:
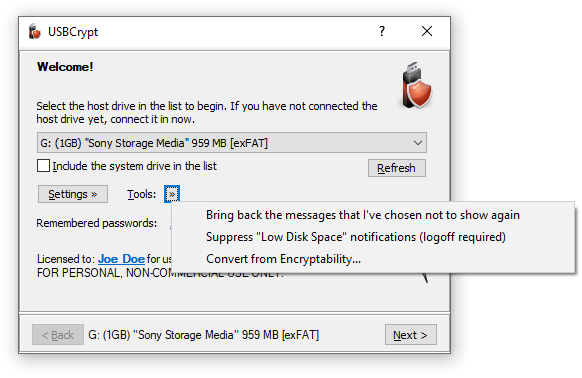
Choose this command to restore the USBCrypt messages that you have previously chosen not to show again.
Choose this command to suppress or restore the notification messages displayed by Windows when the free space on the drives becomes relatively low. You may see such notifications after you have created a Virtual Encrypted Disk to occupy the whole space of host disk. In such a situation, the host disk would have very little unencrypted space left on it, causing Windows to display the "Low Disk Space" notifications. You can use this command to suppress (or restore back) such notifications, Note that if you use this command, you need to log off Windows and then log back on for the change to take effect. Note also that this command affects all drives, not just the ones encrypted with USBCrypt.
Use this command to convert a Virtual Encrypted Disk created with Encryptability software into the format used by USBCrypt. After a Virtual Encrypted Disk has been converted, you can use USBCrypt to start, stop, or manage it.