Encrypting USB drive: Run USBCrypt |
|
Encrypting USB drive: Run USBCrypt |
|
Before you can use your USB drive to keep your private files, first you need to encrypt that USB drive with USBCrypt software. Specifically, you need to use USBCrypt software to create a Virtual Encrypted Disk on your USB drive. After the Virtual Encrypted Disk has been created, you can put your private files into it to keep them strongly encrypted and protected.
To create a Virtual Encrypted Disk, simply run USBCrypt (by using its desktop icon, for example) and select the USB drive that you want to host the Virtual Encrypted Disk from the drop-down list:
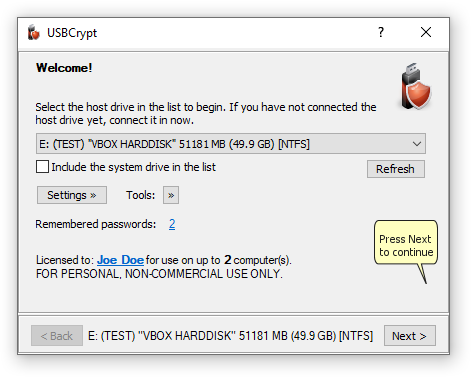
If you have not plugged your removable USB drive into the computer yet, you can plug it in now and it should appear in the list after a few seconds. Or, you can press the Refresh button to update the list of the removable drives manually. Note that by default the system drive (usually the C: drive) is not included in the list; if you want to be able to create a Virtual Encrypted Disk on the system drive, select the Include the system drive in the list option.
When you select a drive in the list, its description appears at the bottom of the USBCrypt window. The description usually includes the drive letter currently assigned to the drive, its label (if any), the name of the manufacturer (as reported by the drive itself), the capacity of the drive and the current file system it's been formatted with.
After you've selected the desired USB drive in the list, press the Next button. USBCrypt will take a moment to analyze the drive you've selected. If it detects that it has not been encrypted yet, it may show the following prompt:
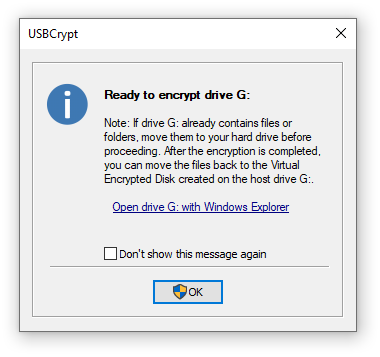
(Note that if you've selected a drive that has already been encrypted with USBCrypt, a different window will be shown). This message serves as a reminder to move any existing files from the host USB drive to the main hard drive of your computer before proceeding with the encryption. The reason is that USBCrypt first needs as much free space on the USB drive as possible to allocate for the Virtual Encrypted Disk. If you have previously put some files on the USB drive that you want to be encrypted, you can take this opportunity and click on the Open drive ... with Windows Explorer link and drag and drop the files from the USB drive to your computer's hard drive (for example, to the Documents folder). Of course, you can use another file manager (such as our AB Commander ![]() ) to move the files, too. If you want to encrypt a fresh USB drive that has no files on it yet, you can just press OK to continue.
) to move the files, too. If you want to encrypt a fresh USB drive that has no files on it yet, you can just press OK to continue.
At this point, USBCrypt should start the encryption wizard that should guide you through the process of encrypting the USB drive. (If you are using the computer as a non-administrator, you will need to provide the administrator credentials to continue.)
Next step: Choose name