The software described in this guide is furnished under a license agreement and may be used only in accordance with the terms of the agreement.
Information in this document is subject to change without notice. The names of companies, products, people, characters, and/or data mentioned herein are fictitious and are in no way intended to represent any real individual, company, product, or event, unless otherwise noted. Complying with all applicable copyright laws is the responsibility of the user. No part of this document may be reproduced or transmitted in any form or by any means, electronic or mechanical, for any purpose, without the express written permission of WinAbility Software Corporation. WinAbility Software Corporation may have patents, patent applications, trademarks, copyrights, or other intellectual property rights covering subject matter in this document. Except as expressly provided in any written license agreement from WinAbility Software Corporation, the furnishing of this document does not give you any license to these patents, trademarks, copyrights, or other intellectual property.
NO WARRANTY
The technical information in this document is provided AS-IS and WinAbility Software Corporation makes no warranty as to its accuracy or use. Any use of the information contained herein is at the risk of the user. This document may include technical or other inaccuracies or typographical errors.
Copyright Notice
© 2026 WinAbility Software Corporation. All rights reserved.
Trademarks
WinAbility, WinAbility.Com, ActiveExit, and "The Way Software Should Be!" are either registered trademarks or trademarks of WinAbility Software Corporation and/or its suppliers in the U.S.A. and/or other countries. Other product and company names mentioned in this document may be the trademarks or registered trademarks of their respective owners and are hereby acknowledged.
Thank you for choosing ActiveExit!
ActiveExit™ is a software tool that you can set up to automatically log off Windows users after a period of their inactivity, or shut down the inactive computers. With ActiveExit, you can:
Log off the inactive users automatically
ActiveExit monitors the user activity (the keyboard, the mouse, and/or the CPU). If no activity has been detected during the time interval of your choosing, ActiveExit displays a message to the user (for the duration of your choosing, too). If no user activity detected after that, ActiveExit will forcefully log-off that user from Windows.
Log off the inactive users even if they locked their screens
ActiveExit will log off an inactive user even if the user has locked the screen before leaving. (The administrator will no longer have to unlock the screen manually each time it happens).
Log off the inactive users even if they set up custom screen savers
Unlike WINEXIT and other similar software utilities, ActiveExit does not replace the screensaver of the user with its own. If fact, ActiveExit does not depend on the Windows screensaver functionality at all.
Log off the inactive users even if they have unsaved changes
This is a powerful feature of ActiveExit that you should consider carefully. Normally, if a user attempts to log off while there are unsaved changes to the documents, Windows prompts the user to save the changes before logging off. With ActiveExit, the automatic log off happens unconditionally, even if there are changes still unsaved by the user. The unsaved changes, if any, will be lost and the user will be logged off.
Shut down the inactive computers
ActiveExit offers you an option to shutdown, sleep, or hibernate the computer after all users log off and no user logs on to it during the period you specify.
Attention System Administrators
ActiveExit is enterprise-ready! It fully supports Active Directory and Group Policy, to simplify its deployment and management within large networks.
If you have not done so yet, visit our web site now and download a free no-strings-attached installation file of ActiveExit and see for yourself how ActiveExit can be of use to you:
Version 26.7 (July 15, 2026)
- This update adds the option to monitor the software activity, to prevent a log off when the user is using software without interacting with it (such as some video players or video conferencing software.)
- You can now see the list of the user sessions monitored by ActiveExit by clicking on the link in the status area of the main screen of the configuration utility.
- You can now open Event Viewer by clicking on a button on the main screen of the configuration utility.
Version 24.5 (May 5, 2024)
This update adds the option that you can use to set up a schedule to specify the days and times during which Active Exit should be active or inactive.
Version 23.10 (October 8, 2023)
This update corrects an error that in some situations caused domain accounts not to be monitored even if they were included in the Apply to list.
Version 22.10 (October 24, 2022)
The digital signatures of the executable files have been updated according to the latest security requirements of Windows 11 and Windows 10.
Version 22.9 (September 15, 2022)
This update corrects a problem introduced in one of the recent updates that in some situations prevented the automatic shutdown of the computer after all users have been logged off.
Version 22.8 (August 19, 2022)
This update improves the appearance and functionality of the message shown to the user when the inactivity period is up:
- The message now shows the countdown of the remaining time before the forced log off;
- The message now disappears automatically when user activity is resumed (the user no longer needs to press OK to dismiss it).
Version 22.6 (June 12, 2022)
This is a minor update that makes it possible to suppress any message shown to the user when the inactivity period is up, by entering 0 as the value for the duration for the message.
Version 22.1 (January 15, 2022)
This update offers several improvements, such as:
- Native support for the ARM 64-bit processor architecture has been added.
- A new option, Log off stale user sessions immediately, has been added.
- The settings are now preserved when upgrading from the "lite" to the full version.
ATTENTION: If you are upgrading from an earlier version of ActiveExit, the upgrade may not preserve the custom settings of ActiveExit. If you want to make sure the settings are preserved, then before the upgrade run ActiveExit configuration utility and use the Export command to save the custom settings into a file. Then after the upgrade use the Import command to use the settings from that file. - A problem has been corrected that prevented ActiveExit from logging off an inactive user after that user first explicitly initiated but then canceled the log off procedure.
- Several other minor improvements and corrections have been made.
Version 19.10 (October 7, 2019)
This update corrects a problem that prevented the use of the empty Apply To and Exclude lists in GPO objects in some situations.
Version 19.9 (September 26, 2019)
This update corrects a problem that prevented the display of a custom user message in some situations.
Version 19.6 (June 1, 2019)
This update offers several improvements, such as:
- A new option, Do not log off the most recent active user, has been added.
- Several other minor improvements and corrections have been made.
Version 18.10 (October 25, 2018)
This update offers several improvements, such as:
- An option has been added that makes the user notification about a pending log-off to be shown full-screen, in front of other windows that might be present on the screen.
- A problem has been corrected that prevented the configuration utility of ActiveExit from being started by the standard users on computers with User Account Control (UAC) turned off.
- The ActiveExit Administrator Kit now includes the administrative template file (ActiveExit.ADM) that you can use for the reference of auditing purposes.
- Several other minor improvements and corrections have been made.
Version 17.3 (March 25, 2017)
This update offers several improvements, such as:
- It's now possible to use the ActiveExit configuration utility to save the settings directly to the Group Policy objects (GPO), without the use of the administrative template file.
- It's now possible to monitor the CPU activity level, in addition to the keyboard or the mouse.
- The monitoring of the Remote Desktop Connection users is no longer offered.
- Several other minor improvements and corrections have been made.
Version 15.8 (August 20, 2015)
This update adds an option to shut down or suspend the computer when no user logs in to the computer for a specified time.
Version 10.8.2 (February 1, 2011)
This is a minor update that improves how ActiveExit detects and handles the license violations.
Version 10.8.1 (November 5, 2010)
This is a minor update that improves reliability and performance of ActiveExit software.
Version 10.8 (August 7, 2010)
This is a complete rewrite of the ActiveExit software. If you've used an older version of ActiveExit, and are considering an upgrade, you may want to review the rest of this User's Guide to see what ActiveExit is now. You will notice many differences: we've simplified the user interface and removed many secondary functions (such as the allowed use schedule, the password protection, the taskbar icon, and so on). Instead, we've concentrated on making ActiveExit do just one task, but do it well: automatically logoff the users after a period of inactivity. Give the new ActiveExit a try!
The installation and operation of ActiveExit software is supported on the versions of Windows that are fully supported by Microsoft. At the time of this writing, the supported versions of Windows are:
- Windows 11
- Windows 10
- Windows Server 2025 (with Desktop experience)
- Windows Server 2022 (with Desktop experience)
- Windows Server 2019 (with Desktop experience)
- Windows Server 2016 (with Desktop experience)
Both the 32- and 64-bit editions (including ARM64) of Windows are supported. (ActiveExit is a native 64-bit application when installed on 64-bit Windows.)
ActiveExit may be able to work on the following older versions of Windows in the test signing mode:
- Windows 8.1
- Windows 7 with Service Pack 1
- Windows Server 2012 (with Desktop experience)
- Windows Server 2012 R2 (with Desktop experience)
IMPORTANT: For each supported version of Windows, all available service packs and Windows updates must be installed. If your computer is not set to install updates automatically, use Windows Update to check for available updates and install them. ActiveExit may not work properly if the latest updates are not installed.
Note that some features of ActiveExit depend on support from Windows and not all versions and editions of Windows provide such support equally well. You are strongly advised to try the software before purchasing it to verify it's working well enough in your particular software environment.
ActiveExit may work with some of the older versions of Windows, such as Windows XP, Vista, or Windows Server 2003 or 2008, but we do not support such configurations. You are advised to thoroughly test the software on the unsupported versions of Windows prior to purchasing it, to make sure it operates according to your requirements "out of the box".
ActiveExit is NOT compatible with Windows 95, 98, Me, Windows NT 4.0, Windows 2000 or any older version of Windows.
In order to monitor the user activity and log off the inactive users on a computer, ActiveExit must be installed on each such computer.
ActiveExit can be installed on any computer running a supported version of Windows. We offer for download the .MSI files (one for the 32-bit version of Windows, and another one for the x64 Windows editions). We also offer a universal setup file that you can run, and it would install the correct set of files (32-bit or x64) automatically for you.
Specifically, to install ActiveExit, follow these steps:
-
Login to Windows as the administrator. If you login as a standard or a limited user, you may not be able to install or use this software.
-
To begin the installation, run the installation file. If you do not have the installation file, please visit our web site to download the latest version:
-
Note that if you have a previous version of this software already installed on your computer, the installation utility may prompt you to restart the computer, in order to be able to replace the files currently in use by Windows.
-
The installation program will walk you through the process of setting up ActiveExit. You will be prompted to read and accept the End User License Agreement, and to select the installation options.
After ActiveExit has been installed, run its configuration utility to enable it and choose the desired settings.
Using ActiveExit on a small number of computers
If the number of computers you want to be monitored by ActiveExit is small, than the easiest way to enable ActiveExit on them is to install and configure ActiveExit on each computer directly. For that, you can use the MSI files that we offer for download from our web site, just be sure to use the x86 file to install on the computers that run the 32-bit versions of Windows, and use the x64 file with the x64 versions of Windows. Or, use the universal setup EXE file, and it would detect the edition of Windows on each computer and install the appropriate edition of ActiveExit automatically for you.
To manage the ActiveExit settings, run the configuration utility of ActiveExit on each computer. If you want to configure several computers in the same way, you may want to use the Export command of ActiveExit to export setting from one such computer into a file, save the file onto a removable flash drive, and then use the Import command on other computers to import the settings from that file and make ActiveExit configured in the same way.
Using ActiveExit on a large number of computers
If you maintain a large number of computers, managed via a domain controller, you need to install and configure ActiveExit on each client computer. You can do so using the usual means of Group Policy, by creating an ActiveExit GPO and linking it to the appropriate OU on your network. This way, you should be able to manage the settings of the client computers by changing the ActiveExit GPO on the domain controller.
How to uninstall ActiveExit
To completely uninstall ActiveExit, use Programs and features (or Add/Remove Programs) command of Windows Control Panel.
IMPORTANT: If your computer is configured for several user accounts, login into the same user account that you were logged in when you installed ActiveExit, before starting the uninstall process.
After you install ActiveExit on a computer, you can use its configuration utility to manage the settings that apply to that computer.
If you install ActiveExit on a domain controller, you can also use the configuration utility to save the settings to a Group Policy Object (GPO), and control the domain computers using the Group Policy.
If you do set up a GPO to manage ActiveExit on the network, you can still run the configuration utility of ActiveExit on each client computer, to check the effective settings and the status of ActiveExit (but not to make changes to the settings).
While setting up ActiveExit, it's important to keep in mind that its settings apply to the whole computer, not to the individual user accounts. It means, for example, that you cannot set up different timeout values for different users: all user sessions processed by ActiveExit would get the same timeout. You can, however, specify which users or user groups should or should not be processed by ActiveExit. For example, you can exclude the administrators from being affected by ActiveExit, and only log off the inactive standard users.
You can use the configuration utility to change the ActiveExit settings that apply to the computer on which you run the utility. On a domain controller, you can also use it to save settings to a Group Policy Object to control the domain computers.
To open the configuration utility, choose ActiveExit from Windows Start menu. The configuration utility of ActiveExit has the following areas:
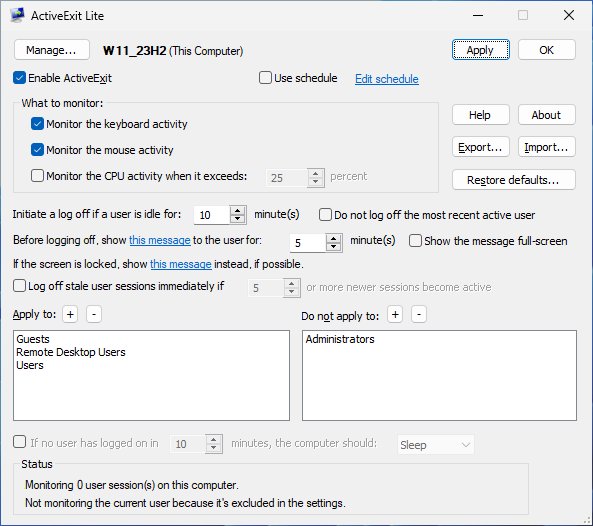
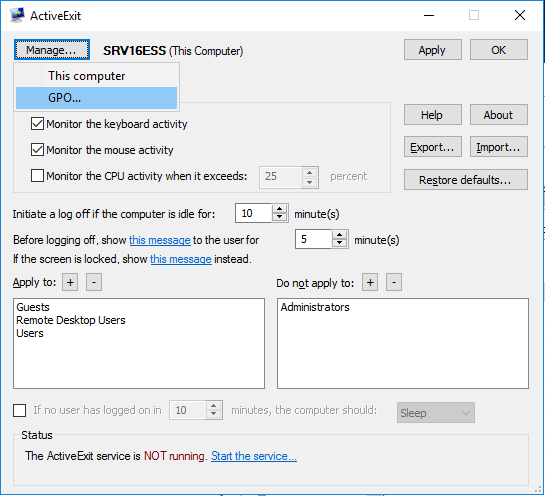
Manage
Press this button to select what to manage, This Computer, or a GPO.
Enable ActiveExit
When managing This Computer, you can use this box to control the status of ActiveExit monitoring. If this box is checked, ActiveExit performs the job it's designed to do: it will log off the inactive users from their accounts, etc. If this box is cleared, ActiveExit stops monitoring the users on this computer. You can use this box to quickly enable or disable ActiveExit without having to uninstall it.
If you've selected to manage a GPO instead of This Computer, this box is replaced with a menu that lets you control the status of the GPO (Not Configured, Enabled, or Disabled.)
Use schedule
If this option is selected, Active Exit will be active only during the active hours specified by the schedule. It will not log off the users during the hours marked as inactive on the schedule.
If this option is not selected, Active Exit will ignore the schedule and will always be active.
What to monitor
Use this area to select the activities that ActiveExit should monitor:
Monitor the keyboard activity
If this option is selected, then whenever the user presses a keyboard key, the idle timeout is reset.
Monitor the mouse activity
If this option is selected, then whenever the user moves the mouse, the idle timeout is reset.
Monitor the software activity
If this option is selected, then when any software requests Windows to keep the system or display active, the idle timeout is reset. Note that this option requires the third-party software to notify Windows about its activity; usually the video players or video conferencing software does that. (A computer program can send such a notification by calling the Win32 API SetThreadExecutionState with the parameters ES_DISPLAY_REQUIRED or ES_SYSTEM_REQUIRED.)
Monitor the CPU activity
If this option is selected, then whenever the CPU activity exceeds the level you have chosen, the idle timeout is reset.
Initiate a logoff if a user is idle for ...
Use this box to specify how long the idle timeout should be. The idle timeout is the time during which no mouse, keyboard, or software activity has been detected, and the CPU activity level has not exceeded the threshold you've chosen. The valid values for the timeout are from 1 to 9999 minutes.
Do not log off the most recent active user
If this option is selected, then the last user who logged on to the computer (or unlocked the screen) would not be logged off by Active Exit even if the idle timeout has been reached. For example, if users A, B, and C log on to the computer one after another, then the users A and B would be logged off when their idle time exceeds the timeout, but the user C would be kept logged on, even if the screen is locked or the idle timeout has been reached. Note that if the user C logs off manually, it would not make user B the active user, unless user B logs back on before the idle timeout has been reached.
Before logging off, show this message to the user...
Use this box to specify how long the warning message should be displayed before actually logging off the user. Enter 0 is you don't want any message to be shown to the user. You can also customize the text of the message by clicking on the link. If you want the message to contain the time remaining before the forced logoff, use the placeholder %d within the message text to indicate where the remaining time should apprear. Note: if a sceensaver activates before the idle timeout, the message may not be visible.
Show the message full-screen
This option causes the warning message to be displayed full-screen, in front of other windows that might be present on the screen. You may want to enable this option if your users might be using a full-screen application (such as a video player) that might prevent a regular message from being visible. Note: if a sceensaver activates before the idle timeout, the message may not be visible.
If the screen is locked, show this message instead
Use this link to specify an alternative text of the warning message displayed to the user, if the user has locked the screen before the idle timeout has occurred.
Note that the warning message is displayed only if the user is connected to the Windows session, such as when the user's desktop is visible to the user, or if the screen is locked and a prompt to unlock it is displayed to the user. If the user is disconnected from the session (which happens, for example, if the user has chosen the Disconnect or Switch User commands from Windows Start Menu), then the warning is NOT displayed and the logoff occurs immediately when the idle timeout is up.
Note also that when the screen is locked, it is NOT enough to press OK to dismiss the warning message displayed by ActiveExit; the user must actually unlock the screen and log back on to keep his or her session active.
Log off stale user sessions immediately if N or more newer sessions become active
If this option is enabled, then ActiveExit will limit the number of active user sessions to N. If a new user logs in to the computer without logging off the previous user (by using the Switch User command of Windows, for example), and it makes the number of active user sessions to exceed the specified number N, then ActiveExit will log off the oldest inactive user session without waiting for it to reach for its idle timeout. You may find this option useful if the computer has limited resources that cannot support more than N active user sessions.
Apply to
The list of the user accounts and/or user groups which should be processed by ActiveExit. If this list is empty, then ActiveExit will process every user who logs in to the computer (unless excluded by the Do not apply to list. If this list is not empty, then only users who are in the list or who are the members of the groups listed will be processed by ActiveExit. (Also, see notes below.)
To add a group or a user to the list, press the [+] button above the list. To remove an item from the list, select it and then press the [-] button above the list.
Do not apply to
The list of the user accounts and/or user groups which should NOT be processed by ActiveExit. If this list is empty, then ActiveExit will not exclude any user or group from processing. If this list is not empty, then ActiveExit will not monitor users or members of the groups listed. (Also, see notes below.)
To add a group or a user to the list, press the [+] button above the list. To remove an item from the list, select it and then press the [-] button above the list.
If no user has logged on...
(This option is available only on computers running Windows Vista or later. If is not available on Windows XP computers.)
If this option is enabled, then ActiveExit will watch for the condition when no user is logged on to the computer. (Such a condition occurs before the first user logs in, or after the last user logs out of Windows.) ActiveExit will wait for the specified number of minutes for another user to log in to Windows. If no user logs in during that time, ActiveExit will shut down or suspend the computer, according to the option selected.
Note that the mouse, the keyboard, or the CPU activities during the wait do not affect the waiting time. In order to prevent the shutdown or suspend of the computer, one must actually log in to Windows before the timeout expires.
Status
This area is used by ActiveExit to display its status.
Export
Press this button to export the current settings of ActiveExit into a file.
Import
Press this button to import the settings of ActiveExit from a file (created previously with the Export command).
You may want to use the Export and Import commands to simplify the configuration of several computers: Instead of setting up each computer individually, you can export the settings from one computer, and then import them from the file on other computers, to make them configured in the same way as the first computer.
Event Viewer
Press this button to open Windows Event Viewer.
Restore defaults
Press this button if you want to return ActiveExit to the state as it was when you first installed it, before you made any changes to its configuration.
Apply
Press this button to save the current settings, without closing the configuration window. Note that the saved changes become effective only after a user logs off and then logs back on to Windows.
OK
Press this button to save the current settings and close the configuration window. Note that the saved changes become effective only after a user logs off and then logs back on to Windows.
Help
Press this button open the User's Guide of ActiveExit.
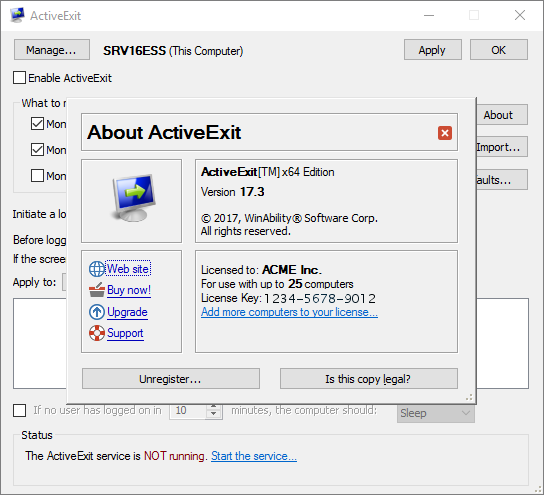
About
Press this button to display the version number and copyright information for ActiveExit. You can also use it to enter your business license key, check your license for validity, etc.
Notes
-
When deciding whether to monitor a specific user or not, ActiveExit only takes into account the groups the user is actually a member of, as listed on the Member of page of the user's Properties window (available through the Computer management utility of Windows ):
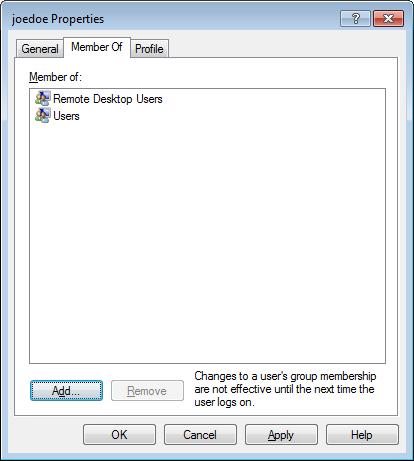
While some group memberships are implied (for example, every user is implied to be a member of the Everyone group), such implied memberships are NOT considered by ActiveExit. To reiterate, if you add a user group to the Apply to or Do not apply to lists of ActiveExit, that group will take effect only if it's explicitly listed on the Member of property page of the user.
-
If the user logs in to a domain, then both the global and the local group membership is checked by ActiveExit. Keep in mind that Windows may map the global groups to the local groups automatically. For example, if a user is a member of the global group Domain Admins, such a user also automatically becomes a member of the local group Administrators, even if Administrators does not appear on the user's Member of property page.
-
The Do not apply to list takes precedence of the Apply to list. That is, if a user matches the Do not apply to list, then ActiveExit will not process such a user, even if it also matches the Apply to list.
-
The decision whether to monitor a user or not is normally made by ActiveExit only when the user logs on to the computer. If you make a change to the list of users or groups that ActiveExit should process, such a change will only take effect next time the affected user logs on to the computer. If you need the changes to take effect immediately, restart the ActiveExit service.
When I open ActiveExit on a computer, all settings are grayed, why?
If you run ActiveExit on a computer that is managed via a GPO, it lets you see the current options, but it does not let you change them:
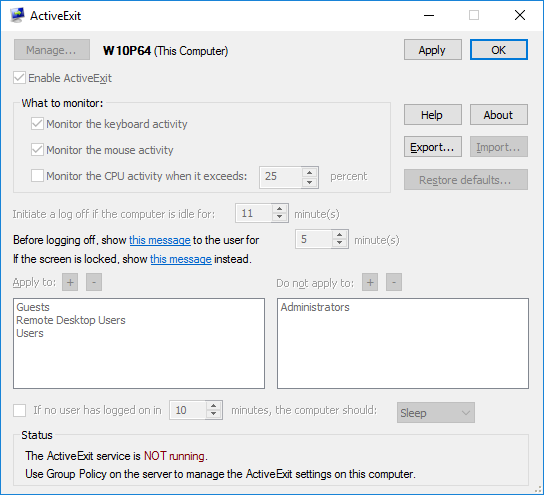
This situation occurs because the computer is managed from the server, by applying the changes to the GPO. To change the settings, make the changes to the GPO on the server, and then issue gpudate on the client.
If you need Active Exit to perform its actions not always, but only during specific days or times of the week, you can set up a schedule that would specifiy the times and days when Active Exit should be active or inactive.
To make Active Exit work on schedule, first select the Use schedule option on its main screen, and also use the Edit schedule link on the same screen to set up the actual schedule:
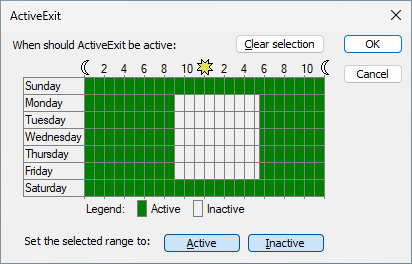
Initially the schedule specifies that Active Exit should be active during any day, any time. To change the schedule, first select the desired interval with the mouse, and press one of the Set the selected range to buttons to set that interval to be Active or Inactive, as necessary. You can select any number of different intervals, as necessary. The boundaries of the selected intervals are rounded to the nearest half-hour.
While a rectangular area is selected within the schedule area, you can also move the boundaries of the selection by pressing the Ctrl or Shift key simultaneously with the arrow keys of the keyboard.
To use the Group Policy to manage ActiveExit on a network, first download the Active Exit Administrator's Kit from the ActiveExit web site ![]() . Decompress the Zip file, and you should find the ActiveExit setup file inside. Run it to install ActiveExit on the server; you will use it to configure a Group Policy Object (GPO) that would control ActiveExit settings on the client computers. You should also find two ActiveExit MSI files there, which you can use to install and operate ActiveExit software on your network.
. Decompress the Zip file, and you should find the ActiveExit setup file inside. Run it to install ActiveExit on the server; you will use it to configure a Group Policy Object (GPO) that would control ActiveExit settings on the client computers. You should also find two ActiveExit MSI files there, which you can use to install and operate ActiveExit software on your network.
Note: The Zip file includes the ActiveExit.ADM file that contains the administrative templates for the settings of ActiveExit. This file is provided for reference only. While theoretically it's possible to use this file to manage the settings in the GPOs, we do not support such use. Instead, you should use the ActiveExit configuration utility to edit the GPOs, as described below.
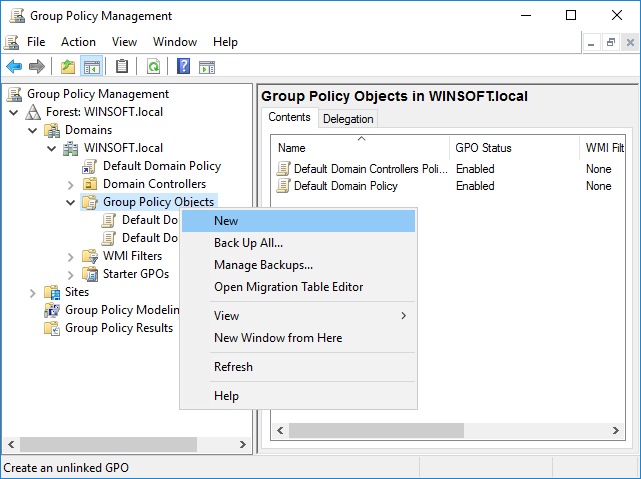
The first thing to do is create a new GPO that will hold the ActiveExit settings. Run the Group Policy Management tool on the server and select Group Policy Objects in the left pane. Right-click on it, and choose New from the menu:
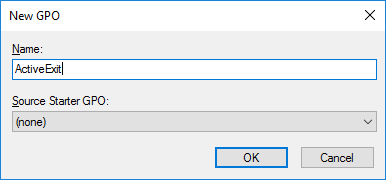
In the New GPO dialog, enter a name for the GPO (such as ActiveExit):
Now that the GPO has been created, we will use it to configure ActiveExit. The configuration involves several distinct tasks, described below.
1. Configuring the GPO to install ActiveExit on the client computers.
ActiveExit uses the MSI files to install its software on the client computers. As such, configuring the GPO to install ActiveExit on the client computers is not different from any other software that is using the MSI files for its installation.
This task should be done just once, when ActiveExit is first installed on the network. You should also repeat it when upgrading ActiveExit to a new version.
Before configuring the GPO, first copy the MSI files to a shared folder that is accessible from the client computers. The usual C:/ServerFolders/Company folder should work just fine for that; verify that the client computers are able open this folder using the UNC path, such as \\SERVER\Company (replace SERVER with the actual server name, such as SRV16ESS that we use in the example below.)
You may want to create subfolder there named ActiveExit packages, and copy both the ActiveExit-NNN-x86.MSI and ActiveExit-NNN-x64.MSI files into it.
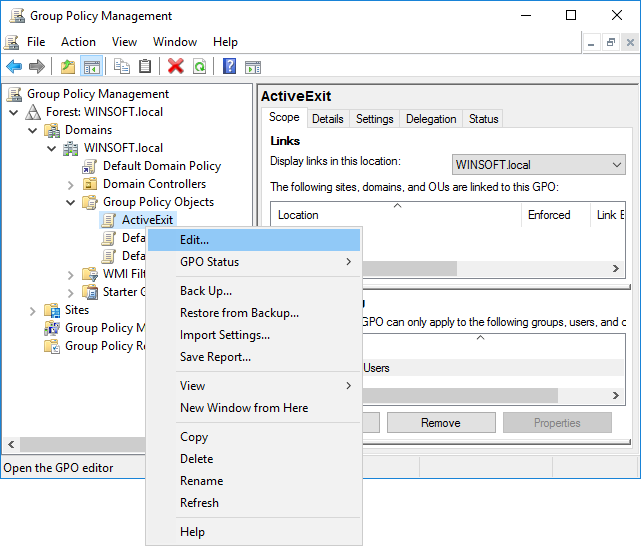
Now we can configure the GPO to install the MSI files of ActiveExit on the client computers. Using the Group Policy Management tool, right-click on the ActiveExit GPO and select Edit from the shortcut menu:
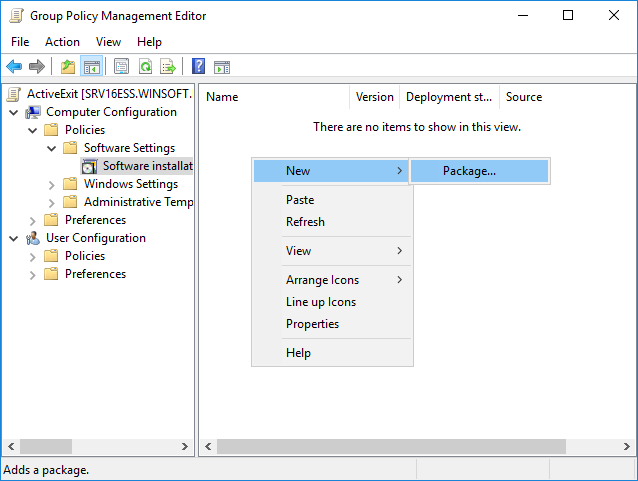
In the left pane, expand Computer Configuration, Policies, Software settings, and select Software installation. In the right pane, right-click on an empty space and choose New - Package from the shortcut menu:
Now navigate to the shared folder Company/ActiveExit packages, but do not start from the C: drive; instead, start from the Network folder, then open the server, and then proceed to the shared folder from there. This should ensure that the MSI files are specified using their UNC paths, as they appear to the client computers:
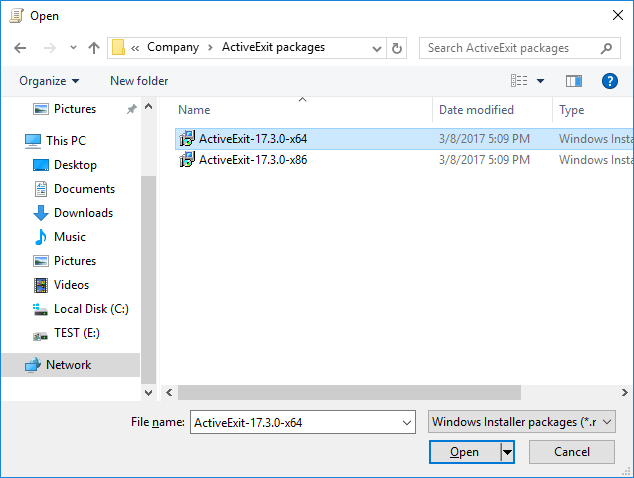
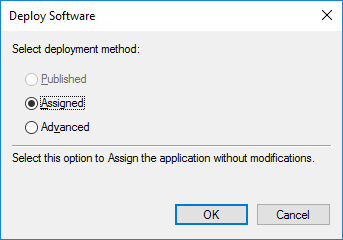
Select one of the MSI files (x86 or x64, depending on the bitness of Windows that the client computers have), and on the next screen select the Assigned option:
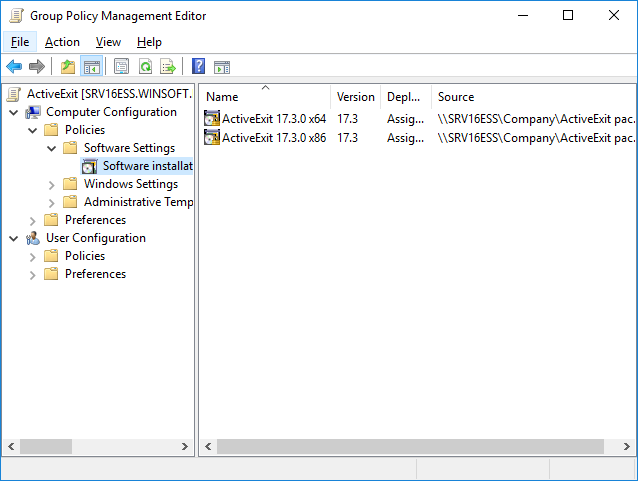
The selected file should now appear in the right panel of the Group Policy Editor. If your network has a mixture of 32-bit and 64-bit installations of Windows, repeat the same procedure to add the other MSI file. When done, make sure that the path(s) in the Source column start(s) with \\SERVER\... rather than C:
Close the Group Policy Editor. Note that at this point even though the GPO is configured to install ActiveExit on the client computers, no installation is taking place yet: you must link the GPO to the appropriate Organizational Unit(s) in order for the installations to actually take place (see below).
2. Configuring the GPO to contain the ActiveExit settings.
For this step, install ActiveExit software on the server, if you have not do so yet. You can use the appropriate MSI file, or the Setup file from the Zip file, the result should be the same.
One more thing to check is that your copy of ActiveExit has the proper license information entered. To verify it, press the About button on the main ActiveExit screen; and examine the license information it is displaying:
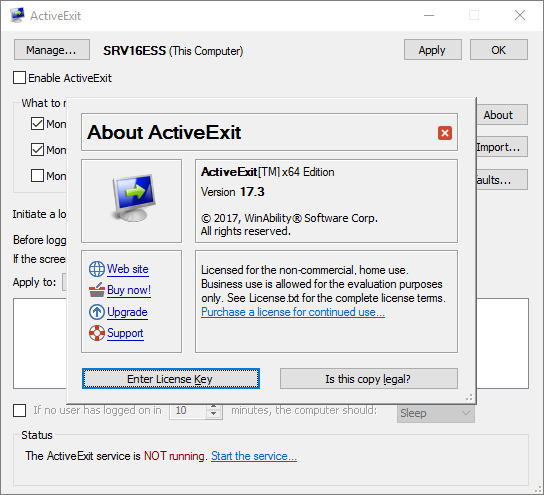
If it shows a text similar to the above, it means that the built-in license is used: it allows one to evaluate the software on up to 5 computers (including the server). For continued operation on more than 5 computers, a separate license must be purchased. After the purchase, press the Enter license key button and fill out the form. When your About screen shows your specific license, you are ready to continue:
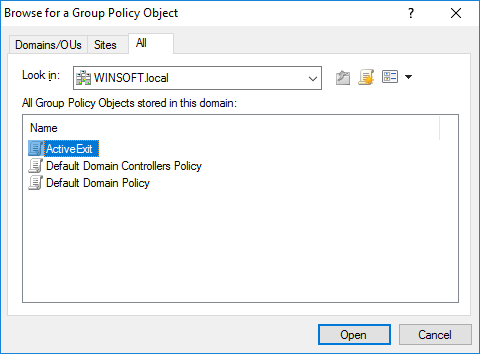
After making sure the license information is correct, close the About window, and press the Manage button. Then select GPO from the menu:
Select the ActiveExit GPO that you had previously created (see above):
Now use this screen to adjust the settings, in the same way as you would do it for a computer. The difference is that these settings would be saved to the GPO, and they would be used by the client computers which are linked to this GPO:
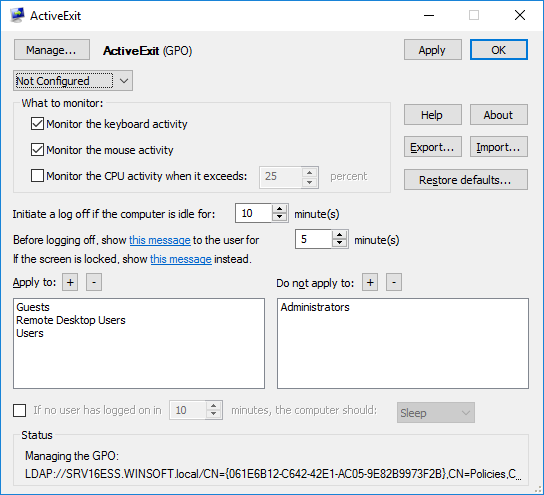
The important thing to change on this screen is replace Not Configured with Enabled. You may also want to adjust other settings, as needed. When done, press Apply or OK, and that would conclude the configuration of ActiveExit settings in the GPO.
3. Linking the GPO
At this point the GPO is configured and ready to use. To specify which parts of your network should use the settings of this GPO, link it to the appropriate Organizational Units (OU), just like any other GPO. In our example, we have only one OU, and we will link this GPO to it, by right-clicking on it in Group Policy Management tool, and choosing Link an Existing GPO from the shortcut menu:
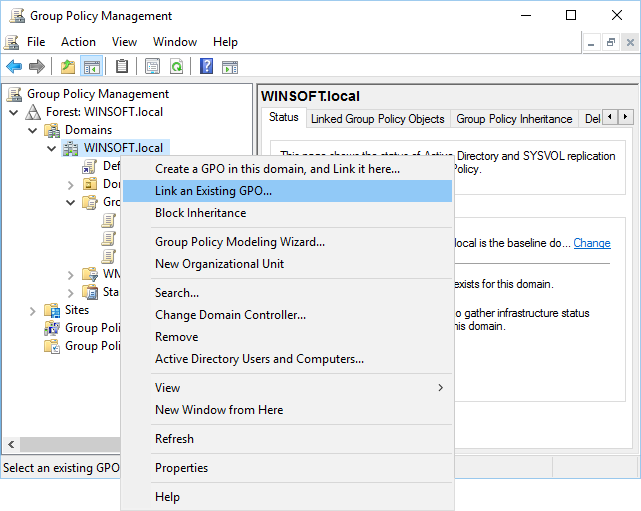
Select ActiveExit GPO from the list, and press OK. From this moment on, the computers in the OU will start to download the GPO from the server and apply the GPO settings. You are done!
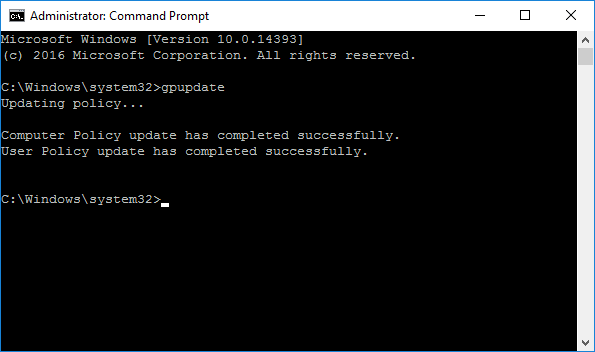
Well, not quite. If you are new to the GPO world, you will probably notice that nothing seems to change on the client computers for some time. This is because the Group Policy updates are not performed immediately, it may take as long as 90 or 120 minutes for the changes to take effect on the network computers.
It's possible to force the update to the Group Policy, though. On the client computer where you want the Group Policy to be updated (not on the server!) open the command prompt as Administrator, and enter the gpudate command. It should force the client computer to obtain the current Group Policy from the server and apply it in real time, without waiting a couple of hours for the update to happen automatically:
Keep in mind, however, that changes to the ActiveExit settings become effective only when a user logs in to the computer. So, after you have changed the ActiveExit GPO on the server, and issued gpudate on the client, you still need to log off the client and log back on for the new settings to take effect.
In some situations it's not enough to log off and log back on, but a full computer restart is required. For example, if you have linked the ActiveExit GPO to a computer for the first time, and performed gpudate on the client, the client computer must be restarted in order for ActiveExit software to be actually installed on it. The restart is also needed after you post an updated version of ActiveExit software on the server: the software update can only happen after the client computer is restarted.
Please consult your Windows Server documentation for more information on GPOs and Group Policy.
When I open ActiveExit on a computer, all settings are grayed, why?
If you run ActiveExit on a computer that is managed via a GPO, it lets you see the current options, but it does not let you change them:
This situation occurs because the computer is managed from the server, by applying the changes to the GPO. To change the settings, make the changes to the GPO on the server, as described above, and then issue gpudate on the client. If instead you want to allow the users of the client computers to make changes to the ActiveExit settings directly, you must set the state of the GPO on the server to Not Configured rather than Enabled or Disabled. This will cause the GPO settings to be deleted from the client computers during the next Group Policy update, and that would allow the users to change the ActiveExit settings on each client computer directly.
I want to stop using ActiveExit on the network, how?
Do NOT delete ActiveExit GPO or uninstall ActiveExit software as the first step! Before that, you need to undo the steps described above:
First, run ActiveExit software on the server, open the ActiveExit GPO with it, and set the status of the GPO to Not Configured. This will cause the ActiveExit settings to be removed from the client computers after the next Group Policy update.
Second, edit the ActiveExit GPO with Group Policy Editor on the server, and delete the ActiveExit packages from the GPO. This should uninstall ActiveExit software from the client computers after they update their Group Policy and restart.
Now wait for the Group Policy to be updated on the client computers, or use the gpudate command on them to force the updates. Restart the client computers after the update to force them to actually uninstall ActiveExit software.
After all client computers performed this procedure, use Group Policy Management tool on the server to unlink the ActiveExit GPO, and then delete the GPO itself. If necessary, use Windows Control Panel on the server to uninstall ActiveExit, and that should complete the removal procedure.
If ActiveExit does not seem to be working properly, check the following:
If you've changed a setting of ActiveExit but it does not seem to take effect, remember that any currently active user must log off and then log back on to Windows. Only then the new setting should take effect.
If you've selected to manage the local computer, but all boxes are grayed out, it means that this computer is set up to be managed via a GPO. In such a situation, select to manage the GPO to make the changes to the settings, instead of trying to manage the computer directly.
Open Event Viewer (on the Administrative Tools menu of Windows) and examine the events reported by ActiveExit service in the Application category. (You may want to filter the events by the source ActiveExit.) Very often the reported events provide enough information to determine why a particular user session has not been terminated when it became inactive.
Verify that ActiveExit service is running.
Run the configuration utility of ActiveExit and see if its Status area contains a warning message. Verify that the Enable ActiveExit box is checked or that the GPO state is set to Enabled.
If the user inactivity time is not detected by ActiveExit, it could be that some software running in that user's account simulates user activity. To check for that, enable a screensaver for that user and see if it gets activated. If not, locate the culprit.
Make sure that the latest Windows updates (including service packs, if any) are applied to your system installation.
If you still experience technical difficulties, please contact us at:
Does ActiveExit require product activation or license validation?
The Lite version of ActiveExit requires the license to be validated online ![]() . The Pro version does not require product activation or license validation.
. The Pro version does not require product activation or license validation.
What kind of license do I need to use ActiveExit on several computers by several users?
You need to account for the total number of computers on the same network, as well as the total number of users, and take the larger of these numbers. For example, if you have a network of 100 computers and there are 300 separate user accounts, you need a license for 300 computers/users.
Can I use the same license key to install ActiveExit on several computers?
Yes, you can use the same license key, provided that you are installing it on no more computers than included in your license. Please refer to the file License.rtf (installed along with other files of ActiveExit) for the detailed description of the terms of using this software on more than one computer.
How do I enter the License Key?
If you are using ActiveExit on a small number of computers, by installing a separate copy of the software on each computer, press the About button on the main screen of the configuration utility and then press the Enter License Key button.
If you use ActiveExit on a domain controller to manage a GPO, then you only need to enter your license on the domain controller, and it would be saved to the GPO along with other ActiveExit settings, to be distributed to the client computers.
Note that if the Enter License Key button is disabled, it means that the computer is managed via a GPO. In such a case, login to ActiveExit on the server, and use the Manage button to open the GPO, then use the Enter License Key button to enter your license information. Don't forget to press the Apply button after that, too, to make sure the updated license is saved to the GPO.
IMPORTANT: When entering your license information, make sure you are entering the Licensed To name and the license key exactly as they are shown on your license certificate, including all capitalization and punctuation. Otherwise, ActiveExit may not accept the license key or may not register your information properly. You may wish to copy and paste the name and key from our message into the form, to avoid typos.
Can ActiveExit be used with the limited user accounts?
Yes, it can. The installation and configuration of ActiveExit must be done by the administrator, but after ActiveExit is enabled, it can monitor and logoff any user account, including the non-administrators and guests.
Can ActiveExit force the computers to sleep or hibernate?
Yes, ActiveExit offers an option to shutdown, sleep, or hibernate the computer if no user logs in to Windows during the specified number of minutes. An alternative is to create an appropriate power plan (using Windows Control Panel) that would cause the computers to sleep or hibernate after a timeout.
How can I determine why ActiveExit did not log off a user it was supposed to log off?
Open Event Viewer (on the Administrative Tools menu of Windows) and examine the events reported by ActiveExit service in the Application category. (You may want to filter the events by the source ActiveExit.) Very often the reported events provide enough information to determine why a particular user session has not been terminated when it became inactive. If that does not solve the mystery, get more troubleshooting tips.
Can I use an ADM file to manage a GPO instead of the ActiveExit configuraiton utility?
Theoretically yes, it's possible to use the ActiveExit.ADM file (included in the Zip archive of the ActiveExit Administrator Kit) to manage the settings in the GPOs, however we do not support such use. Instead, you should use the ActiveExit configuration utility to edit the GPOs. The ActiveExit.ADM file is provided for reference only.
How can I minimize the possible user data loss?
Since ActiveExit terminates the inactive user sessions unconditionally, there is a possibility that any unsaved changes to the user's documents can be lost when ActiveExit logs off the users from their accounts. To minimize the possibility of such loss, make sure that the users only use applications that offer the auto-save feature. For example, some Microsoft Office applications offer the option of periodically saving the document changes, even if the user is away from the computer. If you set up such an auto-save period shorter than the inactivity period used by ActiveExit, then the changes to the user documents would be saved before the automatic logoff would occur.
Is ActiveExit available in languages other than English?
At the time of this writing ActiveExit is only available in English, sorry. However, you can use its configuration utility to set up custom messages to be shown to the end users, so you can enter the translated messages there.
How can I get a printed version of this guide?
This user's guide is available online in the printer-friendly format:
https://www.winability.com/active-exit/users-guide-printable.htm ![]()
Open the link above in your web browser and use the web browser's Print command to print it out on your printer.