Starting the Virtual Encrypted Disk |
|
Starting the Virtual Encrypted Disk |
|
After you've used Encryptability software to create new Virtual Encrypted Disk, the disk is initially created in an inactive state, waiting for you to start using it. In order to actually start using the Virtual Encrypted Disk to store your files and folders, you need to start it first.
There are several ways of starting a Virtual Encrypted Disk. If the Encryptability application is running and the disk already appears in its list, you can double-click on the Virtual Encrypted Disk to begin the process. Or, if there is no Encryptability window on the screen, you can use the Encryptability taskbar icon, by clicking on the icon with the mouse and selecting the Start command from the menu. You can use the method that's most convenient for you, either one should result in the same password prompt displayed:
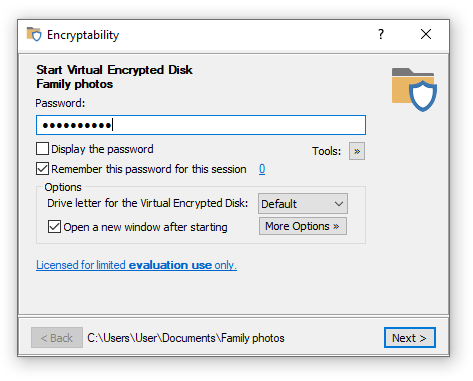
This is the point where those in the know are separated from the rest. If you know the password, you will be let in: the Virtual Encrypted Disk will be started and all files and folders it contains will become available for use. If you don't know the password, the Virtual Encrypted Disk will remain the cold pile of useless 1s and 0s and no power in the whole Universe will be able to decrypt them.
Be sure to enter the password exactly as you've supplied it when creating the Virtual Encrypted Disk: the password is case-sensitive, and if you've entered any spaces or special characters when creating the Virtual Encrypted Disk, you need to enter them here as well, in the exact same order. If your computer has several input languages installed, you need to select the correct one, too, by pressing the input language switch key combination defined in Windows Control Panel. You can see the currently selected input language to the right of the password box.
If you are not sure what you've typed in, you can click on the Display the password box and the plain text of the password you've typed in will be shown. (Before you do that, you may want to check your room for hidden cameras watching your screen. Yes, the bad guys eager to get your secrets could be very sneaky!)
If you plan to start and stop this Virtual Encrypted Disk several times during the day without stepping away from the computer, or if you plan on starting several Virtual Encrypted Disk protected with the same password, you can save yourself a bit of typing and select this option. If this option is selected, then Encryptability will remember the password you've just entered until your computer is restarted. Then, when starting the same or another Virtual Encrypted Disk protected with the same password, you would not need to enter the same password again: when the password prompt appears again, leave the password box empty and press the Next button. In such a case, Encryptability would try the passwords that you have chosen to remember and use them to start the Virtual Encrypted Disk(s) (If the remembered password does not work for a particular Virtual Encrypted Disk, Encryptability will inform you about that and ask you to enter a different password.
If you use the Remember this password for this session option, the password will be remembered until you restart Windows, or choose the Forget passwords command, available under the Encryption menu of the main window of Encryptability. This command is also available on the menu of the Encryptability taskbar icon, for quick access when you need it.
(In case you are wondering: Encryptability does not store the plain text of the password, it only stores its hash value. This way, if someone gets hold of your computer and scans its memory looking for the stored passwords, s/he won't find any.)
Note also a few more options on the same window that you can select before pressing the Next button. These options let you control what happens after the Virtual Encrypted Disk is started:
This option lets you choose the drive letter to be assigned to the Virtual Encrypted Disk after it's started. If you select Default, then the next available drive letter will be used. If you want some other specific drive letter to be used, select it in the list.
If you select this option, then Encryptability will open a new Explorer window to display the contents of the Virtual Encrypted Disk.
You can click this button to open a list of several additional options:
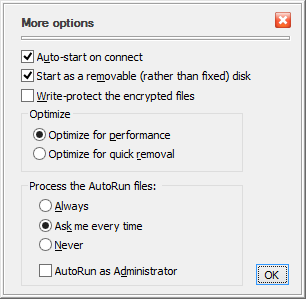
If this option is on, then Encryptability will automatically display the password entry window when when you log in to Windows, or when you connect the host drive to your computer. If this option is off, then you will need to use some other method (like the Start command on the menu of the taskbar icon) to start the Virtual Encrypted Disk off the host drive after you've connected it.
When it comes to the auto-play functionality, the Recycle Bin, optimizations, etc., Windows treats the fixed disks slightly differently than the removable ones. If you require the Virtual Encrypted Disk to be treated as a removable disk, select this option.
If you want to protect the contents of the Virtual Encrypted Disk from the accidental (or intentional) changes, select this option: you will still be able to open the files off it and read them but it won't save any changes you make nor will it let you create or delete files or folders on the Virtual Encrypted Disk.
This option allows Windows to use its file cache mechanism when reading from and writing to the Virtual Encrypted Disk. (This does not pose a security risk because the cache is used only for the already encrypted data.) This option offers the best possible performance for the Virtual Encrypted Disk. However, it increases the risk of data loss or data corruption, should your computer lose power or crash at a very unfortunate moment.
If you often encounter the situation that you cannot stop the Virtual Encrypted Disk because it's in use by Windows, you may want to select this option. Note however, that it may slow down the data transfer between the Virtual Encrypted Disk and the rest of the system.
You can use this option to control the automatic execution of the AutoRun file off this Virtual Encrypted Disk on this computer.
Of course, you can also leave the options as they are for now, and just enter the password and click Next. What happens then is very much like sort of a digital magic: the random bytes of the Virtual Encrypted Disk that previously were not making sense, are suddenly starting to come together in an orderly way, and the Virtual Encrypted Disk "starts" to come alive: it appears like a regular disk in the Computer folder:
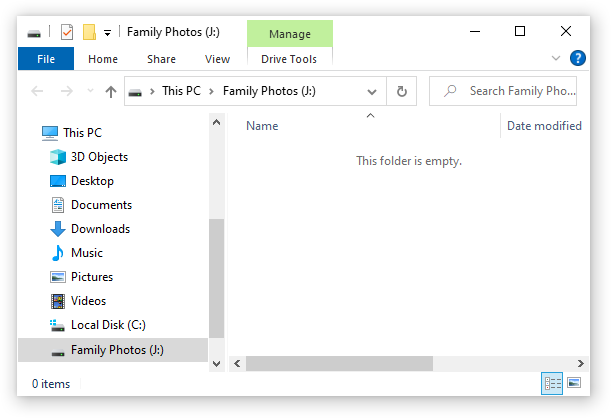
If this is the first time that you've started the Virtual Encrypted Disk, it will be empty. You can start filling it up with the files and folders that you want to be encrypted.
You can see why this disk is called "virtual": there is no actual physical disk with that letter attached to you computer. The C: disk is the main hard drive, the D: disk is your CD-ROM drive, you may or may not have other disks (such as the E: and F: disks shown in the example above). The G: disk is the host USB drive (encrypted with Encryptability). And, finally, the H: drive, is the virtual disk that appears just like any other disk you might have, but that represents the encrypted area that you have created on the host disk G:.
You can use the Virtual Encrypted Disk just like any real disk: you can create folders inside of it, rename and delete files, change their attributes, open files off it, and so on. You can even defragment the Virtual Encrypted Drive, or share it on your network, if you want. For most practical purposes, the Virtual Encrypted Disk is indistinguishable from any regular disk of the same kind. The only (and very important) difference is that the Virtual Encrypted Disk becomes a disk only after you have entered the correct password. This is something that the regular disks are incapable of.
Go ahead, move your personal files that you want to be encrypted into the Virtual Encrypted Disk that you've just started. If you are only starting learning Encryptability, you may want not to move, but copy the files for now: in this case, if something goes wrong, and you want to start over, you would still have the original unencrypted copies left on your hard disk. When you are comfortable with the Encryptability software and the whole concept of the Virtual Encrypted Disks, and also when you have a reliable backup, you can "securely" delete the original unencrypted copies of the private files, and have only the encrypted ones to work with, inside of the Virtual Encrypted Disk.
Now that you've had the Virtual Encrypted Disk started and running, what do you do to lock its back and make the encrypted files protected and inaccessible to no one besides you? For that, you need to stop the Virtual Encrypted Disk and return it to the cold conglomerate of the random 1s and 0s.