Resizing a Virtual Encrypted Disk |
|
Resizing a Virtual Encrypted Disk |
|
After a Virtual Encrypted Disk has been created, you can increase or reduce its size using the Resize command. For example, if you want to add more files to the Virtual Encrypted Disk but the amount of the free space would not allow all new files to fit in, you need to expand the Virtual Encrypted Disk. (Of course, the host storage device must have sufficient free space to accommodate the expansion.) Or, if you find that you don't usually fill the Virtual Encrypted Disk completely with files and want to release the unused space back to the host device, you would compact (or shrink) the Virtual Encrypted Disk.
Note: not all Virtual Encrypted Disks can be resized: only the Virtual Encrypted Disks that have been formatted with the NTFS file system and that have not been split into file segments can be resized. If, when creating a Virtual Encrypted Disk, you have selected a file system other than NTFS, or if you have selected the option to split the host file into segments, such a Virtual Encrypted Disk cannot be resized. The only way to change the size of such a Virtual Encrypted Disk is to create a new Virtual Encrypted Disk of the desired new size, move the files from the old Virtual Encrypted Disk into the new one, and then delete the old Virtual Encrypted Disk.
Before starting the resizing procedure, close any application that might be using files from the Virtual Encrypted Disk. To redice the risk of data corruption, do not shut down or restart the computer, or open files from the Virtual Encrypted Disk until the resizing procedure is complete.
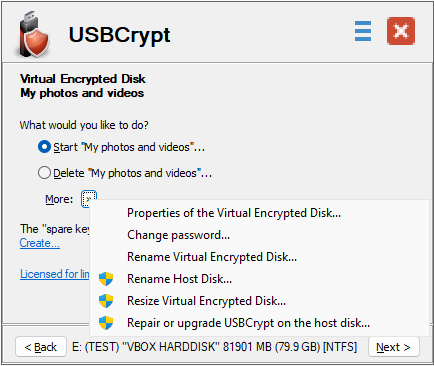
To resize a Virtual Encrypted Disk, run USBCrypt using its Desktop or Start Menu icon, select the host drive in the list, and press Next to go to the next screen. There, click More and choose the Resize Virtual Encrypted Disk command from the menu:
If you have not started the Virtual Encrypted Disk yet, you will be prompted to start it, as usual, by entering its password, and then continue with the Resize command.
The first step of the process depends on whether you plan on reducing or increasing the size of the Virtual Encrypted Disk:
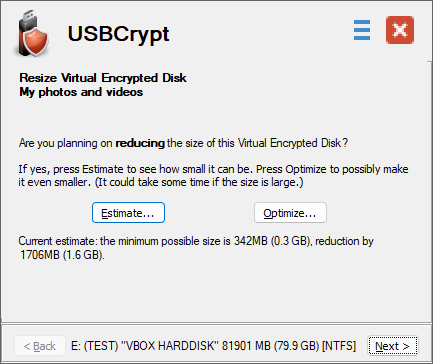
If you only want to expand the Virtual Encrypted Disk, press Next to continue to the next screen. However, if you plan on reducing (shrinking) the size the Virtual Encrypted Disk, press the Estimate button, and USBCrypt will analyze the file system layout of the Virtual Encrypted Disk to determine the amount of space by which it can be reduced. Understand that not all free space may be used for the shrinking, because the result depends on how the existing files within the Virtual Encrypted Disk are spread around the hosted media. If the Virtual Encrypted Disk is large and filled with a large number of files, this process may take a significant time.
You can also choose to perform the optimization of the free space to possibly reduce the size even more, by pressing the Optimize button. Again, if the Virtual Encrypted Disk is large and contains a large number of files, the optimization may take a long time, so you have the option to go ahead with the optimization or skip it and continue with the current estimate.
The final step is choosing the new size for the Virtual Encrypted Disk, using the screen similar to the following:
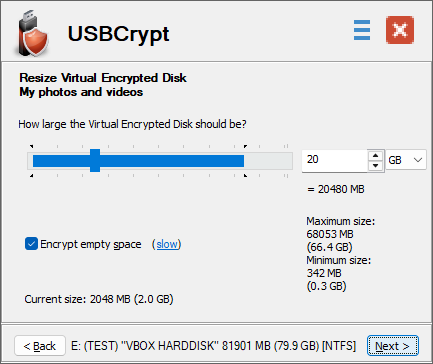
Use the slider for a rough selection of the desired size, and use the box next to the slider to enter the precise number for the new size. When expanding the Virtual Encrypted Disk, you can select the Encrypt empty space option if you want the newly allocated free space to be encrypted. (This option is ignored if you are shrinking the Virtual Encrypted Disk.) Remember that just like when creating a new Virtual Encrypted Disk, selecting this option may significantly increase the time of the resizing process. Read more...
After the resizing process is complete, the Virtual Encrypted Disk is immediately available for use with the new size.