Analyzing the reports |
|
Analyzing the reports |
|
You can use the Reports page of SoftDetective to see the results of the monitoring sessions:
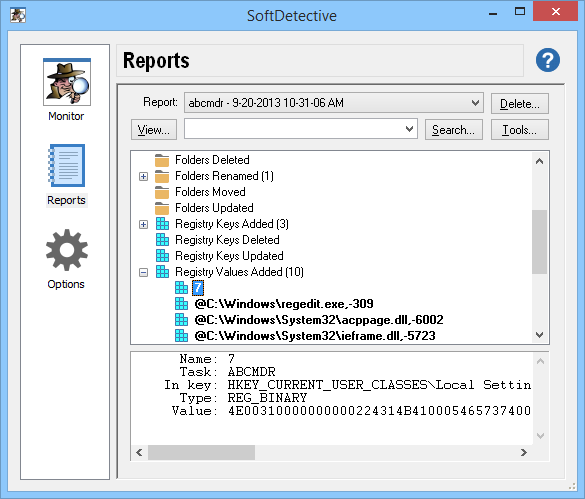
To see a report, select it in the drop-down list. The content of the selected report is displayed below the list, in a tree-like structure. You can expand and collapse the branches of the tree, as usual, to see the events that belong to the given category. The events are displayed using the bold typeface; when you select an event in the tree, the details about the selected event are displayed below the tree.
The events of different categories may have different details. Most events include the name of the object that was subject of the event (such as the name of a file or a registry key), the name of the task that produced that event. The events related to Windows Registry include the registry keys and related information. The events related to files and folders include their full paths, as well as the version and file time information, if appropriate. For the event describing the updates to the files or registry values, the details include the information about the changes.
Some types of events offer more information via their right-click menus. For example, if a file has been deleted, you can right-click on its name in the report and navigate to the copy of the original file that SoftDetective saved in a temporary folder. Or, if a text file was modified, you can use the right-click menu to navigate to both the updated file and the original copy. You can also open both such files using the external diff viewer, to examine the differences in detail.
You can control the way the report is displayed by pressing the View button and using the commands from the menu:
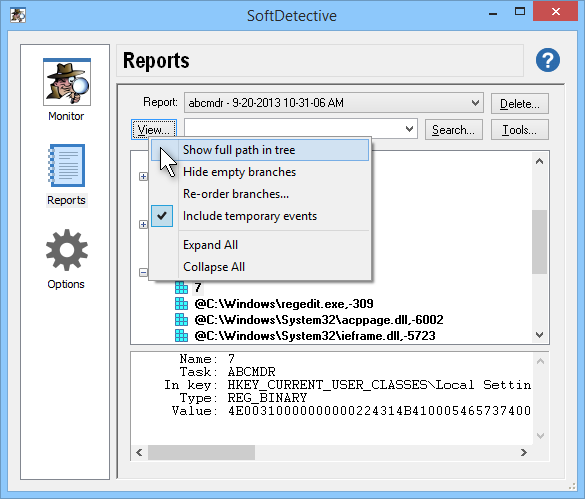
Show full path in tree - When this option is selected, a complete file path (or registry key) information is used when grouping the events in the tree branches. To navigate such a tree faster, you can right-click on the expandable items and use the Expand All and Collapse All commands as necessary. If this option is not selected, then all events that belong to the same category are grouped together under a single branch. Even if you choose this option, you can still see the complete path information in the details section when you select an event.
Hide empty branches - Select this option if you don't want to display the empty branches of the report tree.
Re-order branches - Select this option to change the order of the branches. Note that the Information branch is always displayed first; its position cannot be changed.
Include temporary events - When analyzing the program activity, SoftDetective attempts to recognize the temporary events, such as a file being created and then deleted during the same session, or a temporary file being created under one name and then renamed or moved to a more permanent location. Keep in mind, however, that it's not always possible to recognize such events correctly, especially when monitoring complex installations involving the MSI files or multiple related processes.
Expand All/Collapse All - Use these commands to quickly expand or collapse all branches of the event tree at the same time. You can also expand or collapse individual branches, by right-clicking on them and selecting the commands from the shortcut menu.
Since large reports may contain hundreds or even thousands of events, it may be difficult to locate the particular items in the reports. If you know the name or the value of a particular item you are looking for, you can use the Search button to search for the text in the report.
In addition to viewing the reports as described above, you can also export them into separate files. SoftDetective supports exporting in two formats: as a text file or in the HTML format. To do that, press the Tools button and choose one of the Export command from the menu:
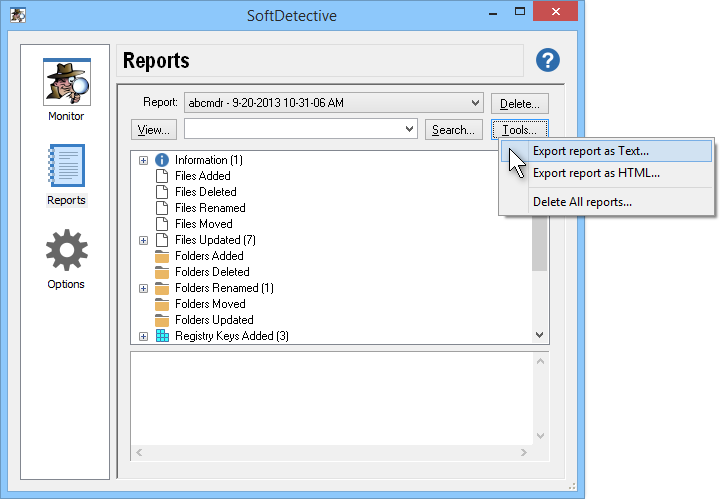
After exporting the report into a file, you can view the file as usual: the text file can be opened with any text editor (such as Notepad), and the HTML files can be viewed with any web browser.
Finally, if you don't want to keep a specific report, you can delete it by selecting it in the reports list and pressing the Delete button. (You will be prompted to confirm that you want to delete the report before it will actually be deleted.) If you want to delete all reports that you've generated so far, you can use the Delete All command on the Tools menu. Keep in mind that there is no undelete command: if you've deleted a report, it is not possible to restore it back after that.