The software described in this guide is furnished under a license agreement and may be used only in accordance with the terms of the agreement.
Information in this document is subject to change without notice. The names of companies, products, people, characters, and/or data mentioned herein are fictitious and are in no way intended to represent any real individual, company, product, or event, unless otherwise noted. Complying with all applicable copyright laws is the responsibility of the user. No part of this document may be reproduced or transmitted in any form or by any means, electronic or mechanical, for any purpose, without the express written permission of WinAbility Software Corporation. WinAbility Software Corporation may have patents, patent applications, trademarks, copyrights, or other intellectual property rights covering subject matter in this document. Except as expressly provided in any written license agreement from WinAbility Software Corporation, the furnishing of this document does not give you any license to these patents, trademarks, copyrights, or other intellectual property.
NO WARRANTY
The technical information in this document is provided AS-IS and WinAbility Software Corporation makes no warranty as to its accuracy or use. Any use of the information contained herein is at the risk of the user. This document may include technical or other inaccuracies or typographical errors.
Copyright Notice
© 2026 WinAbility Software Corporation. All rights reserved.
Trademarks
WinAbility, WinAbility.Com, Folder Guard, and "The Way Software Should Be!" are either registered trademarks or trademarks of WinAbility Software Corporation and/or its suppliers in the U.S.A. and/or other countries. Other product and company names mentioned in this document may be the trademarks or registered trademarks of their respective owners and are hereby acknowledged.
Third-party licenses
The following licenses apply to certain parts of Folder Guard software:
 ---------------------------------------------------------------------------
 Copyright (c) 1998-2007, Brian Gladman, Worcester, UK. All rights reserved.

 LICENSE TERMS

 The free distribution and use of this software is allowed (with or without
 changes) provided that:

  1. source code distributions include the above copyright notice, this
     list of conditions and the following disclaimer;

  2. binary distributions include the above copyright notice, this list
     of conditions and the following disclaimer in their documentation;

  3. the name of the copyright holder is not used to endorse products
     built using this software without specific written permission.

 DISCLAIMER

 This software is provided 'as is' with no explicit or implied warranties
 in respect of its properties, including, but not limited to, correctness
 and/or fitness for purpose.
 ---------------------------------------------------------------------------
Thank you for choosing Folder Guard!
Folder Guard is a computer security program that lets you password-protect, hide, or restrict access to folders, files, and programs. It can also restrict access to the Control Panel commands, prevent downloading of programs from the Internet, control user access to the external drives, and more.
CAUTION: Folder Guard is a powerful tool that should be used with care. Please take time reading this User's Guide before protecting access to your important documents! Always have a backup of your important files ![]() .
.
With Folder Guard you can:
Protect your private folders with passwords
You can protect virtually any "real" folder with a password, allowing only the authorized users to open the protected folder. You can protect an unlimited number of folders, each with its own password, or you can use the master password of Folder Guard to unlock them all at once.
Hide your personal files and folders from other users
You can set up Folder Guard to make your private folders invisible (or appear to be empty) to other users. The folder would be hidden from virtually any program, including Windows Explorer, Office, MS-DOS programs, etc.
Prevent modification to files and folders of your choice
With Folder Guard, you can designate specific files or folders to be read-only. The users would be able to open and view such files, but they would not be able to save the modified versions back to the protected folders.
Password-protect your shared folders from the network users
You can set up passwords for the shared folders to be used by the network users to obtain the full or read-only access to the shared folder, depending on the password they enter. (Note: This feature requires a business license purchase.)
Protect access to the network drives and folders
With Folder Guard you can control access to folders located not only on the local drives, but also on the network drive and folders, shared by other computers on your network.
Restrict access to the USB, CD-ROM and other removable drives
You can use configure Folder Guard to allow or deny access to the removable drives, restricting the user's ability to run or install unauthorized programs on your computer from the external drives. (Note: This feature requires a business license purchase.)
Protection without encryption
Folder Guard protects your files without encrypting them. It means that there is no danger of losing your documents if you lose your encryption key: with Folder Guard all your files remain intact, without modification of any kind.
Quickly pause and resume the protection via a "hot key"
You can choose a specific keyboard combination as the hot key of Folder Guard, to be able to quickly pause and resume the protection of your computer. Of course, the "hot key" is protected with your password, too, only you can use it!
Optional "stealth mode" of operation
You can set up Folder Guard to operate in the stealth mode, to hide its own files and shortcuts from being seen by other users.
Easy recovery in case of emergency
If you forget your password, or experience other problems, use the Emergency Recovery Utility (available for free download from our web site) to restore access to your protected computer.
And more!
You will find Folder Guard indispensable if you share your computer with others and you don't want any changes made to your files. Or, if you allow your kids to play games on your system from time to time, and want to be sure that everything will be OK when they finish. Or, if you don't want your parents to see some of your files. Or, if you are a network administrator and your users give you a headache messing the files up all the time. However you use Windows, you may have concerns about the security, privacy, or confidentiality of your files. And now you have a single, effective solution - Folder Guard.
If you have not done so yet, visit our web site now and download a free no-strings-attached-no-obligation evaluation version of Folder Guard and see for yourself how Folder Guard can be of use to you:
- https://www.winability.com/

- https://www.winability.net/
- https://www.winability-software.com/
- https://www.folder-guard.com/
Note:
Folder Guard helps you protect files and folders from the prying eyes of most Windows users. This protection, however, is not intended to withstand attack by anyone who has an unrestricted physical access to the computer or the administrator rights, as well as sufficient time and expertise.
Version 26.3 (March 5, 2026)
This update corrects a problem that in some situations caused a 'black screen' to appear for a few minutes after a user logs in to Windows.
Version 26.1 (January 25, 2026)
This update offers several improvements and corrections:
- Improved compatibility with the latest releases of Windows 11 and Windows Server 2025;
- Improved protection of the password-protected folders against access via LAN by an administrator;
- Improved handling of the password-protected shared folders: in most situations, the client computers no longer need to be optimized for faster network access;
- A new option Prompt to optimize for faster network updates has beed added to control the detection of the conditions that would benefit from the optimization;
- A problem has been corrected that in some situations prevented the taskbar notification icon of Folder Guard from being displayed when unlocking password-protected folders via LAN from a computer on a domain;
Version 25.9 (September 5, 2025)
This update offers several improvements and corrections:
- A new option Resume protection automatically after no mouse or keyboard activity has been added that you can use to resume the protection or lock previously unlocked folders automatically after a period of user inactivity.
- You can now unlock local password-protected folders using their UNC paths, on the same computer.
- Several other minor improvements and corrections have been made.
Version 25.7.1 (July 28, 2025)
This update adds support for the Turkish language.
Version 25.7 (July 18, 2025)
This update offers several improvements and corrections:
- A new option Show Unlock commands on the icon menu for password-protected folders has been added that controls whether the menu of the taskbar notification icon contains commands to unlock local password-protected folders.
- The notification message displayed after unlocking a local password-protected folder now contains a link that you can click to open the unlocked folder with File Explorer.
- Several other minor improvements and corrections have been made.
Version 24.11 (November 10, 2024)
This update corrects a problem that in some situations could cause a BSOD during OS startup.
Version 24.10 (October 1, 2024)
This update offers several improvements and corrections:
- You can now use Folder Guard to block programs from starting while the protection of Folder Guard is in effect.
- A new option Block programs for trusted users has been added that controls whether trusted users are allowed to start the blocked programs.
- The items on the Trusted list can now be selected using the check marks.
- A problem that prevented the use of the Options view when a language other than English was selected has been corrected.
- Several other minor improvements and corrections have been made.
Version 24.8 (August 26, 2024)
This update offers several improvements and corrections:
- The ghost folders can now be password-protected. (However, such folders must be specified using exact paths, masks are not supported.)
- The simple masks for restricting access and visibility of the ghost folders can now contain star characters at the end of each path component.
- Several other minor improvements and corrections have been made.
Version 23.5 (May 3, 2023)
This update offers several improvements and corrections:
- The filters can now be applied not only to files, but also to subfolders.
- It's now possible to set up restrictions for the ghost folders and files, allowing you to set up restrictions in advance, for the files or folders that do not exist yet.
- The ghost folders and files can be specified using the simple masks, allowing you to restrict more than one folder or file, if their names match the simple mask of the ghost item.
- Several other minor improvements and corrections have been made.
Version 23.2 (February 22, 2023)
This update offers several improvements and corrections:
- A new command Pause for local accounts has been added.
- New command line options PAUSE_LOCAL and RESUME_LOCAL has been added.
- A new, more user-friendly task selector for trusted programs and filters has been implemented.
- A problem has been corrected that caused the Unlock button not to appear in the password-protected folders in some situations.
- Several other minor improvements and corrections have been made.
Version 22.12 (December 19, 2022)
This update offers several improvements and corrections:
- When creating or changing a password that is too short, Folder Guard now displays a warning and offers to choose a longer password;
- The Ukrainian language has been added.
- Several minor improvements and corrections have been made.
Version 22.10 (October 24, 2022)
The digital signatures of the executable files have been updated according to the latest security requirements of Windows 11 and Windows 10.
Version 22.9 (September 20, 2022)
This update offers several improvements and corrections:
- When a shortcut is chosen to be protected with Folder Guard, the user is now prompted to select whether to protect the shortcut itself or the target;
- The reparse points can now be protected with Folder Guard, too;
- When enabling or disabling the stealth mode, the visibility of the taskbar notification icon of Folder Guard is now controlled automatically, too, along with other Folder Guard shortcuts;
- Several minor improvements and corrections have been made.
Version 22.8 (August 11, 2022)
This update corrects a problem that in some cases prevented the items set to be 'visible' under a folder set to appear empty from being actually visible in File Explorer.
Version 22.5 (May 5, 2022)
This update offers several improvements and corrections:
- A new option has been added to record the file system events in a log file for troubleshooting purposes;
- Several other minor improvements and corrections have been made.
Version 22.3 (March 3, 2022)
This update offers several improvements and corrections:
- Native support for the ARM 64-bit processor architecture has been implemented;
- New command line switches have been added: /SILENT and /VERBOSE;
- Several minor improvements and corrections have been made.
Version 21.4 (April 17, 2021)
This update offers several improvements and corrections:
- The temporary passwords with expiration dates can now be used to pause the protection or unlock the pasword-protected folders.
- Several minor improvements and corrections have been made.
Version 20.10.3 (October 22, 2020)
This update corrects a problem that was causing system crashes in some situations.
Version 20.10 (October 10, 2020)
This update corrects a problem that was causing crashes in some situations with third-party storage solutions used alongside of Folder Guard.
Version 20.9 (September 25, 2020)
This update offers several improvements and corrections:
- The Traditional Chinese language has been added to the list of the available languages.
- Several minor improvements and corrections have been made.
Version 20.1 (January 21, 2020)
This update offers several improvements and corrections:
- The Catalan language has been added to the list of the available languages.
- The Trusted Programs list can now contain masks to specify classes of the paths that should be trusted.
- The Trusted Programs list can now contain UNC paths specifying programs located on other network computers.
- A problem has been corrected that prevented paths longer than 64 characters to be added to the Trusted Programs list.
- If Folder Guard is installed using an MSI package from the Administrator's Kit, it is now prevented from being uninstalled by the end user via the Control Panel. (It can still be uninstalled via the Group Policy or by running the msiexec utility.)
- Several other minor improvements and corrections have been made.
Version 19.9 (September 30, 2019)
This update offers several performance improvements that make certain system backup operations faster.
Version 19.7 (July 10, 2019)
This update offers several improvements and corrections:
- A problem has been corrected that prevented Folder Guard from working properly when a very large number of different folders were configured to be protected.
- Several other minor improvements and corrections have been made.
Version 19.6 (June 21, 2019)
This update offers a correction that should prevent system crashes that could occur in some situations when browsing to the network locations protected with Folder Guard.
Version 19.5 (May 21, 2019)
This update offers several improvements and corrections:
- A new option, Report events to Windows Event Log, has been added to the Options view of Folder Guard.
- A problem has been corrected that prevented some domain users added to the Trusted list to be treated as trusted users.
- Several other minor improvements and corrections have been made.
Version 19.4 (April 4, 2019)
This update offers several improvements and corrections:
- Each password-protected folder can now have an unlimited number of different passwords. (Previously, the limit was 4 passwords per folder.)
- A new command, Lock all unlocked shared folders, has been added to the right-click menu of the notification icon of Folder Guard.
- The text of the command Locked all unlocked folders on the main prompt of Folder Guard has been changed to Lock all folders I've unlocked to better reflect the scope of this command.
- A problem has been corrected that in some situations, when unlocking a shared folder from another computer, caused Folder Guard to report that protection was not enabled on the remote computer.
- Several other minor improvements and corrections have been made.
Version 18.7 (July 30, 2018)
This is a security update that corrects a problem that could allow an attacker to manipulate the contents of the configuration file of Folder Guard (while the protection is paused or disabled) to cause a crash of the system.
Version 18.5 (May 12, 2018)
This update corrects a problem introduced in version 18.4 that in some situations caused the contents of the subfolders of the protected folders to remain hidden even after the correct password had been provided when unlocking the folder.
Version 18.4 (April 23, 2018)
This update offers several improvements and corrections:
- The Korean language has been added to the available translations of Folder Guard.
- A problem has been corrected that in some situations allowed the user to delete files protected with a read-only filter.
- Several other minor improvements and corrections have been made.
Version 18.3.1 (March 30, 2018)
This update offers several improvements and corrections:
- A problem has been corrected that in some situations prevented the user from being able to change Folder Guard settings on a computer with a disabled User Account Control.
- The precedure of cleaning the history lists of Windows Explorer has been improved.
- Several other minor improvements and corrections have been made.
Version 18.1 (January 3, 2018)
This is a maintenance update that contains several minor improvements and corrections.
Version 17.7 (July 31, 2017)
This release offers several important improvements, such as:
- If you are a system administrator of a large network, you can now use Folder Guard to edit Group Policy Objects (GPO) directly, to configure the protection of the network computers using Group Policy and Active Directory.
- The Trusted Programs and Trusted Users screens have been replaced with a unified Trusted view.
- The protection options have been separated from the program settings and are now controlled using the Options view.
- You can now select a custom font to be used in the Folder Guard views.
- Several other minor improvements and corrections have been made.
Note that with this update we are changing the version numbering to the "Ubuntu" style. For example, version 17.7 means it was released in July of 2017.
Version 10.4.1 (May 20, 2017)
This update adds the Arabic language translation to Folder Guard 10.4.
It also corrects an error that could cause Folder Guard to crash on a computer with a misconfigured Windows Search functionality.
Version 10.4 (May 5, 2017)
This update offers several improvements to Folder Guard 10, such as:
- The language of the user interface of Folder Guard can now be changed directly, without the need to install a different language version.
- A new option has been added that allows you to choose whether to show or hide the Unlock buttons on the password-protected folders. If you choose not to display such buttons, you can still unlock the password-protected folders by using the right-click menu, for example.
- Several other minor improvements and corrections have been made.
Version 10.3 (January 12, 2017)
This update offers several minor improvements and corrections.
Version 10.2 (October 21, 2016)
This update enables the use of Folder Guard 10 on clean installations of Windows 10 build 1607 and Windows Server 2016 with Secure Boot enabled.
Version 10.1 (August 21, 2016)
This update offers several improvements to Folder Guard 10, such as:
- The user interface of the Folder Guard application has been translated to several languages other than English.
- When a user locks a password protected folder, Folder Guard now sends a notification to Windows Search. After receiving such a notification, Windows Search is expected to remove the information about the files located in the protected folder from its index, so they would not appear in the search results.
- A problem has been corrected that in certain situations caused the option to clear the File Explorer history after a password-protected folder was locked to be applied incorrectly.
- Several other minor improvements and corrections have been made.
Version 10.0 (May 15, 2016)
This is a major update that adds many new features and capabilities to Folder Guard, such as:
- The ability to password-protect the shared folders.
- The ability to protect access to the network drives and folders.
- Password-protected folders can now have more than one password, with different properties.
- The stealth-mode is improved to allow the control of the protection via the hot key, in addition to the emergency recovery utility.
- Many subtle changes under the hood improving the functionality of Folder Guard.
Version 9.1 (August 27, 2013)
- This is a minor update that corrects a few minor problems reported by the users of the previous version.
Version 9.0 (April 20, 2013)
This is a major upgrade offering many changes, with the goal to make it easier to set up the protection and reduce possible confusion over the many options that Folder Guard offers. Here are the most significant changes from the previous versions 8.x:
- The user interface has been updated, that will hopefully make Folder Guard even easier to use than before.
- The Permissions command has been removed. If you used this command in the previous version, you may want to use the Group Policy and Local Security Policy commands of Windows instead.
- The Trusted Programs list now uses the full path to the program's file to determine whether it should be trusted. With this change, if you have added a custom trusted program to the list in the previous version, you will need to add it again, using its full path.
- The protection of the folders on the mapped network drives is no longer offered. If you relied on this feature in the previous version of Folder Guard, you may want to use the built-in network security of Windows to control access to the network drives.
- Folder Guard now automatically handles the proper access to the desktop.ini files of the protected folders, to preserve the custom icons and other customizations of the folders, if any.
- Folder Guard no longer supports the pre-Windows XP versions of Windows (such as Windows 2000 and earlier).
- In order to use the filters of Folder Guard, you must now purchase a full (business) license. If you purchase a personal/home use license only, the filters will have no effect.
- Many other improvements and corrections have been made.
The installation and operation of Folder Guard software is supported on the versions of Windows that are fully supported by Microsoft. At the time of this writing, the supported versions of Windows are:
- Windows 11
- Windows 10
- Windows Server 2025 (with Desktop experience)
- Windows Server 2022 (with Desktop experience)
- Windows Server 2019 (with Desktop experience)
- Windows Server 2016 (with Desktop experience)
Both the 32- and 64-bit editions of Windows (including the ARM64 editions) are supported. Note that a business license for 10 computers or more must be purchased in order to install Folder Guard on Windows Server.
Folder Guard may be able to work on the following older versions of Windows in the test signing ![]() mode:
mode:
- Windows 8.1
- Windows 7 with Service Pack 1
- Windows Server 2012 (with Desktop experience)
- Windows Server 2012 R2 (with Desktop experience)
Note that Windows Vista x64 and Windows Server 2008 x64 are NOT SUPPORTED. The reason is that Microsoft chose not to update ![]() these versions to support the SHA256 digital signatures in the kernel mode, and without such support these systems cannot use the Folder Guard kernel driver.
these versions to support the SHA256 digital signatures in the kernel mode, and without such support these systems cannot use the Folder Guard kernel driver.
IMPORTANT: For each supported version of Windows, all available service packs and Windows updates must be installed. If your computer is not set to install updates automatically, use Windows Update to check for available updates and install them. Folder Guard may not work properly if the latest updates are not installed.
Note that some features of Folder Guard depend on support from Windows and not all versions and editions of Windows provide such support equally well. You are strongly advised to try the software before purchasing it to verify it's working well enough in your particular software environment.
Folder Guard may work with some of the older versions of Windows, such as Windows XP, Vista, or Windows Server 2003 or 2008, but we do not support such configurations. You are advised to thoroughly test the software on the unsupported versions of Windows prior to purchasing it, to make sure it operates according to your requirements "out of the box".
Folder Guard is NOT compatible with Windows RT, Windows 95, 98, Me, Windows NT, Windows 2000, or any older version of Windows. Folder Guard is NOT compatible with Linux, OS X, or other operating systems that are not based on Windows.
- Login to Windows as the administrator, or as a power user. If you login as a regular or limited user, you may not be able to install or use this software.
- To begin the installation, simply run the installation file. If you do not have the installation file, please visit our web site to download the latest version:
https://www.winability.com/download/
- Note that if you have a previous version of this software already installed on your computer, the installation utility may prompt you to restart the computer, in order to be able to replace the files currently in use by Windows.
- The installation program will walk you through the process of setting up Folder Guard. You will be prompted to read and accept the End User License Agreement, and to select the installation options such as the folder where to copy the files.
- After you press the Finish button, the installation program will copy the files into the specified folder and configure Windows for using Folder Guard. If the installation program detects that your version of Windows is 64-bit, it installs the 64-bit files. Otherwise, it installs the 32-bit files.
- IMPORTANT: Make a backup copy of the installation file of Folder Guard that you have downloaded from our web site, as well as a copy of the message with your license key, on a CD-R or other removable disk, because if you ever need to reinstall the software, you will need both, the installation file and your license information to install the program in the fully-licensed mode. It's not enough to store the files on your hard disk, because when (not if) it crashes, you will lose the files. (Yes, hard disks do crash, believe us!) We provide for download from our web site the latest versions of the installation files only. When we release an updated version, we remove the older version from the download area, so the installation file with the version that you have purchased may not be available for download in the future. Remember, it's your responsibility to backup your important files! If you do misplace your license key or the installation file that we no longer offer for download, please use this link to order a replacement:
https://www.winability.com/store/?lost_key
To completely uninstall Folder Guard, it's not enough to simply delete its program files from the installation folder. To completely remove Folder Guard from your computer, follow the instructions below.
IMPORTANT: If your computer is configured for several user accounts, login into the same user account that you were logged in when you installed Folder Guard. If you use Windows Fast User Switching, log off from all other accounts before trying to uninstall Folder Guard.
NOTE: If you have enabled the stealth mode of operation of Folder Guard, it has hidden the Uninstall Folder Guard command from the Start menu, as well as from the Add/Remove Programs list of Windows Control Panel. To restore these commands, run Folder Guard and use its Tools - Stealth Mode command to turn the stealth mode off, then exit Folder Guard before continuing.
Method 1
Open Windows Settings - Apps or a similar screen, or use Windows Control Panel - Programs and Features (or Add/Remove Programs) command, depending on the version of Windows that you have, and use it to uninstall Folder Guard, just like most other software.
Method 2
Run the Setup utility of Folder Guard with the command line switch /U. That is, choose Start - Run, and enter the following command:
If you use a 32-bit version of Windows:
"C:\Program Files\Folder Guard\Setup.exe" /U
If you use a 64-bit version of Windows:
"C:\Program Files\Folder Guard\Setup64.exe" /U
If you use an ARM64 version of Windows:
"C:\Program Files\Folder Guard\SetupA64.exe" /U
(This command assumes that you have installed Folder Guard into the folder C:\Program Files\Folder Guard; if not, please enter the correct path to Setup.exe (or Setup64.exe) in the command line above. Also note the double quotes around the path, as well as a space character in front of the /U switch, they are important parts of the command and necessary for it to work properly).
You will be prompted to enter your Master Password before the uninstalling could be continued. This is necessary to protect Folder Guard from being removed by unauthorized users. If you forget your password, use the Emergency Recovery Utility to reset it.
You may also be prompted to restart your computer, in order to deactivate Folder Guard and release the files that are currently in use by Windows, before they can be uninstalled.
You can use Folder Guard for the first 30 days FREE OF CHARGE, with no strings attached and absolutely no obligation to purchase anything!
During the 30 Free Days the operation of the software is not limited in any way, it is 100% functional. We make the software work without limitations so you can have a real look at it and decide whether or not it fits your needs. The only difference in the operation of the software during the free days is the Welcome screen that may be shown when you start Folder Guard:
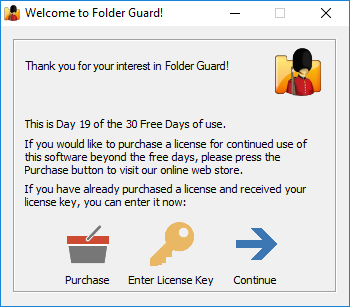
Please remember that Folder Guard is NOT free or public domain software. It is free for the first 30 days only. If you want to use the software after that, you must either purchase a license for continued use of the program, or uninstall Folder Guard from your computer. For the complete terms of use, please refer to file License.txt that is installed along with other files of Folder Guard.
Related topics:
We accept all major credit cards, and we also offer many other payment options.
Open one of our web sites listed below, click on the Purchase or Buy Now link, and it will take you directly to our secure online store, where you can see the latest pricing and discount information, our money-back guarantee, privacy policy, and other related information:
We provide free software updates to the same product that we may release within one year from the date of your purchase. For example, if you have purchased your license on March 1, 2025, you may use that license key for all updated versions of the same product that we may release during the next year, up to March 1, 2026 (both minor and major updates are covered by this offer). In other words, within one year after the purchase you get all updates to the product free of any charges.
After that, to update to a newer version, you would need to purchase an upgraded license. Please note, you are in no way obligated to update to the new versions: you may continue using the version that you have purchased for as long as you like, if it works for you well enough, without paying any additional upgrade fees.
Please visit our web sites for the latest information:
We provide free online support to the licensed customers through our web site, for at least one year after the purchase. The prospective customers evaluating the software are welcome to use our support area, too. Before requesting technical or customer support, however, please check out this manual, it may already contain the answer to your question. In particular, be sure to look through the FAQ (Frequently Asked Questions) section of this guide.
Please DO NOT send us email messages, because due to the spam, worms, and spyware problems the reliability of email has diminished greatly in the last few years. The email messages that you send us often do not arrive, and if they do, our replies are often get blocked by your anti-spam or anti-virus software, causing frustration and unnecessary delays in communication.
Please visit our web site to request technical or customer support:
First of all, a word of caution: Folder Guard is a powerful tool that should be used responsibly. Using it thoughtlessly, you can inadvertently make your computer inaccessible. For example, it is very easy with Folder Guard to prevent access to the Desktop folder, and make Windows start with a blank screen. To avoid such surprises please review the following:
- Before you begin using Folder Guard, backup your entire hard drive or at least the most important documents and the system files. By the way, it is a good practice to backup your files on a regular basis!
- Make sure you know how to start Windows in the safe mode and know how to use the computer in that mode. Folder Guard is not normally enabled at Windows startup in the safe mode, so you should be able to bypass it and correct any problems. (And yes, you can configure Folder Guard to protect your computer even in the safe mode, click here for more information.)
- Use the Tools - Emergency Recovery command of Folder Guard application to create an Emergency Recovery utility and save it onto an external disk, such as a flash drive. This way, if you accidentally lock yourself out of Folder Guard or forget its Master Password, you could use the Emergency Recovery utility to reset the password and let yourself back in.
- Create a practice folder somewhere on your hard disk (such as C:\Test), copy some files into it, and try to protect that folder first. After you get used to the way Folder Guard operates, you may want to start protecting other folders that contain the files and documents you actually want to be protected.
- Do not assign the no access attribute to the C:\Windows folder, unless you know what you are doing, because that will make Windows unable to use its own files! Do not restrict access to the whole C: drive, because other programs located on that drive would stop working! Let us repeat: Folder Guard is a powerful tool that should be used with care.
- If you use Windows 11, 10, 8 (or a later version) with User Account Control enabled, then every time you run Folder Guard you will see a prompt like this:
This screen is expected, because Folder Guard needs the administrative access to your computer in order to be able to protect your files and folders. Press Yes to run Folder Guard. However, if you see a different screen with the message "An identified program wants access to your computer" (or a similar message), DO NOT continue! Such a message could indicate that the Folder Guard executable file got corrupted or even worse, that it has been infected with a virus. It is very unsafe to allow such files to run. In such a case, you should first make sure your computer is not infected with viruses, and then visit our web site to download a fresh copy of Folder Guard and reinstall it from scratch.
The main purpose of Folder Guard is to restrict access to files and folders that you think should not be accessible to other users who might log in to your computer. Folder Guard offers several methods of controlling access to files and folders:
Protecting folders with passwords
You can assign a password to a folder and that would allow to open the folder only if someone knows the password. You can protect different folders with different passwords, and you can add several different passwords to the same folder, each password authorizing the full or read-only access to the folder and the files within. You can also create separate passwords to be used by the network users, who connect to the shared folder over the network. (Note: the password-protection of the shared folders is only available if Folder Guard is registered with a business license key.)
Restricting access and visibility of folders and files
You can restrict the visibility of and access to folders without giving them individual passwords. You can specify which Windows users should or should not see the folder, or have the full, read-only, or no access to the folder and the files within. When you need the full, unrestricted access to your system, you could pause the protection (by entering the Master password), and make all files and folders fully accessible, as if Folder Guard were not present on the computer. Having finished the work, resume the protection, and the folders would become restricted again for users who might log in to your computer while you are away.
Restricting access with the filters
With this method, you can set up how specific programs may or may not access the whole classes of files. For example, with a proper filter, you can deny access to any EXE and/or DLL file if it is launched from any external drive attached to your computer, and thus prevent users from running programs from the external drives. (Note: the filters are only available if Folder Guard is registered with a business license key.)
In order to start protecting files and folders with Folder Guard, first you need to specify which files and folders you want to be protected, and how exactly you want to protect them. When you run Folder Guard for the first time after installing it, it prompts you to set up the protection settings:
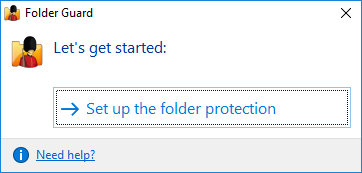
If you had previously set up the protection and want to change it, you can use the following screen instead:

Use the Set up or Change folder protection link, and the main configuration program of Folder Guard will open, letting you password-protect folders, hide folders, and set up other restrictions. When you are done setting up the restrictions, Folder Guard will ask you to resume the protection of files and folders:
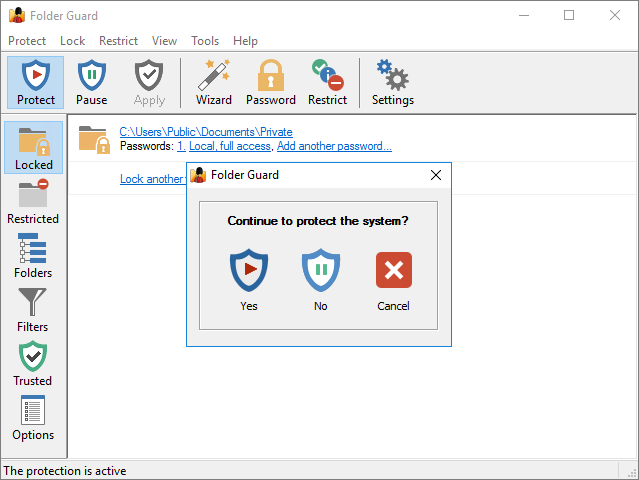
If you want the protection to take effect, select Yes. (If for some reason you don't want the folders to become protected right away, select No; you can resume the protection later on, when needed.)
If you've chosen to resume the folder protection, you can continue using your computer, as usual, and Folder Guard will be protecting your files and folders quietly in the background. For example, if you've selected a folder to be hidden, it will hide that folder from Windows Explorer and other programs and keep it invisible. If you've set up a password for a folder, it won't allow the folder to be opened until you enter the correct password, and so on. If you run Folder Guard again while the folder protection is in effect, it will display the following prompt:
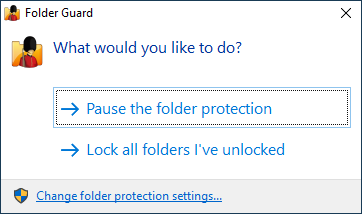
You can choose to Pause the folder protection: if you do, Folder Guard will ask you for the Master password, and then temporarily stop protecting the files and folders. You should be able to see and open the protected files and folder without any restrictions, as if Folder Guard was not present on your computer at all. When you are done working with the protected files and folders, you can run Folder Guard again, and it will prompt you to resume the protection:

In addition to pausing or resuming the protection, you can also click on the Change folder protection settings link, and it would open the main configuration program of Folder Guard, letting you add or remove the protection from the files and folders, and change other protection settings.
Relax, you don't have to read or understand this section in order to use Folder Guard. We have provided this information only in case you are really curious. You can safely skip this section and go to the next one.
As you probably know, most Windows programs don't work with files and folders directly; they rely on the support provided by the Windows operating system to work with files and folders. (It makes each program able to work with wide range of the storage devices, letting Windows take care of the details). For example, if you use Windows Notepad to open a text document, the Notepad program first prepares a special request for the contents of the disk and sends this request to Windows. Having received the request, Windows searches its internal data structures and the contents of the disks, and returns the results back to Notepad, which in turn shows the files and folders to you in the Open File window. After you have selected the file and pressed OK, Notepad prepares another request for opening the file you have selected, and sends it to Windows, as well. Windows reads the appropriate bytes of data from the disk and returns them back to Notepad that shows them to you in its window. In reality, the procedure is much more complex: even a simple operation like the one described above may take hundreds of different requests sent back and forth between the program and Windows, before you can see the results on the screen. All such requests and actions are performed by the programs transparently to you, and you don't even have to know what is going on under the Windows hood, unless you really want to.
Folder Guard works by intercepting the system requests that Windows programs and Windows itself exchange between each other. Folder Guard analyses the requests and the data they contain, and uses the attributes of the files and folders that you have set up with Folder Guard to allow or deny such requests. For example, if you designated a file to be read-only, and some program sends a request to read information from this file, Folder Guard allows such request to go through without intervention, and passes the results from Windows back to the program. If, however, a program sends a request to write some data into such file, Folder Guard intercepts it, and returns it back to the program without passing it to Windows. This prevents the file from being overridden (as per the read-only attribute), and makes the program display an error message such as "Access denied" or similar.
That's how Folder Guard works.
Note: don't confuse the protection that Folder Guard performs with encryption. Folder Guard does NOT encrypt or modify your files and folders in any way, it only restricts access to them. If you require your files to be encrypted, you should use some other solution, such as Encryptability ![]() or USBCrypt
or USBCrypt ![]() , not Folder Guard.
, not Folder Guard.
When you run Folder Guard for the first time, it prompts you to choose the Master password:
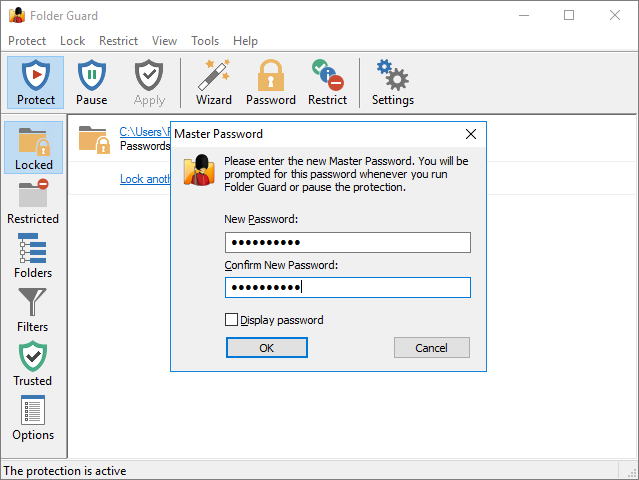
You will need to enter this password every time you decide to pause the folder protection, or to change the protection settings of your computer. You also need to enter this password when you upgrade or uninstall Folder Guard, again, to stop unauthorized users from removing Folder Guard from your computer without your permission:
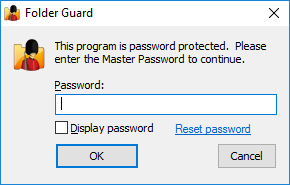
If you forget the Master password, click on the Reset password link to perform the Emergency Recovery procedure (that is, to erase the password and let you log in to Folder Guard).
Note that Folder Guard uses several other passwords, as well, such as the folder passwords that you can use to password-protect specific folders. If you forget any of such passwords, simply run Folder Guard and use its commands to set up new passwords for the folders.
When choosing the passwords, keep in mind that the length of a password must be between 1 and 64 characters. Any characters are allowed, including spaces and punctuation. The passwords are case sensitive: If, for example, you have chosen the word Apple as the password, Folder Guard will not accept the words APPLE or apple as the valid passwords.
Note that the passwords used by Folder Guard are stored on your computer in the hashed form (based on the SHA256 secure hash algorithm), or encrypted with the AES encryption. In other words, it is practically impossible for someone to discover the text of the passwords by analyzing the contents of your hard drive.
In order to protect files and folders with Folder Guard, you need to use its main window to specify which files and folders you want to be protected, and how exactly you want to protect them:
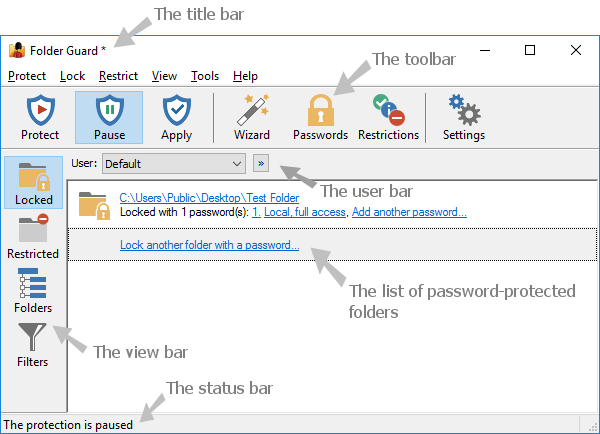
The main window contains the following areas:
Title bar:
Like the title bars of most other programs, it shows the name of the application. If you've made changes to the current configuration that have not been saved or applied yet, a star character * is displayed next to the name.
Toolbar:
The toolbar offer quick access to the frequently used commands of Folder Guard.
User bar:
The user bar is only visible if you specifically set it so using the View - User bar command. You can use it to select the Windows user for which to set up the restrictions.
View bar:
You can use the View bar to quickly switch between the different views of Folder Guard.
The Locked button selects the view of the folders that you have protected with passwords.
The Restricted view lists the files and folders that you have restricted without using the passwords.
The Folders view shows the drives and folders that your computer has as a tree-like structure.
The Filters view displays the list of the filters.
The Trusted view displays the list of trusted users and programs that you want to bypass the protection of Folder Guard.
The Blocked view displays the list of programs that you want to be blocked from starting while the protection of Folder Guard is active.
The Options view displays the list of various options that affect the way Folder Guard performs the protection of files and folders.
Status bar:
Status bar is used to display the information messages.
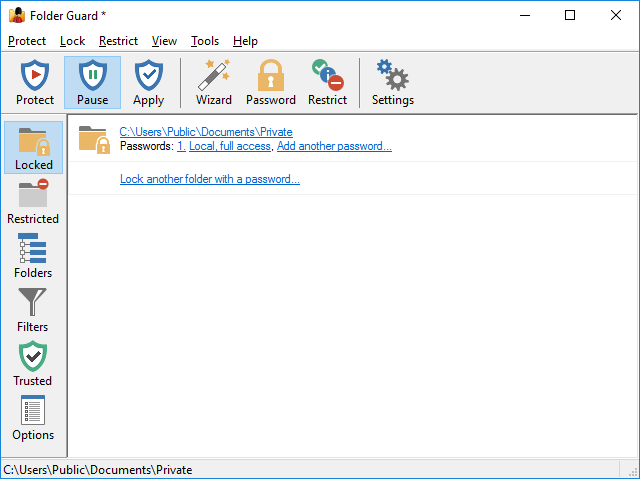
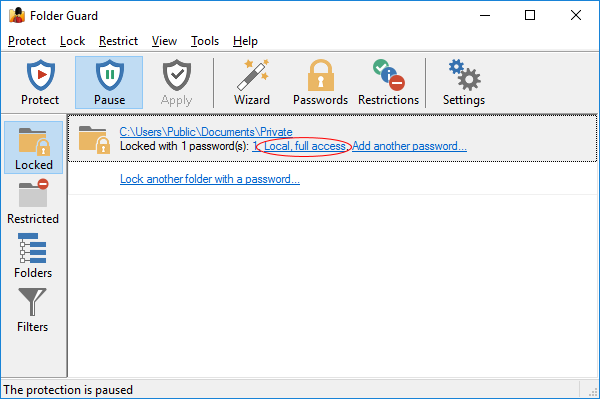
The Locked view of Folder Guard is displayed when you press the Locked button on the View bar or choose Locked folders from the View menu:
This view shows a list of folders that are currently protected with passwords. The information for each such folder includes:
- The full path of the folder. Clicking on it switches to the Folders view with this folder selected in the folder tree.
- The number of passwords that this folder is currently protected with.
- For each folder password, clicking on the number opens a window that you can use to change the text of this password or delete it. Clicking on the short description of the password opens a window that you can use to change the password properties.
- If the number of passwords for this folder is less than the limit (4), a link appears that lets you add another password to the same folder, with a different text and properties.
You can also right-click on the items in the list and use the commands on the context menu that are applicable to the password-protected folders.
The last item of the list offers a link to start the Wizard that you can use to protect another folder with a password. If several different folders are password-protected, they are listed alphabetically according to their paths.
See also:
Protecting folders with passwords
The Restricted view of Folder Guard is displayed when you press the Restricted button on the View bar or choose Restricted folders and files from the View menu:
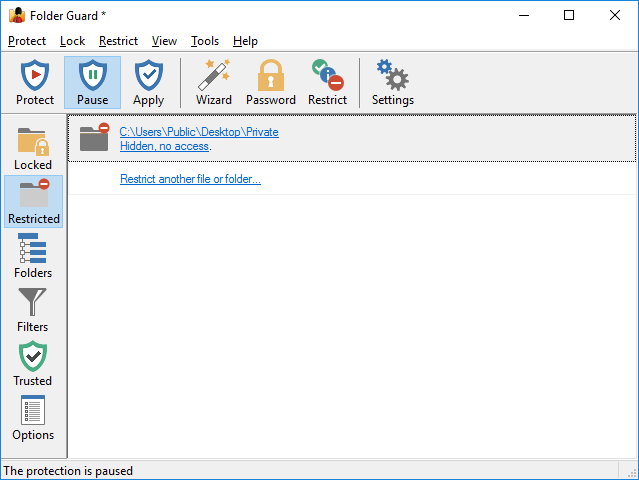
This view shows a list of folders and files that are currently protected with restrictions. The information for each such item includes:
- The full path of the restricted folder or file. Clicking on it switches to the Folders view with this folder or file selected in the folder tree.
- A short description of the restrictions that currently apply to this folder or file. Clicking on such a link opens the Wizard that you can use to change the restrictions.
- If different restrictions are set up for different users, the description shows such restrictions separately.
You can also right-click on the items in the list and use the context menu commands that are applicable to the restricted folders and files.
The last item of the list offers a link to start the Wizard that you can use to restrict access to and visibility of another folder or a file. If there is more than one folder or file with restrictions, they are listed alphabetically according to their paths.
See also:
Hiding and restricting access to folders
The Folders view of Folder Guard is displayed when you press the Folders button on the View bar or choose Folder tree from the View menu:
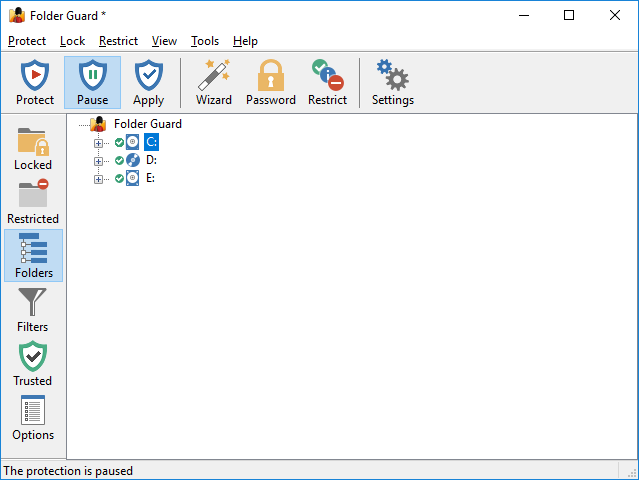
This view shows the drives and folders of your computer as a tree-like structure. You can use this view to navigate to the folders in a way similar to how Windows Explorer works, and set up the protection of the folders.
The folder tree does not show files by default, because all files are protected by Folder Guard according to the protection settings of the folder in which the files are located. If you need to apply different protection settings to specific files, first use the Add file command that appears on the context menu when you right-click a folder to add one or more files to the folder tree. Then you could apply the protection settings to such files in the same way as to folders. Note, however, that you cannot protect individual files with passwords, only folders can be protected that way.
The folder tree initially includes only folders located on the local drives that your computer has. If you want to protect access to the folders located on other computers, you can use the Add network location command on View menu to add the network folders to the folder tree, and then navigate such folders and apply the protection settings to them, in the same way as to the local folders.
See also:
The Filters view of Folder Guard is displayed when you press the Filters button on the View bar or choose Filters from the View menu:

This view shows the filters that you can use to control access to the whole classes of files based on their location and the programs they are being accessed. When this view is active, an additional Filter menu appears on the menu bar of the Folder Guard window. This menu contains commands specific to the filters. When you switch to another view, this menu becomes hidden again.
Note that although the filters are available during the free use period, to continue using them, a professional or another business license must be purchased. If you purchase a home, personal use license, the filters would become disabled.
See also:
The Trusted view of Folder Guard is displayed when you press the Trusted button on the View bar or choose Trusted from the View menu:
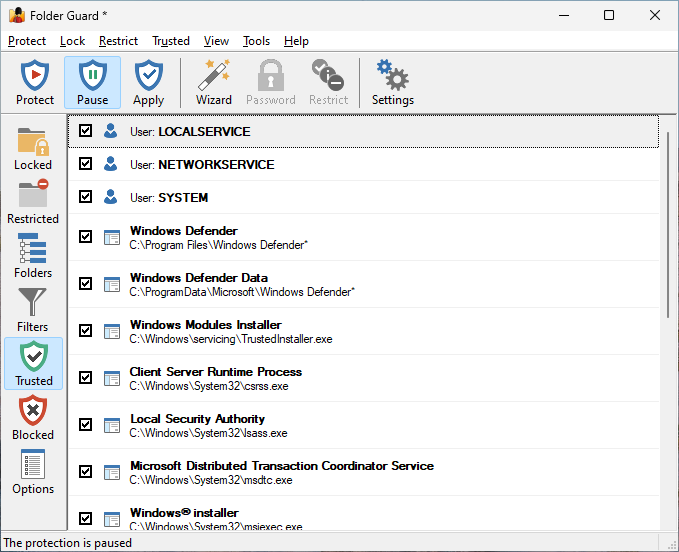
The list shows both the trusted users and trusted programs. You can right-click on the list items and use the shortcut menu to remove the selected items from the list, or use the Trusted menu to add more items to the list.
See also:
The Blocked view of Folder Guard is displayed when you press the Blocked button on the View bar or choose Blocked from the View menu:
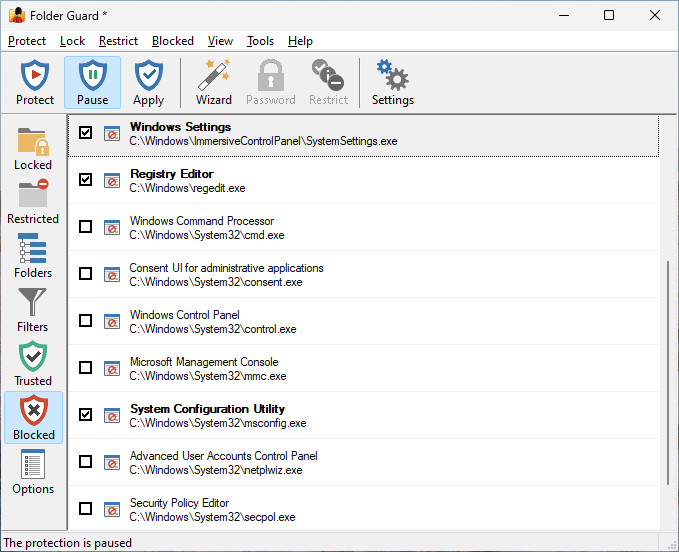
The list contains programs that can be blocked from starting by Folder Guard.
See also:
The Options view of Folder Guard is displayed when you press the Options button on the View bar or choose Options from the View menu:
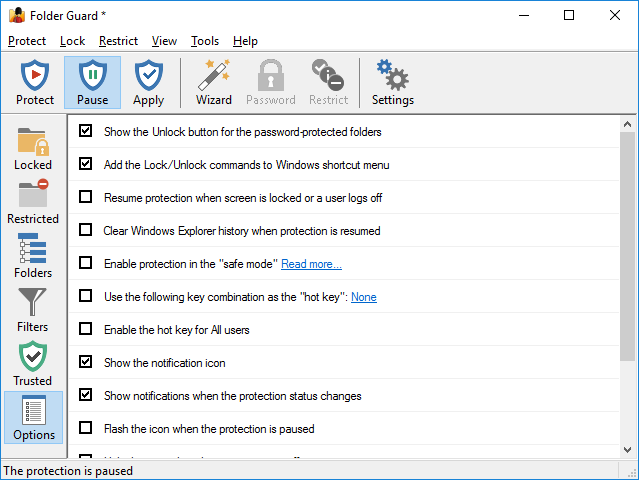
Use this view to control the protection options of Folder Guard.
Tip: Use the Restore default options command on Tools menu to set all options to their default values, as they were when you first installed Folder Guard.
This view contains the following areas:
Show the Unlock buttons for the password-protected folders
If selected, this option causes Folder Guard to display the Unlock button when a user navigates to a password-protected folder with Windows Explorer. If you don't want other users of your computer to see such a button, clear this option. In such a case, you may want to enable the option to add the Lock/Unlock commands to Windows shortcut menu (described below) in order to be able to unlock the protected folders by right-clicking on them and entering their passwords.
Add the Lock/Unlock commands to Windows shortcut menu
If selected, this option causes Folder Guard to add the Lock and Unlock commands to the Windows shortcut menu for the folders protected with passwords. Note that if you enable the stealth mode, the Unlock command may not be shown on the shortcut menu even if you select this option.
Resume protection when screen is locked or a user logs off
Check this box if you want the protection to resume automatically after the computer screen is locked (by a screensaver program, or by pressing the Win+L keys), or when a user logs off Windows. If the protection is already in effect while the screen is being locked, this option has no effect. Note that in the latter case, it would NOT lock the password-protected folders that you had previously unlocked, if any. If you want a password-protected folder to be automatically locked when the screen is locked, select the appropriate option on the Password properties screen for the password.
Resume protection automatically after no mouse or keyboard activity
Check this box if you want the protection to resume automatically after no mouse or keyboard activity has been detected for the specified number of minutes. However, if the main Folder Guard application is currently running on this computer, the protection is not resumed automatically, to avoid disruption of the administrator's actions. If the protection is already in effect while the mouse or keyboard activity timeout has been reached, this option will lock the password-protected folders that you had previously unlocked, if any.
Block programs for trusted users
If this box is checked, both regular and trusted users are prevented from starting the blocked programs. If this box is cleared, trusted users are allowed to start any program, even if it is set to be blocked from starting.
Clear Windows Explorer history when protection is resumed
If selected, this option causes Folder Guard to clear the history of the recently used documents and programs, displayed by Windows Explorer, every time you resume the protection. You may want to select this option if you don't want other users to be able to see the traces of your private documents in Windows Explorer. Note that this option clears all history, not only the entries related to the protected files and folders. Also, this option does NOT clear the history of other applications you might have, it only affects the history of Windows Explorer.
Enable protection in the safe mode
If checked, this option makes Folder Guard protect the folders even in the safe mode of Windows. Note: This option must be used with care.
Use the following key combination as the "hot key":
The "hot key" is a combination of keys that, when pressed together, would display the prompt to pause or resume the protection of Folder Guard. Or, if a Windows Explorer window is active on the screen displaying a password-protected folder, then pressing the hot key would display a prompt to unlock the password-protected folder rather than the prompt to pause or resume the protection.
If selected, this option causes Folder Guard to use the keyboard combination you have entered in the box below it as the "hot key". Note that the hot key combination is not functioning while the Folder Guard application is open. However, the hot key should start working as soon as you close the Folder Guard application.
Enable the hot key for All users
If selected, this option causes Folder Guard to enable the hot key for any user who may log in to the computer. If this option is cleared then the hot key is enabled only for the primary user of the computer. (That is, the user who has installed Folder Guard software, usually the administrator.)
Show the notification icon
If selected, this option causes Folder Guard to display its notification icon.
Show Unlock commands on the icon menu for password-protected folders
If selected, this option causes Folder Guard to add commands to unlock local password-protected folders to the menu of the notification icon.
Show notifications when the protection status changes
If selected, this option causes Folder Guard to display the popup "balloons" or the "fly-by" notifications every time the protection is paused or resumed, or when a password-protected folder is locked or unlocked. Clear this option if you don't want to see such notifications.
Flash the icon while the protection is paused
If selected, this option causes Folder Guard to periodically flash the image of its notification icon to indicate that the computer is currently unprotected.
Hide the icon when the protection is in effect
If selected, this option causes Folder Guard to hide the notification icon when the protection is in effect. You may want to select this option if you don't want other users to see the icon while they use your computer.
Show the icon for All users
If selected, this option causes Folder Guard to display the notification icon for any user who may log in to the computer. If this option is cleared, the icon is displayed only for the primary user of the computer. (That is, the user who has installed Folder Guard software, usually the administrator.)
Purge user sessions that have been inactive
This option affects how long Folder Guard "remembers" users who unlock the password-protected folders. If a user unlocks such a folder, and then does not access that folder for the specified period of time, the folder would lock itself automatically and the user would need to re-enter the folder password again to unlock it. You may find this option useful, for example, if you have a large number of users who unlock a password-protected shared folder on a server via a network. If the number of such users is very large, you may want to reduce this timeout value, to reduce the amount of the server RAM used for keeping track of such users.
Report events to Windows Event Log
If selected, this option causes Folder Guard to report some events, such as users pausing or resuming the protection, or unlocking and locking the password-protected folders, to Windows Event Log. You can view such events using the built-in Event Viewer tool of Windows. The events are recorded under the Windows Logs - Application log. At this time the descriptions of the events are provided in the English language only, even is another language is selected for the user interface of Folder Guard.
Note that if a password-protected shared folder is being locked or unlocked from another computer, such events are recorded in the Windows log on the server computer, where the shared folder is shared from, and where Folder Guard is installed to protect it. Also note that if this option is not selected, some errors related to the enabling the protection of Folder Guard are still recorded to Windows Event Log.
Log file system events
If selected, this option causes Folder Guard to record file system events into a file, that you can select by pressing the Options link. You may find this option useful for troubleshooting, especially when using the filters. Read more...
Allow temporary passwords (Key)
If selected, this option enables the use of the temporary passwords of Folder Guard on this computer. Click the Key link to view or change the temporary passwords key.
Folder Guard offers you the Show the notification icon option to display its notification icon in the taskbar notification area (next to the system clock).
You may find this icon useful as a visual indicator of the status of the folder protection. If the folder protection is in effect, the color of the icon is red:
![]()
If the folder protection is in effect, but one or more of the password-protected folders are currently unlocked, the color of the icon is blue:
![]()
If the folder protection is paused, the color of the icon is green:
![]()
In addition to being a visual indicator, the notification icon also offers quick access to several tools of Folder Guard. To access such tools, right-click on the notification icon, and choose the appropriate tool from the menu:
![]()
This menu offers the following commands:
Lock (folder)
Choose this command to lock one of the folders that you had previously unlocked.
Lock all I've unlocked
If you have unlocked more than one folder, use this command to quickly lock all of them simulteneously. Notice that this command has no effect on the folders unlocked by other users, such as the shared folders that might be unlocked from other computers on the network. (To lock such folders, use the next command described below.)
Lock all unlocked shared folders
If you have protected a shared folder with a password and other users have this folder unlocked over the network, you can use this command to quickly lock all such folders and stop other users from accessing the protected shared folders. Notice that this does not prevent the network users from continuing to use the already opened documents: only if the user closes the document and attempts to open it again, the access to the document would be restricted. Also keep in mind that this command has no effect on the protection status of the folders on this computer that you had unlocked locally. (To lock such folders, use the previous command described above.)
Unlock (folder)
If the option Show Unlock commands on the icon menu for password-protected folders has been selected, you can use this command to display a password promt to unlock one of the local password-protected folders.
Run Folder Guard
This command has the same effect as choosing the desktop (or the Start menu) shortcut to run Folder Guard.
Pause/Resume protection
These commands give you a quick method for pausing and resuming the protection performed by Folder Guard.
About Folder Guard
This command lets you quickly see the version number of Folder Guard that you have installed. Notice that it does not give access to other related tools, such as entering your license key: to use such tools, you must open the main configuration program of Folder Guard and use the About command from its Help menu.
Show icon
Clear this option is you want to hide the notification icon and make it invisible. If later on you decide to make the icon visible again, enable the Show the notification icon option using the main configuration program of Folder Guard.
To protect a folder with a password, run Folder Guard and choose the Change folder protection settings link:
When the Folder Guard application opens, click on the Lock a folder with a password link:
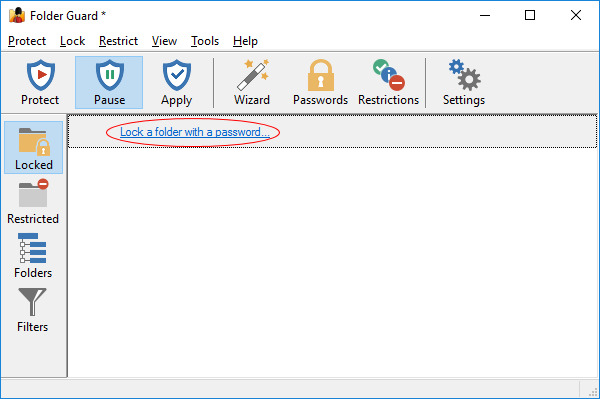
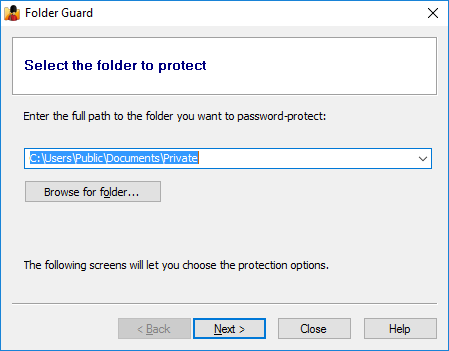
This should prompt you first to specify the folder you want to protect, which you can select by pressing the Browse for folder button:
On the next screen, select the Lock with a password option and press the Choose the password button to specify the password:
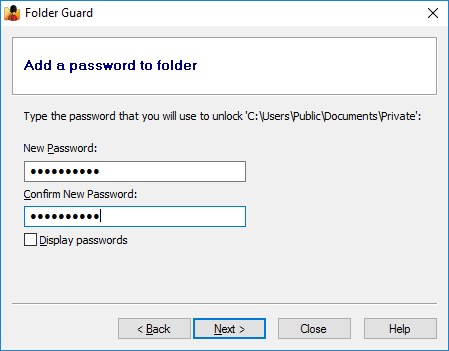
Press Next and review the options offered for this password:
Adjust the password properties, if needed. Press Finish and that's it! The password-protected folder will appear in the list of the protected objects in the Folder Guard window. Press the Protect button on the toolbar to actually start protecting the folder (or, if the protection is already in effect, press the Apply button to apply the new settings.)
Now let's see the password protection in action: run Windows Explorer and navigate to the folder you've just protected. Instead of the files in the protected folder, you should see the Unlock button.
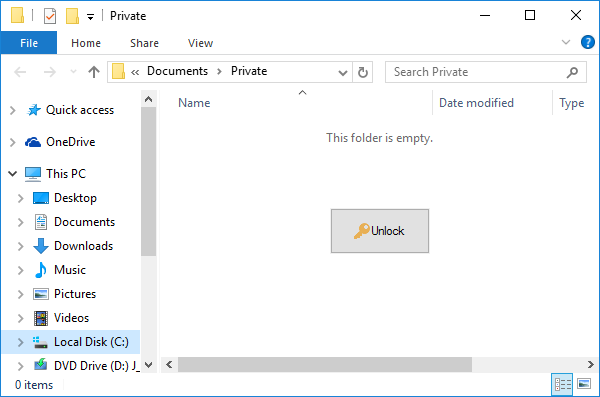
Press the Unlock button and a prompt for the password should appear on the screen:
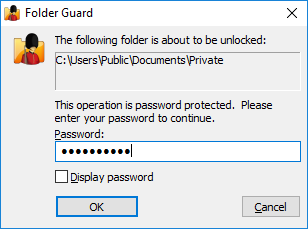
Enter the password and the folder should unlock and you can now open the files and/or subfolders it contains, as usual:
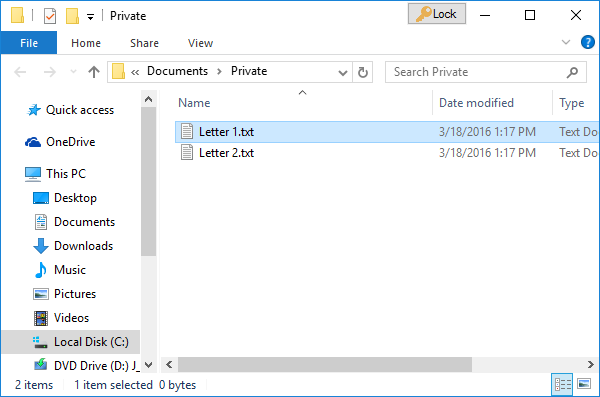
How to lock the folder back?
See the Lock button in the title bar of the Explorer window on the image above? It appears there right after you unlock the folder. If you press it, you will be asked to confirm the action:
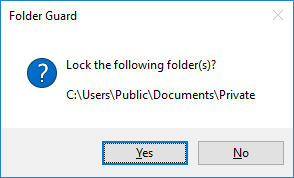
You can also close the Explorer or application window that you used to unlock the folder. If you have previously chosen the Lock the folder when the Explorer or application window is closed option on the Password properties screen for this password, then the folder would be locked immediately after the window is closed. If such option was not selected, then you would see a confirmation message shown above.
Note that the Lock button is only added to the window that you used to unlock the folder. If you open a new Explorer window and navigate to the previously unlocked folder, the Lock button will NOT appear on its title bar. In such a case, Folder Guard offers several other methods to lock the folder when you no longer need it:
- Right-click on the protected folder in an Explorer window and choose Lock from the shortcut menu. (This command is only available if you have previously chosen the option to add the Lock and Unlock commands to Windows shortcut menu.) This method works with any Explorer or Open/Save As window, in addition to the original window that you used to unlock the folder.
- Right-click on the Folder Guard notification icon and choose the Lock command from its menu: (This command is only available if you have previously chosen the option to show the notification icon of Folder Guard.)
![]()
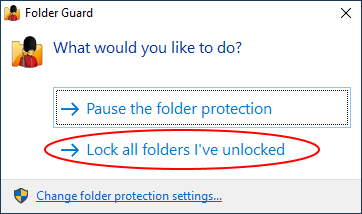
- Run Folder Guard application and press the Lock all unlocked folders button to lock all previously unlocked folders, if any:
- Run FG32.exe (or FG64.exe) with the appropriate command line option.
- If you've selected the Lock the folder when the screen is locked option on the Password properties screen for this password, then the folder would be locked automatically when the screen is locked. (Any method for locking the screen would work: you could press the Win+L keys or you could set up a screensaver to lock the screen after a timeout.)
Can I unlock the folder from other applications?
Yes, you can unlock the folder from the applications that use the standard Open and Save As windows to locate the files:
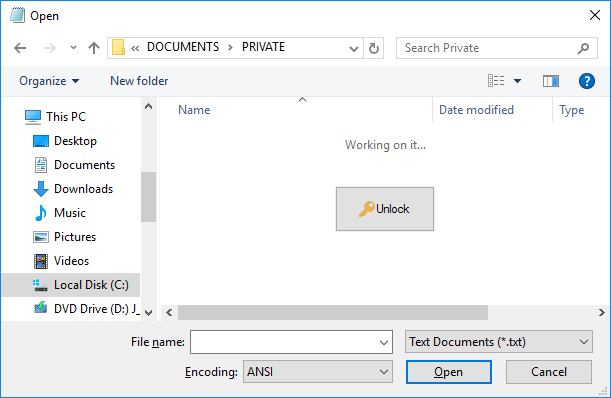
Note that the Unlock or Lock buttons may not appear if the application is started As Administrator. To unlock a folder in such a case, use the right-click (shortcut) menu for the protected folder. (This method is only available if you have previously chosen the option to add the Lock and Unlock commands to Windows shortcut menu.)
Can I add several passwords to the same folder?
Yes, each folder can have up to 4 different passwords, and each such password can have different properties. For example, one password could unlock the full access to the folder, and another password could provide only the read-only access. This way, you could give the first password to people who you trust to make changes to the files in the protected folder, and give the second password to the users who could view the files and documents there, but not save the modifications back to the protected folder.
How to remove the password from the folder?
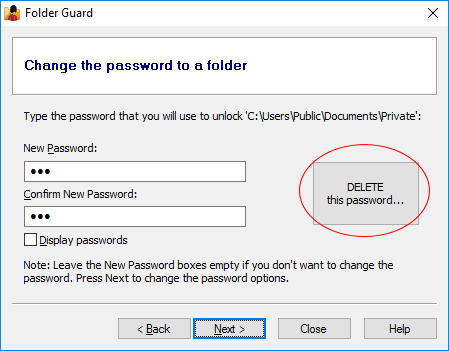
In the Folder Guard window, right-click on the folder in question and choose the Set passwords command from the context menu. Select the password you want to remove, and press Next. This should open the screen that you can use to not only change the text of the password, but also to delete that specific password:
Or, if you've decided that you no longer want the folder to be protected by Folder Guard at all, right-click on the protected folder, and choose the Remove passwords command from the context menu. This will remove all passwords from the selected folder and make it fully accessible. (Don't forget to press the Apply button on the toolbar to apply the changes.)
Can I password-protect a subfolder within a folder that already has a password ?
No, if the parent folder already has a password, its subfolders cannot have passwords, too. Likewise, you cannot create a password for the parent folder of a folder that is already password-protected, or restricted otherwise.
Can I password-protect files and programs?
No, only folders can be protected with passwords, sorry. The files and programs can still be protected with restrictions and filters, or by blocking specific programs from starting.
Does the password protection work over the network, too?
Yes, if you've selected the Any network user option for the password, then any user connecting to the shared folder via a LAN network can unlock the folder by entering that password. The locking and unlocking methods in such a situation are different, though.
Can I unlock a local password-protected folder via the Network folder?
Yes, you can. For example, if you have password-protected a local folder C:\Test, and the drive C: is shared, then you can unlock this folder by opening it on the same computer using the network path \\MYPC\C\Test (assuming the name of your computer is MYPC and the C: drive is shared using the name C). Note that this only applies to local computer, where the folder is shared from. If you want to unlock the shared folder from other computers, you need to enable the Any network user option as described above.
I've unlocked a shared folder, but other users still cannot access it, why?
When you unlock a password-protected folder, it opens access to the folder only for you, the user who actually unlocked it. Other users must enter the password themselves in order to gain access to the password-protected folder.
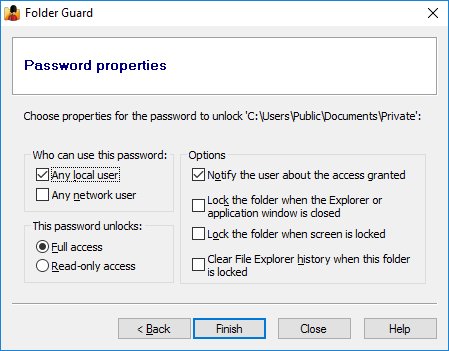
If you've protected a folder with a password, you can modify the effects of such protection by adjusting the properties of the folder password. The screen to choose such properties is displayed as one of the steps while you are creating a new password. You can also modify the properties of an existing folder password, by clicking on the link with the short description of the password in the Locked view:
You can use this screen to change the properties of a folder password:
This screen contains the following areas:
Who can use this password:
Any local user
If you check this box, then any user who logs in to this computer through the desktop would be able to unlock the folder by entering the correct password. Note that if the user logs in to the desktop using a remote access tool such as Remote Desktop, such a user is still considered a local user.
Any network user
If you check this box, then any user who connects to this computer through the Network folder would be able to unlock the folder by entering the correct password. Note that in order to be able to connect to the protected folder from another computer via the Network folder, the protected folder must be shared first (or located within a shared folder), using the standard folder sharing procedure offered by Windows. If the protected folder is not shared by Windows, then this option cannot magically enable other users to connect to the folder via the network.
Note: At least one of the above options must be selected. You can also select both boxes, if you want both the local and network users use the same password.
This password unlocks:
Full access
This option would give the user a full, unrestricted access to the folder after the user has entered the correct password.
Read-only access
If this option is selected, then the user would be able to see the contents of the folder and open the files from that folder for viewing, but saving changes back to the protected folder would be denied. Note that the Read-only access does NOT prevent other operations such as printing or copying the files to other folders; it only prevents saving modifications back to the protected folder.
Options
Notify the user about the access granted
If this option is selected, then after the user enters the correct password, Folder Guard displays a message with information that either the full or read-only access is granted to the user. The message also contains a link that the user can press to open the unlocked folder with File Explorer. If this option is not selected, then no such message is displayed after the folder is unlocked.
Lock the folder when the Explorer window is closed
If this option is selected, then when the user closes the original Explorer or application window that was used to unlock the folder, the folder would be automatically locked without asking the user to confirm. If this option is not selected, then the user would see a message asking them to select whether the folder should or should not be locked after closing the window. This option has no effect on other Explorer or application windows that were not used to unlock the folder, even if such windows currently display the protected folder. It may not have effect also on the computers where the Windows option "Launch folder windows in a separate process" is enabled. In such situations, use the notification icon to lock the folders back.
Lock the folder when the screen is locked
If this option is selected, then when the user locks the screen by, for example, pressing the Win+L keys, or when the screen is locked due to a screen saver becoming active, Folder Guard will automatically lock this folder. If this happens, then when the user unlocks the screen and logs back on to Windows they will need to unlock the folder again, to continue working with it. If this option is not selected, then the folder remains unlocked when the screen is locked.
Advanced
Press this button to open a menu to control the following advanced options:
Clear Explorer history when this folder is locked
If this option is selected, then, after locking the folder, Folder Guard will also attempt to erase the history information related to the protected folder that is kept by Windows Explorer. Note that this option does not remove all traces of the protected folder from the computer. Also, other applications may remember this folder in their own history lists.
Prompt to optimize for faster network updates
If a password has the Any network user option enabled, then in some sitiations using such a password to unlock a folder over LAN may not work properly if Windows uses network cache to display the contents of the shared folders. In such a situation, the contents of the unlocked folder may not appear immediately after unlocking it, or the contents may remain visible after locking the folder back.
If you experience such inconsistencies when unlocking or locking a password protected folder over LAN, you may want to enable the Prompt to optimize for faster network updates option to detect such conditions on the client computers and, if detected, display a message to the end user propting them to optimize the computer for faster network access:
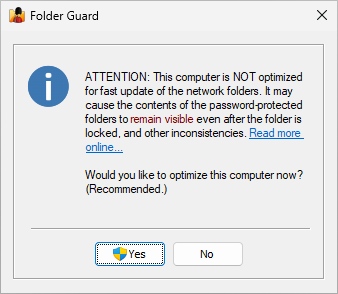
If the user selects Yes, the optimization would be performed by adding the following data to Windows Registry on the client computer: (Note that the administrator approval is required to perform the optimization.)
Key: HKEY_LOCAL_MACHINE / SYSTEM / CurrentControlSet /services / LanmanWorkstation / Parameters
Type: DWORD
Name: DirectoryCacheLifetime
Value: 0
If alerting the user and prompting to perform the optimization is not desirable, you may want to clear the option Prompt to optimize for faster network updates and use an alternative method of adding the registry data described above, such as a logon script or Group Policy.
Note: The functionality described here is only enabled for the customers who have purchased the professional or another business license for Folder Guard software. It is not available for the home, personal license customers.
To protect a shared folder with a password, first of all make sure you have installed Folder Guard on the computer where the folder is shared from. We refer to this computer as the server, to distinguish it from the clients, which are the computers accessing this shared folder over the network. (Note that the server does NOT need to run the server version of Windows; any supported version of Windows will do.)
Next, verify that the folder is shared and accessible from other computers. To share a folder, run Windows Explorer on the server, open its parent folder, right-click on the folder you want to share, and choose Share (or Share with) from the menu. Before you can share folders, you may need to adjust the security settings of your computer, such as enable Network discovery, etc. Please refer to Windows Help for more information on sharing the folders. Make sure the shared folder is accessible from other computers before continuing.
After you have shared a folder, create a subfolder that you want to password-protect with Folder Guard. (The top level shared folders cannot be password protected, due to the way folder sharing is implemented in Windows.) For example, if you have shared the folder C:\Users\Public\Documents, create a subfolder named Private under it.
To password-protect a subfolder of a shared folder, run Folder Guard on the server, and use the usual steps involved in setting up a folder password. Note that you should set up the password protection using the local path of the shared folder that starts with a drive letter, such as C:\Users\Public\Documents\Private, not a network path or a network drive that is used to access this folder over the network from other computers.
To allow the shared folder to be unlocked from other computers, check the Any network user box on the Password properties screen:
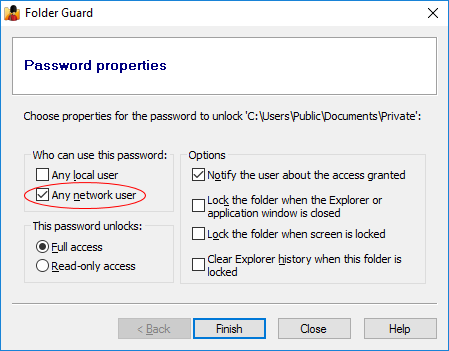
If the Any network user box is greyed out and not available for using, it means that you are running Folder Guard on one of the client computers or are not using a local path for the shared folder. Please see above for more information.
Apply the changes. Now, when a user connects to this shared folder from another computer with Explorer, they should see the following:
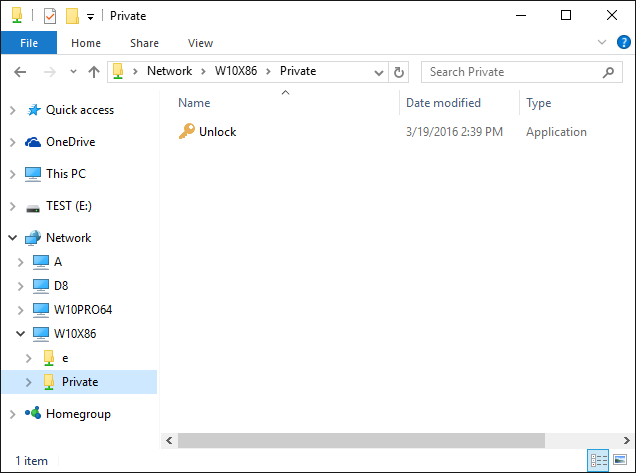
As you can see, the locked folder appears empty except for the application named Unlock. (If you see other files that are supposed to be hidden, don't panic, it just probably means that your computer is displaying the results from its file cache. Wait a few seconds and refresh the folder. If the view remains the same, you may need to optimize your computer for faster network updates, as described below.)
As the Unlock name implies, the network user can run this application to unlock the folder. To see how it works, double-click Unlock to launch it. If Windows warns about running programs from a network location, allow the program to run, and it should prompt you to enter the password:
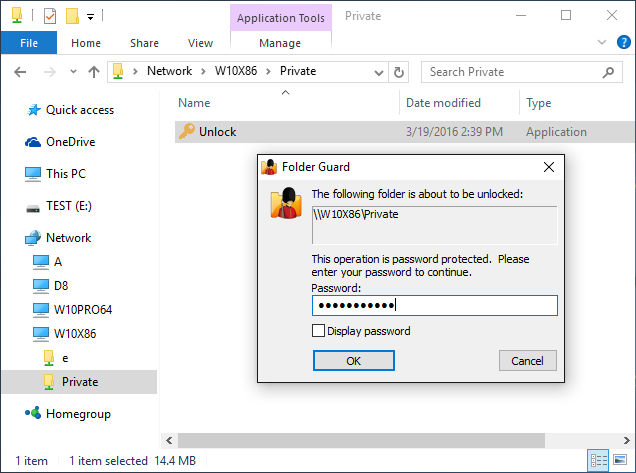
Enter the password and the folder should become unlocked. You should be able to see now the actual contents of the folder and open the files it contains:
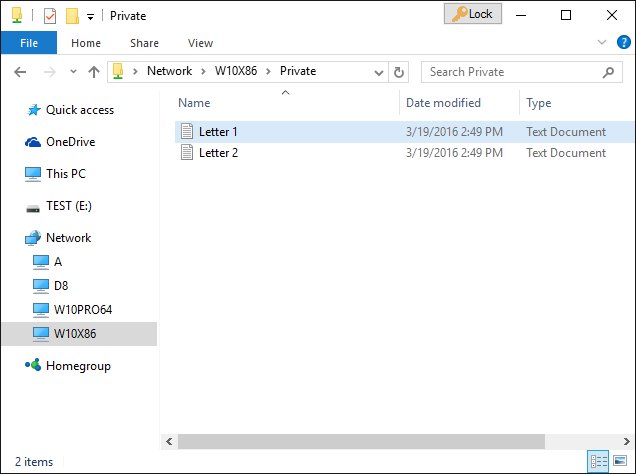
Folder unlocked but its view is not updated?
If the user does not see the contents of the folder soon after it's been unlocked, or if the contents of the folder remains visible after the user locks it back, it could be because the computer is not optimized for the fast network updates. To detect and handle such conditions, you may want to enable the option Prompt to optimize for faster network updates.
How to lock the folder back?
When unlocking a shared folder from a computer that does not have Folder Guard software installed, to lock the folder back you could use one of the following methods:
1. Use the Lock button in the title bar of the Explorer window that you used to unlock the folder. However, the Lock button may not be available in some system configurations, such as when the Windows option "Launch folder windows in a separate process" is enabled. In such situations, use the second option:
2. Right-click on the Folder Guard notification icon and choose the Lock command from its menu. (Note that after all previously unlocked folders have been locked back, the notification icon is automatically removed from the taskbar.
Can I add several passwords to the same folder?
Yes, each folder can have up to 4 different passwords, and each such password can have different properties. For example, one password could unlock the full access to the folder, and another password could provide only the read-only access. This way, you could give the first password to people who you trust to make changes to the files in the protected folder, and give the second password to the users who could view the files and documents there, but not save the modifications back to the protected folder.
How to remove the password from the folder?
In the Folder Guard window, right-click on the folder in question and choose the Set passwords command from the context menu. Select the password you want to remove, and press Next. This should open the screen that you can use to not only change the text of the password, but also to delete that specific password:
Or, if you've decided that you no longer want the folder to be protected by Folder Guard at all, right-click on the protected folder, and choose the Remove passwords command from the context menu. This will remove all passwords from the selected folder and make it fully accessible. (Don't forget to press the Apply button on the toolbar to apply the changes.)
Is it necessary to install Folder Guard on a computer in order to be able to unlock access to a password-protected shared folder on another computer?
No, it is not necessary. If a computer does not have Folder Guard software installed, a user of such a computer can unlock a shared folder by running the Unlock utility directly from the shared folder, as described above.
Can a shared folder be unlocked from a computer that does not run Windows?
No, only computers that run a supported version of Windows can unlock the password-protected shared folders. If a computer has a different OS, such as Linux or OS X, such computer cannot run the Unlock utility (which is a Windows-only program) and therefore it would not be possible to unlock the password-protected folder from such a computer.
After unlocking a shared folder, an error message is still shown?
If the shared folder is unlocked as described above from a workstation using a mapped drive letter, but an error message such as Location not found or Access denied is displayed when accessing the folder, the following procedure could correct the situation:
1. Assuming the mapped drive letter is K:, use Registry Editor to open the key HKEY_CURRENT_USER\Network and delete the subkey for the mapped drive letter (K in this example).
2. Use Registry Editor to open the key HKEY_CURRENT_USER\Software\Microsoft\Windows\CurrentVersion\Explorer\Map Network Drive MRU and delete the entry for the mapped drive letter (K in this example).
3. Use File Explorer to map the shared folder path to the drive letter (K:) again.
Folder Guard has the ability to protect access not only to local folders, but also to the network folders, shared from other computers on the LAN. It can protect both the mapped network drives (accessible via the This PC or Computer folder) and the network folders that have no drive letters (accessible via the Network folder).
Keep in mind, however, that such protection works only on the computer where Folder Guard is installed and enabled. For example, if you install Folder Guard on the computer A and configure it to protect access to a shared folder located on the computer B, then such protection will be in effect only when the computer A is connecting to the computer B. If another computer C is connecting to the same shared folder on the computer B, such connection will not be restricted by Folder Guard (unless it is installed and enabled on the computer C, too.) If you require the shared folder on the computer B to be protected from any computer connecting to it over the network, then you need to install Folder Guard on the computer B itself and set up the protection of the shared folder on that computer.)
The easiest way to restrict access to a network folder is to use the Protect with Wizard command on the Protect menu. When the Wizard starts, use the Browse for folder button to navigate to the network folder that you want to protect:
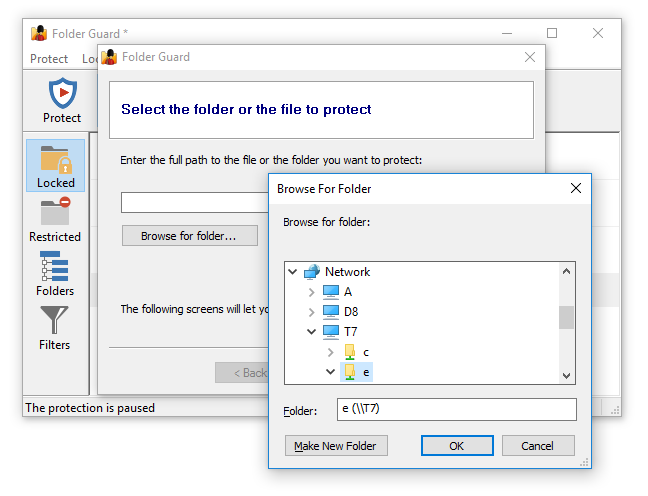
You can select a folder to protect through the Network folder, or, if you have previously created a mapped network drive for it, you can enter that network drive, too. In the latter case, Folder Guard will resolve the mapped network drive to the target network folder and use it to set up the protection. Note that the mapped network drive may not be visible to Folder Guard because it is run as Administrator. This is due to the security feature ![]() of Windows; if you don't see the mapped network drive while browsing folders, use the Network folder instead to select a folder to protect.
of Windows; if you don't see the mapped network drive while browsing folders, use the Network folder instead to select a folder to protect.
After you've selected a network folder, proceed as usual: you can choose to protect it with a password, or with the access and visibility restrictions.
If for some reason you don't want to use the Wizard to set up the protection of a network folder, you could use another method: first, switch to the Folders view of Folder Guard, and use the Add network location command on the View menu to locate the network folder you want to protect and add that folder to the folder tree of Folder Guard:
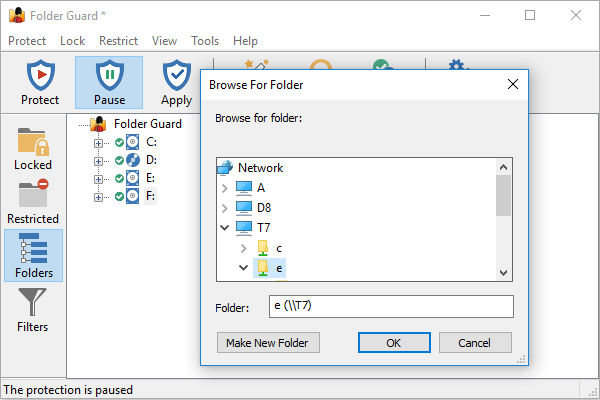
After you have added the network location in this way, it will appear in the folder tree of Folder Guard, after the local drives:
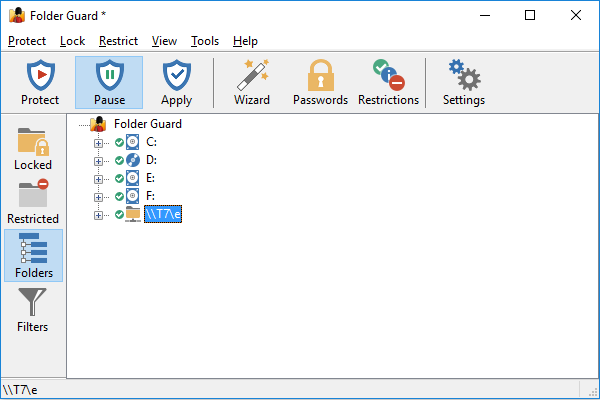
Now you can expand the network location, select the folder you want to protect and use the right-click menu to set up the restrictions, or a password, just like with a local folder.
How to remove a network location?
If you no longer want a network location to appear in Folder Guard, you can select it in the folder tree, and then use the View - Remove network location command to remove it. Note that this will also remove any passwords or restrictions that you might have previously set up for the folders at that location.
You can use Folder Guard to protect folders on the removable drives. However, keep in mind that such protection would work only while the removable drive is attached to your computer, where Folder Guard software is installed and enabled. If you disconnect the removable drive and connect it to another computer (without Folder Guard software on it), the removable drive will NOT be protected. This is how Folder Guard works: it protects access to your folders dynamically, without modifying the folders or files.
If you require the removable drive to be protected on other computers as well, you need to use an encryption program, such as our software USBCrypt. Please visit the following web page for more information:
https://www.winability.com/usbcrypt/ ![]()
Remember also that even the main hard drive of your computer, C:, that is usually not considered removable, can still be physically removed from your computer if the attacker has a physical access to it. The attacker could then attach your hard drive to another computer as an external drive, and read information from your C: drive without any restrictions. If you are concerned about such a possibility, then again, you should use encryption software to protect your sensitive files. (Remember, that Folder Guard does NOT encrypt your files or folders.)
If, however, the physical removal of the drives is not of concern in your situation, you can use Folder Guard to protect the removable drives in the same way as the other drives, using the same methods as described elsewhere in this Guide.
In addition to protecting folders with passwords, Folder Guard also allows you to hide folders and/or restrict access to them without creating individual passwords for each such folder. You can choose to hide a folder completely, or make it appear empty. You can also make a folder completely inaccessible, preventing someone from opening it, or make it read-only, that would allow the user to open and view the files within the folder, but prevent saving modifications back to the protected folder. Both folders and files can be protected with restrictions.
To set up such restrictions for a folder, switch to the Restricted view of Folder Guard and click the Restrict a file or a folder link:
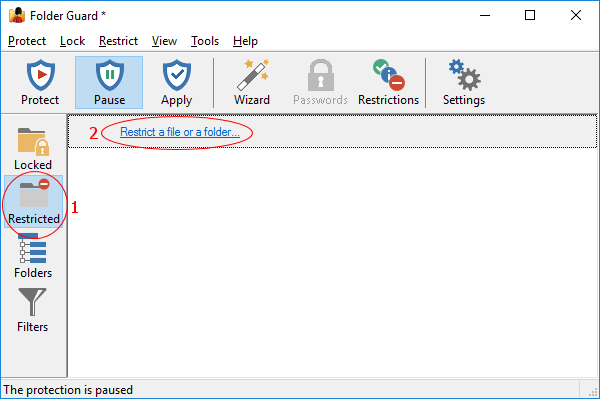
Press Next, and use the Browse for folder or Browse for file buttons to select a file or a folder that you want to restrict:
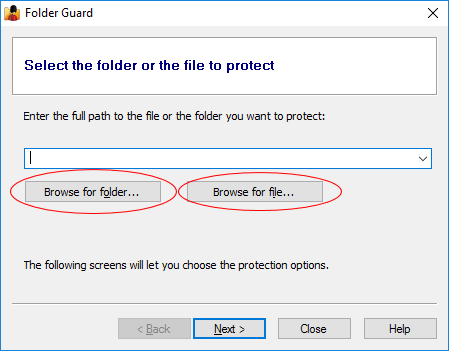
After selecting a folder or a file, press Next again, and you should be able to select the desired visibility attribute for it:
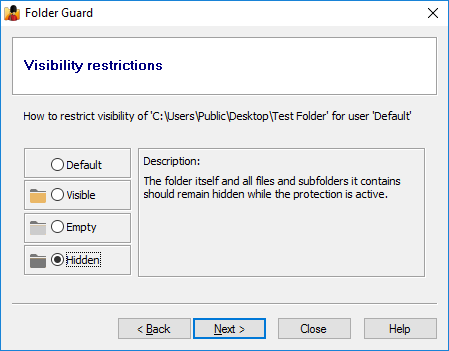
Visibility attributes:
 Hidden
- If assigned to a file or a folder, this attribute unconditionally hides the file or the folder itself (and all files and subfolders the folder may contain).
 Empty
Empty
- If assigned to a folder, this attribute leaves the folder itself to be visible in an Explorer window, but hides all files and subfolders contained therein, unless you have explicitly set a file or a subfolder of this folder to be visible. (This attribute cannot be assigned to a file.)
 Visible
- If assigned to a file or a folder, this attribute makes the file, or all files and subfolders contained in the folder, as well as the folder itself, to be visible in an Explorer window, as if Folder Guard were not present in the system.
In addition to the hidden attribute, it's also a good idea to protect the folder with the no access attribute as well, to make other users unable to open files from that folder even if they cannot see them (such as through the previously created shortcuts, for example). To do that, press Next, and select the No access option:
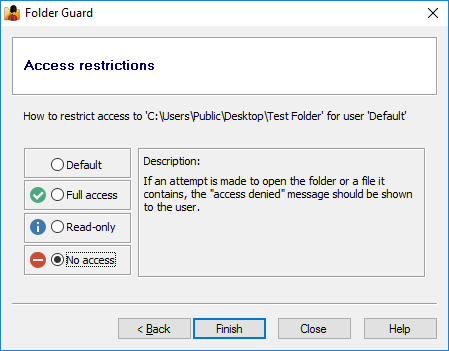
Access attributes:
 No Access
- If assigned to a file, this attribute prevents opening the file, (or running the file, if it is a program). If assigned to a folder, it prevents opening the files this folder or any of its subfolders contain, unless you have allowed access to the specific files or subfolders, by assigning different access attributes to them. This attribute also prevents saving any modifications to the file(s) into the same folder, creating, deleting, or renaming files or subfolders.
 Read-only
- If assigned to a file or a folder, this attribute allows opening the file, or files in the folder, so that the contents of the file(s) may be viewed by the user, but prevents saving any modifications to the file(s) into the same folder. It also prevents creating, deleting, or renaming files or subfolders. If assigned to a folder, this attribute applies to all files and subfolders under that folder, unless you have assigned different attributes to specific files and/or subfolders of that folder.
 Full access
- If assigned to a file, this attribute allows full access to it. If assigned to a folder, it allows for full, unrestricted access to the folder itself, as well as to the files and subfolders it may contain, unless specific files or subfolders have been restricted by you with their own access attributes. All operations, such as opening and saving files, renaming or deleting them, modifying their properties, etc., are permitted, as if Folder Guard were not present in the system.
To see the restrictions in action, resume the protection (or Apply the changes), and the folder you've made hidden should become invisible to Windows Explorer, Windows applications, MS-DOS programs, and the command prompt. All files and subfolders that might be located in that folder will be hidden, too, until you pause the protection.
If you did not select to hide the folder, but only selected the no access option, then the folder would be visible, but an attempt to open it would result in the Access denied or a similar message displayed by Windows. To allow access to such a folder, pause the protection. When done, resume the protection to make the folder inaccessible again.
The "default" attributes:
If you have not applied any restricting attributes to a folder, such a folder is considered to have the default attributes. (That's what most folders have initially, before you start setting up the protection.) The visibility of (and access to) such a folder is determined by the attributes of its parent folder: if the parent folder is restricted, its files and subfolders become restricted, as well, unless you have assigned different attributes to the files or subfolders, which would override the attributes inherited from the parent folder.
Note that each folder can have different attributes for different users of your computer, so that the folder would be protected differently for each user.
An alternative method of setting up the restrictions
If you don't want to use the Wizard as described above, you can also set up the restrictions using the Folders view of the Folder Guard application. In that view, navigate to the folder you want to restrict, and then use the commands on the right-click menu:
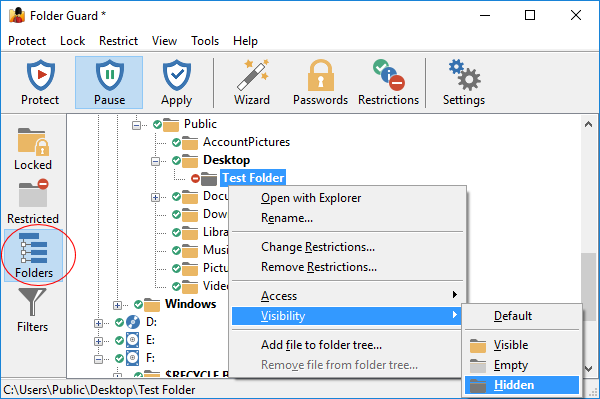
If you want to restrict a file this way, you need to use the Add file to folder tree command first, to make the file appear in the folder tree, and then use the right-click menu for the file, just as you would for the folder.
If you want to restrict a file or a folder on another computer on the same network, use the View - Add network location command first, to make the network location appear in the folder tree, then navigate to it and set up the restrictions just as you would for the local files and folders.
How do I make a hidden folder visible?
So you've hidden a folder from other users, or restricted it in some other way, but now you want to use that folder yourself, without restrictions. Unlike the password-protected folders, you cannot temporarily unrestrict the individual files or folders, but you can pause all protection instead. To do that, you don't need to run the main program of Folder Guard every time you want to pause or resume the protection. Some of the quicker ways of doing that are:
1. Run Folder Guard from Start menu or from Desktop, and it should prompt you to pause or resume the protection:
2. Right-click on the notification icon of Folder Guard and use the commands on its shortcut menu:
![]()
(If you don't see this icon, it means that you have either disabled the Show the notification icon option, or that your Windows taskbar is configured not to show all notification icons.)
3. If you have set up a hot key of Folder Guard, you could press it to quickly display the prompt to pause or resume the protection, too.
When the folder becomes visible, you can open the files it contains, and work with them as usual. When done, use the same commands described above to Resume the protection, and the folder will become hidden again, until next time you need to see it.
Of course, if you want to make the folder visible permanently, and not hide it with Folder Guard anymore, you can do so by removing restrictions from the folder using the main Folder Guard application.
Can I restrict a folder that does not exist yet?
Yes, you can use Folder Guard to hide or restrict access to such ghost folders (and/or files).
With Folder Guard, you can restrict access to (and visibility of) not only folders, but also of individual files and programs. While you can't protect them with passwords, you still can hide them, or make them inaccessible, by setting the appropriate restrictions just as you would for the folders.
For example, suppose you want to protect access to Registry Editor, a powerful Windows tool that can be used to change many internal settings of Windows and applications, but can also create a big disaster if used improperly. You probably don't want other users to be able to use it without your permission. To begin, start the Wizard of Folder Guard, just like when you were protecting folders, but this time use the Browse for file button to select the file you want to protect. In case of Registry Editor, its file name is regedit.exe, and it is located in the C:\Windows folder:
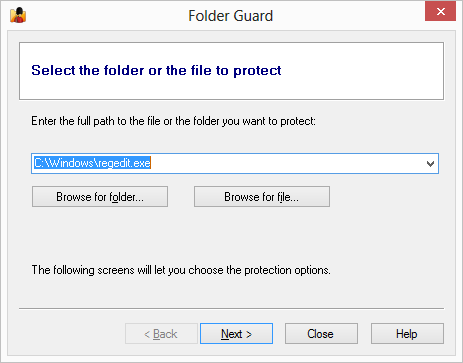
Press Next on the following page, and then leave the default visibility attribute selected, which would not affect the visibility of the file regedit.exe (and leave it visible, as before). On the last page, however, select the No access attribute to apply to this file:
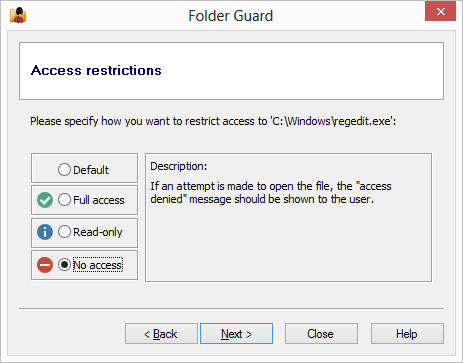
Now resume the protection, and try to run Registry Editor. Instead of allowing to opening, Windows should display a message similar to the following:
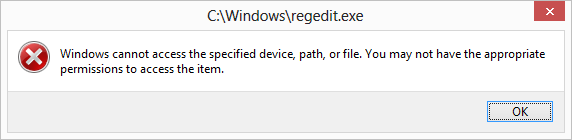
What if you yourself want to use Registry Editor? Just run Folder Guard and pause the protection! When you are done using Registry Editor, resume the protection again. Yes, it's that easy.
When protecting programs, be careful not to protect access to some system file used by Windows, because doing so may cause Windows not to work properly. For example, do not restrict access to the file explorer.exe, because this file is used by Windows not only to browse your computer, but also to display your desktop! If you don't want users to browse certain folders, protect the folders themselves, rather than Windows Explorer.
Keep in mind that if you want to restrict access to a program or a file that you usually open via a shortcut, then you should protect the target file, not the shortcut. If you only restrict access to the shortcut, then users would still be able to open the file or run a program directly, bypassing the shortcut.
Folder Guard can not only protect access to folders or files, but also prevent specific programs from starting. You may want to use this capability to, for example, protect system tools, such as Registry Editor ![]() , from being used by unauthorized users.
, from being used by unauthorized users.
To control the programs that you want to be restricted from starting by Folder Guard, use the Blocked view of Folder Guard:
Each item of the Blocked list contains a description of the program and the path to the program's executable. The path could be a specific path to the program EXE file, or a mask containing the star characters (*). Only the path of the item is used by Folder Guard when determining whether the program should be blocked from starting; the description is only used as a visual aid to help you manage the list of items.
In front to each item there is a check mark that controls whether the item should actually be blocked: only the items which are checked will be blocked; if the check mark is cleared, such an item will NOT be blocked by Folder Guard.
Note: only the programs running locally on the same computer where Folder Guard is operating can be blocked. If a program is running on another computer and accessing this computer over the network, such a program cannot be blocked.
When you first install Folder Guard, it creates a list of common system tools that you may want to block. However, no program in that list is initially blocked: all items have their check marks cleared initially. If you want an item to be blocked, check the box in front of it.
If you have selected an item to be blocked by Folder Guard, then such a program will be prevented from starting while the protection of Folder Guard is active. If you need to run a blocked program by yourself, pause the protection by entering the Master Password, and that would make any blocked program able to start, as usual. After the program has started, you may want to resume the protection, and that would also resume the protection of the blocked programs. Note that if a blocked program has already started while the protection was paused, that program will continue to run even after the protection is resumed. Only if the program is closed and then attempted to start again it would be blocked from starting.
Note that the Blocked list does not appy to the trusted users: a trusted user is not restricted from running programs, even the blocked ones.
How to add (or remove) programs to the Blocked list?
You can control the Blocked list by right-clicking on the items of the list and using the menu displayed. Or, use the Blocked menu on the top menu bar that appears when you switch to the Blocked view. You can use the commands on the menu to modify the existing items, add new ones, or remove the items from the list. You can also use the Reset the list command to restore the list how it was when you first installed Folder Guard, removing any changes you might have made to the list.
Which programs should or should not be "blocked"?
You may wish to review the Blocked list, created by Folder Guard when you've first installed it, for some common system tools that you might consider blocking. For example, Registry Editor ![]() is a powerful tool that can be used to tweak many system settings. However, in the hands of an ignorant or a malicious user it can be used to damage your system, so it's a good candidate for blocking. Do your own research of the tools offered to decide whether you want to use Folder Guard to block them.
is a powerful tool that can be used to tweak many system settings. However, in the hands of an ignorant or a malicious user it can be used to damage your system, so it's a good candidate for blocking. Do your own research of the tools offered to decide whether you want to use Folder Guard to block them.
One system program that needs a special mention is Consent UI for administrative applications with the path C:\Windows\System32\consent.exe. This program is used by Windows any time another program needs to run As Administrator, and it is responsible for displaying the elevation prompt asking you to confirm that it's OK to launch a program with the administrator privileges. If you block this program (consent.exe) with Folder Guard, (and also select the option Block programs for trusted users, because this program is executed in the context of the SYSTEM user, which is usually trusted), it would essentially prevent other users of your computer to run programs as administrator. When you yourself need to run a program as administrator, you would simply pause the protection of Folder Guard.
Another set of tools that you might consider blocking are the data recovery or system monitoring tools (such as PC Hunter or Disk Genius) that use the low-level methods of analyzing the storage of your computer and thus might be able to bypass the protection of folders performed by Folder Guard. If you have such tools installed on your computer, you may want to block them with Folder Guard, to prevent their use while the protection is in effect.
Keep in mind that if you block some of the system tools, it may prevent Windows from working properly. For example, do NOT block Windows File Explorer, because it is used not only to browse the folders of your computer, but also to display the Desktop. If you block Explorer, you may not be able to use your computer! Always make sure you have a good backup of your system and of all important files before experimenting with blocking system tools.
Usually you use Folder Guard to set up restrictions for the folders or files that already exist on the computer. However, what if you want to set up the restrictions in advance, for the folders or files that do not exist yet, but may come into existence in the future? Folder Guard can be used to restrict such ghost objects, too.
For example, suppose you don't want anyone to use File Explorer to create new folders in the root folder of the E: drive. To achieve that, use the same procedure as to restrict an existing folder. In this case, however, you cannot use the Browse for folder button because the folder you want to restrict access to does not exist yet. Instead, enter the path to the non-existent folder directly, which is E:\New folder in this example. When you press Next, Folder Guard would detect that the folder does not exist and ask you to confirm that you still want to add it to the restricted items:
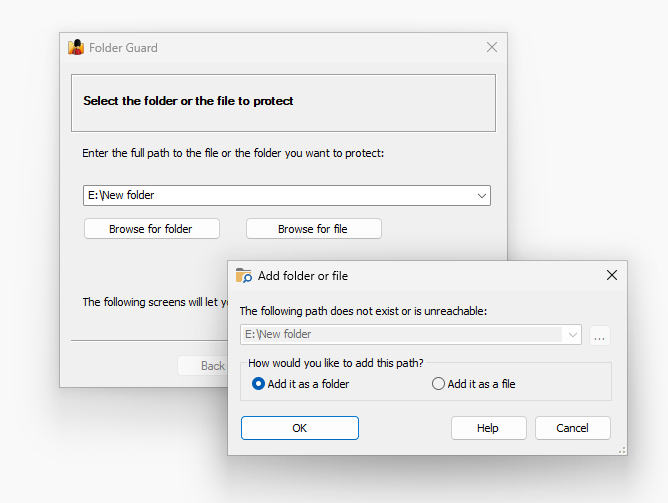
Select Add it as a folder if you want the restictions of this item to apply to any object, be it a folder or a file, with a matching path. If, however, you want to restrictions to apply to files only, select the Add it as a file option.
Continue the Wizard as before, and select the desired restrictions, which in our example should be Visibility: Default, Access: No Access. Apply the changes to the setting, resume the protection, if needed, and try to use the New - Folder command of File Explorer for the drive E:, you should get the access denied message and the folder would not be created.
(Of course, keep in mind that it would still be possible to create new folders with names other than New folder, using tools other than File Explorer. If you want to stop people from creating any new folder, you would need to create an appropriate filter for that specific purpose.)
When specifying the path of the ghost folder to restrict, in addition to the exact path that would apply to a single object, you can also use a simple mask, that is a path that ends with the star character (*). The star character in such a case serves as a placeholder for any number of arbitrary characters (including no characters at all). Such a restriction would apply to any file or folder with its path starting with the text preceding the star character. For example, to continue the example above, you can specify the path of the ghost folder as E:\New folder*
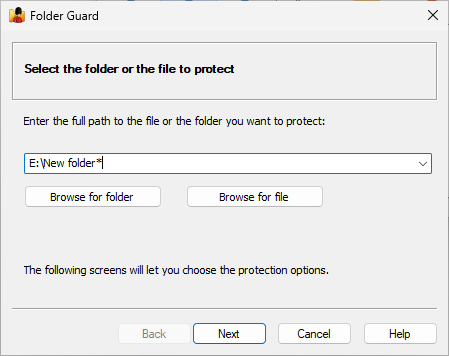
The restrictions you would set up for such an item would apply to any of the following folders:
E:\New folder
E:\New folder1
E:\New folder2
E:\New folder12
E:\New folder 1
E:\New folderA
E:\New folderAbc
...and so on.
On the other hand, the restrictions would NOT apply to any of the following folders:
C:\New folder
E:\New folde
...and so on
Note that to restrict a group of ghost files or folders in this way, you can use the star character only at the end of the path, or at the end of the path components. For example, you could use the folllowing simple mask:
E:\Test*\Another Test*
Such a mask would apply to the folders like:
E:\Test\Another Test
E:\Test1\Another Test2
E:\Test12\Another Test34
and so on. However, the following masks are invalid and cannot be used, because the star characters are not at the end of the path components:
E:\Te*st\Another Test* - INVALID
E:\*Test\Another Test* - INVALID
E:\Test*\*Another Test - INVALID
If you need to restrict items using a more complex mask, you could probably achieve that by creating an appropriate filter.
When a ghost folder is added to the Restricted view, its icon gets a red bookmark, to distinguish it from the existing folders:
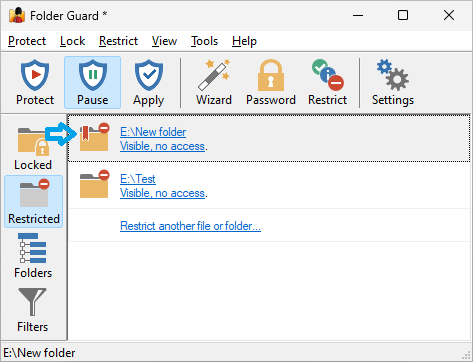
To manage or change a ghost folder, switch to the Folders view, and right-click on the ghost folder. Using the commands on the right-click menu, you should be able to edit it, change its path or restrictions, or remove it from the folder tree when it's no longer needed. Also, if the ghost folder currrently exists on the computer, you have the option to de-ghost it, that is to make Folder Guard treat it as a regular folder.
Note: The functionality described here is only enabled for the customers who have purchased the professional or another business license for Folder Guard software. It is not available for the home, personal license customers.
Folder Guard offers you an option to create temporary passwords that can only be used before the expiration time of your choosing. When enabled, a temporary password may be used in place of a regular password to pause the protection, or to unlock a password-protected folder (local folders only!) You can generate an unlimited number of temporary passwords. For each temporary password, you can specify its expiration date and time. You can also specify whether the temporary password should unlock the full or read-only access to a password protected folder.
IMPORTANT: The temporary passwords of Folder Guard are less secure than the regular passwords. Firstly, the temporary passwords described here are used as they are, in their plain text form, which makes them subseptible to interception by an adversary. In contrast, the regular passwords are not stored by Folder Guard in their plain text form: they are stored either encrypted, or as the hash values, which makes it impossible to obtain the original texts of the regular passwords.
Secondly, a determined aversary could potentially reverse engineer the program code of Folder Guard that is used to handle the temporary passwords, and produce its own program code to generate temporary passwords with expiration dates in the future.
For these reasons, the temporary passwords are disabled by default and are not used or accepted by Folder Guard. If you understand the risks involved in using the temporary passwords and still want to use them, first you must enable the appropriate option on the Options screen of Folder Guard.
To create a temporary password to be used to pause the protection or to unlock any local password-protected folder, run Folder Guard application and choose the Generate temporary password command from the Tools menu:
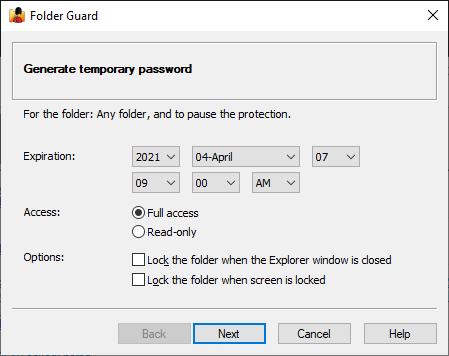
If you want to create a temporary password that could be used to unlock only one specific password-protected folder, select that folder in the Locked screen of Folder Guard application, right-click on that folder and choose Generate temporary password from the right-click menu. The temporary password generated in such a way can only be used to unlock that specific folder; in cannot be used to unlock any other folder or to pause the protection.
Use the Generate temporary password screen to specify the desired expiration date and time for the temporary password. The password generated in this way can only be used before the expiration date and time you select on this screen. When a temporary password was used to pause the protection, and the expiration time is reached after that, the protection is resumed automatically at that time. If the temporary password was used to unlock a folder (rather than to pause the protection), then when the expiration time is reached, only that specific folder is locked automatically; no other folders are affected. Note that you may need to refresh the file listings (by pressing F5 within File Explorer) to see the updated state of the locked folders.
You can also use this screen to specify the access level the temporary password should grant (full access or read-only) when it is used to unlock a folder. (The Access level has no offect when the temporary password is used to pause the protection, it is only used when the password is used to unlock a folder.) You can also change options which control the automatic locking of the folder after it's been unlocked with this specific temporary password. These options have the same effect as the ones offered for the regular folder passwords.
Finally, press Next to display the generated temporary password:
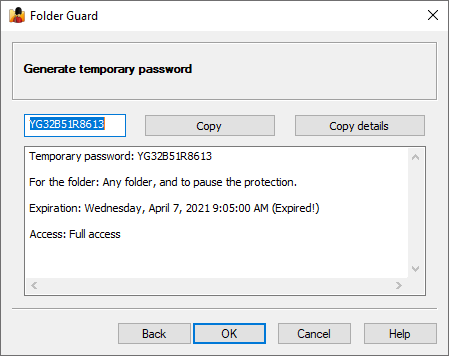
You can use the Copy button to copy the generated password to Windows Clipboard (or use the usual Ctrl+C keys to achieve the same effect.) You can also press the Copy details button to quickly copy the more detailed information displayed in the text box below. Then you should be able to paste the copied information into a document intended for the receipient of the temporary password.
You can check the expiration time and other properties of a temporary pasword by using the Verify temporary password on the Tools menu:
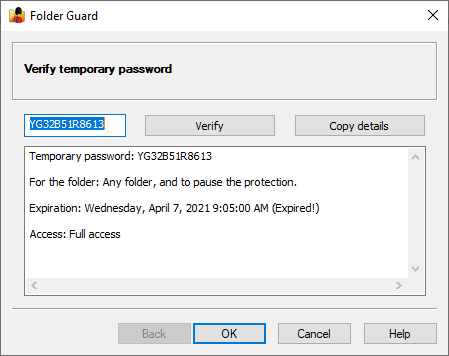
Can a temporary password be used to access the Folder Guard application?
No, a temporary password can only be used to pause the protection or to unlock a folder. To run the Folder Guard application and change the protection settings, or to uninstall Folder Guard, the regular Master password must be entered.
Can a temporary password be used to unlock a shared folder over the network?
No, the temporary passwords can only be used to pause the protection, or to unlock folders locally, on the same computer when the locked folders are located. A temporary password cannot unlock a shared folder located on another computer on the network.
Can a temporary password be revoked after it's been given to someone?
You cannot revoke a specific temporary password, but you can revoke all previously issued temporary passwords at once, by changing the temporary passwords key (see below). Another possibility is to disable the use of the temporary passwords by clearing the Allow temporary passwords option. While this option is cleared, Folder Guard will not accept any temporary password regardless of its expiration date. If you enable this option back, Folder Guard will start accepting the temporary passwords again.
What is the temporary passwords key and how to handle it?
The temporary passwords key is an arbitrary number that affects the generation and acceptance of the temporary passwords. This number is selected in a pseudo-random manner when you install Folder Guard, so each computer would have a different temporary passwords key. Only temporary passwords generated with a specific temporary passwords key can be accepted on the computer while that specifc temporary passwords key is in effect on that computer. (This prevents someone from generating a temporary password on a different computer with a different temporary passwords key from using such a temporary password on your computer.)
You can view or change the temporary passwords key using the Options screen of Folder Guard: click on the Key link next to the Allow temporary passwords option. Note that if you cange the temporary passwords key to a different value, it will invalidate any previously generated temporary password. If you need a temporary password to be accepoted again, you would need to generate it again, while the new temporary passwords key is in effect.
You should keep the temporary passwords key secret, because if an adversary learns its value, they could use it on another computer to generate temporary passwords to be used on your computer.
Finally, keep in mind that if you perform a clean reinstall of Folder Guard software, it may 'forget' the previously used value of the temporary passwords key and create a new value for it. As mentioned above, this would invalidate all peviously issued temporary passwords. If you want the temporary passwords to remain valid in such a case, write down the previous value of the temporary passwords key, and then enter that value after reinstalling Folder Guard.
Note: The functionality described here is only enabled for the customers who have purchased the professional or another business license for Folder Guard software. It is not available for the home, personal license customers.
Folder Guard lets you control access not only to individual files and/or folders, but also to the whole classes of files. For example, if you need to set up some general access rights to the Excel files, you can use Folder Guard to create a filter that would apply to the Excel files only (that, to the files with the extensions .xls and .xlsx ), and then assign the desired access attribute to such a filter, that would make the attribute to apply to any Excel file, no matter where it is located.
Let us explain in more detail. A filter is a set of rules that defines which files it applies to, according to the names of the files, the folders they are located in, and programs that are accessing the files. You may define several different filters, or have no filters at all, depending on how exactly you want your computer to be protected. Each filter can have an access attribute, such as no access, read-only, or full access applied to it.
After you have set up the filters and enabled the protection, Folder Guard begins to monitor how different programs are accessing the files on your computer. Whenever a program attempts to access a file, Folder Guard uses the list of filters you've set up to determine whether the file name, the path of the folder where the file is located, and the path of the program that is accessing the file match any of the filters. If Folder Guard finds such a filter, it uses its attribute (full access, read-only, or no access) to allow or deny access to the file.
IMPORTANT: the filters may override other restrictions you might have set up with Folder Guard. For example, if you password-protected a folder on a drive that's restricted with a filter, you may not be able to unlock such a folder with a password the usual way, because the filter prevents access to the whole drive. Or, if a folder is restricted with the no access attribute, but a filter with the read-only attribute applies to a file in that folder, then the read-only access would be effective for that particular file. This may create the impression that the restrictions or the password-protection of Folder Guard does not work properly, while in fact it is the filters that interfere with other restrictions. To troubleshoot such problems try to temporarily disable the filters (by setting their Access attribute to Default) and see if that enables other restrictions to work properly.
Folder Guard comes with a pre-loaded set of filters (discussed below). To see the currently defined filters, use the command View - Filters (or press the Filters button in the left-hand View bar):
You can create new filters or modify the existing ones using the commands on the Filter menu. (This menu appears on the menu bar only when the filter view is active). In complex situations, such as when several different programs need to be restricted or allowed access to specific file types, you may find the option to produce a file system event log useful for troubleshooting.
Note that only the access attributes may be applied to the filters; the visibility restrictions cannot be applied to the filters.
How Folder Guard applies the filters
Whenever a program attempts to access a file, Folder Guard takes a note of the following information:
- The name of the file or the subfolder being accessed;
- The full path to the folder where the file or subfolder in question is located;
- The full path to the program that is accessing the file.
Folder Guard then scans the list of filters, in the order they are listed in the Folder Guard window, and attempts to match the noted information with each filter that has a non-default access attribute for the user currently logged on to the computer. The match occurs if all of the following conditions are met:
- The name of the file being accessed matches the mask of the Apply to files field of the filter, but does not match the Except for files field, OR The name of the subfolder being accessed matches the mask of the Apply to subfolders field of the filter, but does not match the Except for subfolders field, AND
- The name of the folder where the file or subfolder is located matches the specification of the Apply to locations field of the filter, but does not match the Except for locations field, AND
- The path to the program accessing the file matches the specification of the Apply to programs field of the filter, but does not match the Except for programs field.
If all three conditions above are met, Folder Guard uses the access attribute assigned to the filter to allow or deny access to the file. If even one condition listed above is not met, Folder Guard skips the filter and continues to search for the matching filter until the end of the list is reached. If no matching filter is found, Folder Guard checks whether you have restricted the file in some other way, using the Restricted or Folders views or Folder Guard.
Note: The Trusted Programs list has a higher priority than the list of the filters. That is, a trusted program can access all files unconditionally, even if you have set up a filter that restricts access to certain files for that program.
Remarks
All masks are case-insensitive. For example, *.exe, *.Exe, and *.EXE all have the same effect. When describing the masks of the filters, the following terms are used:
|
Examples of masks for the Apply to/Except for files boxes
|
If a mask must include spaces, it should be enclosed in double quotes. For example, to specify all files that begin with white paper, use the mask "white paper*", including the quotes.
Several masks may be separated with spaces, semicolons (;), or commas (,). For example:
*.txt;"white paper*";*.EXE,*.doc
Any file that has the file name extension txt, or exe, or doc, or if its file name begins with white paper, would have matched such a composite mask.
Examples of masks for the Apply to/Except for locations boxes
|
If a mask must include spaces, it should be enclosed in double quotes. For example, to specify all files that reside in subfolders of C:\Program Files, use the mask "C:\Program Files\*", including the quotes.
Note that some applications and Windows components use the short (a.k.a. MS-DOS-style) names for the folders. (For example, C:\PROGRA~1 refers to the same folder as C:\Program Files.) To protect access from such applications, add a mask to match the short name of the folder as well (for example, C:\PROGRA~1\* ).
Several masks may be separated with line breaks, spaces, semicolons (;), or commas (,). For example:
"C:\Program Files\*", C:\PROGRA~1\*, C:\Windows*
Examples of masks for the Apply to/Except for programs boxes
|
Sample filters
Folder Guard comes with several pre-configured filters, some of which are discussed below. You can use them as they are, or modify them to better suit your needs, delete them or create the new ones. If you don't want the filters to be used, you can reset their attributes with the Attributes - Reset command.
Example 1: Lock applications.
This filter applies to the common executable and script files located in any folder other than the Windows folder (which is usually C:\Windows), or the Program Files folder (which is usually C:\Program Files), or the folder where Folder Guard is installed (to allow you access to Folder Guard!). Any subfolder is excluded from this filter.
You may find this filter useful if you don't want the users of the computer to run arbitrary programs (for example, by downloading them from the Internet or by running them from the removable drives).
If you enable this filter (by assigning the No access attribute to it), it would prevent running any program unless it's a built-in Windows program or a program you have installed in the default location (C:\Program Files). An attempt to run an executable file or a script would result in the Access Denied message.
The users would still be able to download other files or use the removable drives to copy other types of files and documents, because this filter would not apply to such files.
Note that some programs get installed in folders other than C:\Windows or C:\Program Files. If you have such programs, you need to add their folders to the [Except for Folders] list as well. Also note that the list of the executable and script file extensions is not complete: your computer may have other file extensions designated for use as the scripts; if so you need to add them to the Apply to files list.
Keep in mind that such protection is not attack-proof: someone could attach the removable disk to another (unprotected) computer and rename the executable file so that it would have an extension not on the restricted extensions list. The attacker could then attach the disk to the protected computer, copy the file to the C:\Windows folder, and then rename it back. After that, the file would no longer be restricted from executing. If you want to be protected from such an attack, you may want to completely restrict access to the external drives, using another filter described below.
Example 2: Run only allowed applications.
Suppose you don't want other users to run any programs other than MS Word and Excel. You could use the Run only allowed applications filter that would apply to all program files (that is the files with extensions .exe, .com, and .bat), but not to the files winword.exe (MS Word) and excel.exe (MS Excel). Also, this filter would not apply to the files located in the folders that begin with C:\Windows (since these folders contain system files, which should always be accessible in order for Windows to work properly). The programs located in the folder "C:\Program Files\Folder Guard" would also be exempt from this filter, since you want to be able to run Folder Guard files to change or disable the protection as needed.
Now, if you assign the no access attribute to this filter for a particular user, that user would not be able to run any programs other than MS Word and Excel, and the programs located in the Windows folder, or its subfolders.
Example 3: Lock MP3 files.
This filter applies to the MP3 files (*.mp3) located on any drive other than the main one (C:).
You may find this filter useful if you want the users of the computer to play the MP3 files it contains, but not to copy the MP3 files to the removable drives.
If you enable this filter by assigning the No access attribute to it, it would prevent opening or saving an MP3 file to any drive other than C:. At the same time, it would not restrict the MP3 files already located on the C: drive and allow the users to listen to them, modify their properties, etc. If someone were to attach a removable drive to computer, s/he would not be able to copy the MP3 files from the C: drive to the removable drive. (Copying the MP3 files from the removable drives would be restricted, too.)
Note that this filter does not affect files other than MP3: the users would be able to freely copy them to and from the removable drives, as usual.
What if at some point you need to copy some MP3 files to an external drive (for example, to create a backup of your music collection)? Just run Folder Guard and pause the protection. When done, resume the protection back.
Example 4: Lock video files.
This filter works in the same way as the Lock MP3 files filter described above, only it applies to the video files (*.mpg, *.avi, and others). If you assign the No access attribute to this filter, it would prevent users from copying your video files to/from the external drives but allow playing such files that already exist on the C: drive.
Example 5: Lock MS Office documents.
This is another example of a filter that prevents copying of the common Microsoft Office documents to/from the removable drive, while allows their use if they are already present on the C: drive.
Example 6: Lock external drives.
The Except for locations box for this filter contains the following:
C:*;\\*;*:\$RECYCLE.BIN
That is, it would apply to any file or folder that is not located on the C: drive, and is not located on a network (that is, any folder that has a UNC path that starts with a double backslash, such as \\server\share), and also it would not apply to the Recycle Bin folder located on any drive.
This means that if you enable this filter by assigning the No access attribute to it, it would prevent opening or copying any file to/from any drive other than C:. If, instead, you assign the Read-only attribute to the filter, it would allow opening or copying files from the removable drives, but prevent copying files to them.
Note that if the Recycle Bin folder were not excluded from the filter, Windows would show a message about a corrupted Recycle Bin on any drive other than C:.
Example 7: Stop common downloads.
This filter applies to the common executable and script files, such as *.bat, *.dll, *.exe, *.msi, and others. If you assign the Read-only attribute to such a filter, the user would be able to use the existing executable files and scripts, but an attempt to install a new one (or modify an existing such file) would be denied by Folder Guard. This filter would effectively stop users from downloading or installing new executable files.
To allow the expected modifications and updates to proceed without intervention from Folder Guard (such as those performed by Windows Update), make sure that the SYSTEM user is added to the Trusted Users list, and also that the updating program is added to the Trusted Programs list. Adding your anti-virus software to the Trusted Programs list is also a good idea, to allow it to have an unrestricted access to all files and folders.
Folder Guard offers you an option to log file system events that apply to a folder of your choice into a file. You may find this option useful when troubleshooting the access and visibility of files and folders protected with Folder Guard.
You can specify the location of the log file by using the Options for file system events log screen. Folder Guard begins logging the file system events into a file when you select the Log file system events option and press the Protect button to resume the protection (or, if the protection is already active, when you press the Apply button to make changes to the options effective.) Folder Guard continues to log the file system events until you pause the protection, or clear the Log file system events option and press the Apply button. Note that every time the protection is resumed, Folder Guard discards any previously recorded events and starts the log file from scratch. If you want to keep the log files pertaining to several protection sessions, you should change the file name of the log file before enabling the protection, or copy the previously created log file to another location, to prevent it from being overwritten with the new information.
Keep in mind that if you keep the Log file system events option enabled for an extended period of time, it may result in producing a log file of a very large size. Also, recording the file system events into the log file makes the CPU of your computer work harder and may result in a slowdown of the computer. For these reasons, you should not keep the Log file system events option enabled for an extended period of time, and use it only for the troubleshooting purposes.
The log file created by Folder Guard is a regular text file encoded in the UNICODE format. It can be opened and viewed with almost any text editor, such as Windows Notepad. Note that the logging must be stopped before the file can be opened for vieweing.
The log file contains a sequence of records, each record describing a particular file system event as it was encoutered and processed by Folder Guard. Below is an example of a typical record that may appear in the log file:
    ALLOWING ACCESS:
      Path: E:\TEST
      Module: \DEVICE\HARDDISKVOLUME2\WINDOWS\EXPLORER.EXE
      User: ADMIN
      LogonId: 0.0
      Status: 0x0
The first line of the record, such as ALLOWING ACCESS, is the description of the event. The lines below it offer additional information about the event, such as:
- Path - The path to the folder or file that this event applies to;
- Module - The program that caused this particular event;
- User - The name of the user account associated with this event;
- LogonID - The user session associated with this event;
- Status - The status of the operation as reported by Windows after completing the file system operation.
Please note that we do not offer any support in interpretation of the information recorded in the log file. It is up to you review the log file and make conclusions based on the events recorded.
With Folder Guard, you can set up different restrictions for different users of your computer. For instance, you can make a folder visible when you log in to Windows, but also make it hidden when some other user logs in.
To control which restrictions should apply to which users, use the User List of Folder Guard: (If it is not visible when you open the main window of Folder Guard, choose the View - User bar command from the menu to make it visible.)
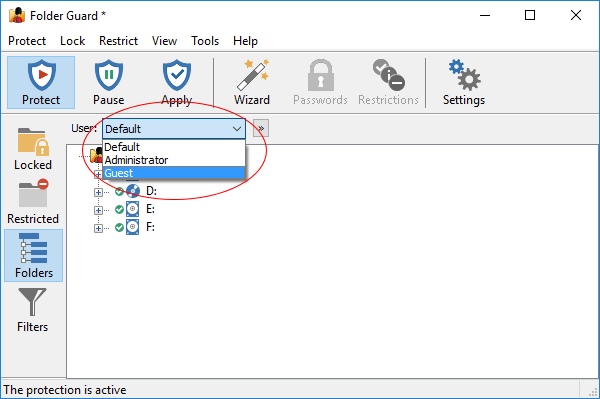
The User List originally contains only one item: Default. This user name is used to set up the restrictions that would apply to all users for whom no user-specific restrictions have been set up. To create restrictions that would apply to specific users, first you need to add the desired user names to the User List. To do that, press the button next to the User List and choose Modify user list from the menu:
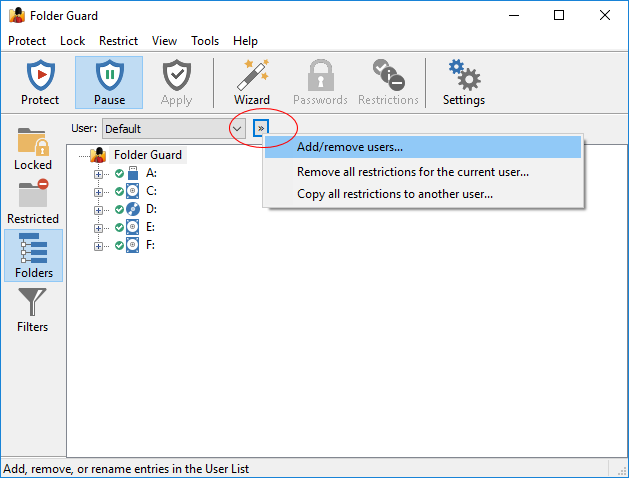
This should open the Modify User List window that you can use to add specific user names to the list. (You don't need to add all users, just those for whom you want to set up specific restrictions; other users not in the list would be restricted according to the Default user restrictions.)
After you've added other user names to the User List, you will be prompted to select the user for whom you want to set up the restrictions when using the Wizard:
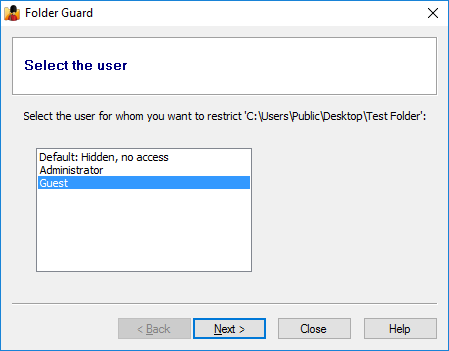
If you right-click on a folder in the Folders view of Folder Guard and use the context menu to set up the restrictions, the commands would apply to the user currently selected in the User List.
For example, suppose you have a folder named Private (located in the public Desktop folder), and you usually log in to Windows using the user name Administrator. You want to set up the protection of this folder so that when you log in to Windows the folder is visible, but when any other user logs in, the folder should be hidden. To do that, first select the Default name in the User List, then navigate to this folder in the folder tree of Folder Guard, and apply the Hidden attribute to this folder:
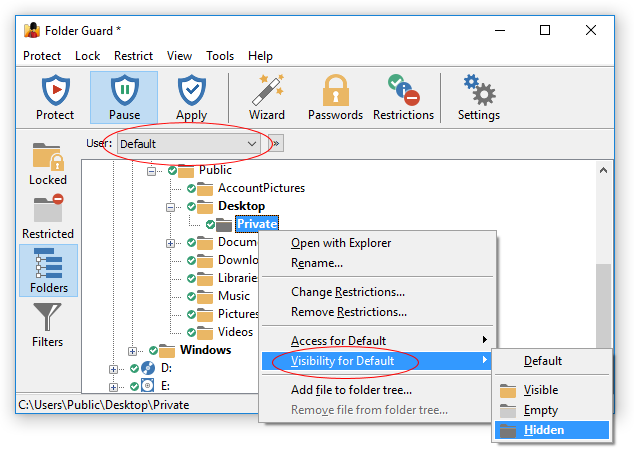
This will make the Hidden attribute to apply to this folder when any user logs in to Windows. The next step is to make the folder visible when you (Administrator) log in. For that, select Administrator in the User List, then right-click on the folder and choose the Visible attribute from the menu:
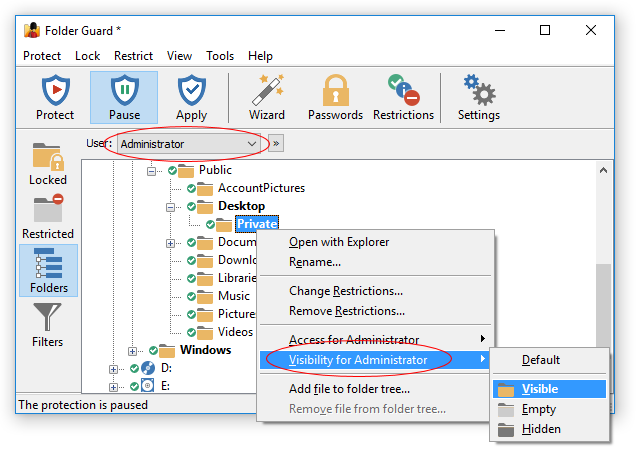
That's it; the user-specific protection of the folder has been set up! If you log in to Windows using the user name Administrator, the folder should be visible. If any other user logs in to Windows, the Default user's attributes would apply, and that would make the folder hidden.
Of course, if you have other users, you can set up restrictions specific to them, too. For instance, if you want some users to be able to see and open files from your private folder, but not to save any changes to them, you would assign the Read-only attribute to the folder for such users. If you don't assign any user-specific attributes to a folder, then when such a user logs in to the computer, the restrictions specified for the Default user would apply.
Controlling the restrictions for the network users
If you share a folder on a network, you can set up separate restrictions that would apply to the users who access the shared folder from other computers over the network. To do that, use the Add/remove users screen to add the special NetworkUser name to the user list. Then, select this user name in the User List and set up the restrictions for it in the same way as for the local users. Remember also that Windows offers its own, built-in method of controlling security of the shared folders, which you can use instead of Folder Guard.
See also:
Folder Guard allows you to designate specific users as the "trusted" ones. For example, if your computer is set up so that other users have their own login names and passwords, different from yours, then you probably want Folder Guard to apply its protection only to other users and not to your own user account. Another case is the system user accounts which are used by Windows services in the backgound: you probably want them to have an unrestricted access to the computer, in order to perform the system tasks smoothly.
To control which users should or should not be "trusted", use the Trusted view:
The top portion of the list contains the list of the user names that may be trusted by Folder Guard. In front to each item there is a check mark that controls whether the item should actually be trusted: only the items which are checked will be trusted; if the check mark is cleared, such an item will NOT be trusted by Folder Guard.
Originally, the Trusted Users list contains several system accounts that must have full access to all files and folders on your computer in order for Windows to operate properly. You can right-click on the list or use the Trusted menu on the top menu bar to add other users, or remove users from the list, if needed.
When performing the protection, Folder Guard intercepts the requests from programs to open files, list the contents of folders, etc. If such a request comes from a user that is designated by you as a trusted one, Folder Guard passes the request on to the operating system without any intervention, thus allowing the user to have a full access to all folders on your computer. If the name of the user is not in the Trusted list, Folder Guard allows or denies such request according to the restrictions of the files and folders that you've set up.
In other words, the Trusted list overrides other restrictions you might have set up with Folder Guard. For example, you could configure Folder Guard to hide a specific folder for a specific user, but if you add that user to the Trusted list, the folder will not be hidden for that user. If you want to fine-tune the restrictions for a specific user, remove it's name from the Trusted list first.
The protection of folders performed by Folder Guard may confuse some of the system utilities, such as the backup or disk managing software. For example, if your backup software allows you to specify which folders to include in the backup, and you leave the protection in effect during the backup, the folders you've made hidden with Folder Guard may not be backed up. (On the other hand, if the backup software stores a complete image of the disk disregarding its folder structure, it may be safe to leave the protection on, since Folder Guard does not prevent the direct access to the disk sectors.)
To avoid such problems, you could add your backup and disk utilities to the Trusted list of Folder Guard:
Below the list of user names, you should find a list of items representing executable programs. Each such item contains a description of the program and the path to the program's executable. The path could be a specific path to the program's EXE file, or a mask containing the star characters (*). Only the path of the item is used by Folder Guard when determining whether the program should be trusted; the description is only used as a visual aid to help you manage the list of items.
In front to each item there is a check mark that controls whether the item should actually be trusted: only the items which are checked will be trusted; if the check mark is cleared, such an item will NOT be trusted by Folder Guard.
When performing the protection, Folder Guard intercepts the requests from programs to open files, list the contents of folders, etc. If such a request comes from a program that is designated by you as a trusted one, Folder Guard passes the request on to the operating system without any intervention, thus allowing the program to have a full access to all folders on your computer. If the path of the program is not in the Trusted list, Folder Guard allows or denies such request according to the attributes of the files and folders set up by you.
In other words, the Trusted list overrides other restrictions you might have set up with Folder Guard. For example, you could create a filter with Folder Guard that would deny access to a specific folder for a specific program, but if you add that program to the Trusted list, the folder will be fully accessible for that program. If you want to fine-tune the restrictions for a specific program, remove it from the Trusted list first.
Note: only the programs running locally on the same computer where Folder Guard is operating can be made trusted. If a program is running on another computer and accessing a shared folder over the network, such a program cannot be made trusted. In other words, only programs with paths starting with local drive letters such as C: or another local drive can be made trusted. If the path to the program starts with a mapped network drive or with a double forward slash, such a program cannot be made trusted.
Originally, the Trusted list contains several system programs that must have full access to all files and folders on your computer in order for Windows to operate properly.
To add additional programs to this list, such as the backup program that you have, use the commands on the Trusted menu of Folder Guard application. (Note that the Trusted menu appears on the menu bar only when you switch to the Trusted view.) You can add the programs by entering the paths to the executable files or by selecting one of the currently running tasks.
In addition to specifying the exact paths to the programs you want to be trusted, you can also use the masks to specify broad classes of the paths. (A mask is just like a path, except that it may contain one or more star characters (*) to designate the parts of the path that should match any number of arbitrary characters.)
For example, consider the following mask:
C:\Program Files\Windows Defender*
This mask would match any path that starts with the part before the star character, C:\Program Files\Windows Defender . It means that any of the following program files would be trusted:
C:\Program Files\Windows Defender\Offline\OfflineScannerShell.exe
C:\Program Files\Windows Defender\ConfigSecurityPolicy.exe
C:\Program Files\Windows Defender Advanced Threat Protection\MsSense.exe
Another example: the following mask:
C:\*\Notepad.exe
would match any file named Notepad.exe located in any folder of the C: drive, except for the root folder. That is, both of these paths would match this mask:
C:\Windows\Notepad.exe
C:\Windows\System32\Notepad.exe
Note that only Windows applications (64-, 32-, or 16-bit ones) can be designated as the trusted ones. You may add a DOS program or a console application to the Trusted list, but it will not have any effect.
Which programs should or should not be made "trusted"?
You may wish to add to the Trusted list the system tools such as an anti-virus utility, a disk defragmenter, a disk scanner, a backup utility, etc. If you do so, you won't have to manually disable the protection before running such tools, since they will have a full access to all your folders and files anyway, as if Folder Guard was not present in your system at all.
You probably don't want to make programs such as Explorer trusted, because if you do, they will be allowed a full access to all files and folders, even to those you have hidden or password-protected!
I've made a program trusted, but it's still restricted. Why?
Some programs come with several program files located in different folders. For example, Windows Notepad usually has 2 such files (notepad.exe), one located in the C:\Windows folder, and another one in the C:\Windows\System32 folder. In situations like this you should add both such files to the Trusted list. (You may want to use Windows Search to locate all program files on your computer. Or use Windows Task Manager to see the file locations of the running tasks.)
"Safe mode" is a special diagnostic mode of Windows, which you can use to troubleshoot problems with your computer. (You can find more information about the safe mode and how to use it in Windows Help.) When you reboot your computer in the safe mode, only the core Windows components are loaded and activated, leaving most extra software modules (including Folder Guard) in an inactive state. This means that when your computer is restarted in the safe mode, your computer is not protected by Folder Guard.
However, it is possible to configure Folder Guard to protect your computer even in the safe mode. Before you do that, though, make sure you have a system recovery disc and learn how to use the troubleshooting tools it contains, to be able to restore access to your computer should a conflict between Folder Guard and some other software or device on your computer occur. Please note that we DO NOT provide technical support regarding the use of the safe mode or the troubleshooting tools; please contact the manufacturer of your computer regarding such issues.
To enable Folder Guard protection in the safe mode, select the appropriate option on the Options view.
If you don't want other users to see the files of Folder Guard on your computer, you can configure Folder Guard to operate in the "stealth mode". To enable or disable this mode, use the Tools - Stealth Mode command of Folder Guard.
When you enable the stealth mode, Folder Guard performs the following actions for you:
- It assigns the hidden attribute to the shortcuts to Folder Guard, if they appear on the Start menu, on the All Programs menu, and on the Desktop. Note that only the shortcuts named Folder Guard, as created by the Folder Guard installation utility, get hidden in the stealth mode. If you rename the shortcuts, they will NOT be hidden when you enable the stealth mode. To hide such shortcuts, assign the hidden attribute to them manually. Note also that the hot key and the notification icon remain active even in the stealth mode; if you don't want them to be available, you should turn them off manually.
- It assigns the hidden attribute to the installation folder of Folder Guard. This way, other users would not be able to see the files of Folder Guard or disrupt its operation by deleting its files.
- It hides Folder Guard from the Add/Remove Programs command of Windows Control Panel. This way, other users would not be able to see the presence of Folder Guard in the list of the programs installed on your computer.
Important:
In the stealth mode, you cannot run the Folder Guard application in the usual way (because its shortcuts and the application folder become hidden!) To be able to control Folder Guard settings and the protection, consider doing the following:
- Before enabling the stealth mode, create the Emergency Recovery Utility and save it to an unprotected folder. Learn how to use it, because if your computer locks down due to the protection you set up, you may still be able to use this utility to get back to Folder Guard and disable the protection.
- You may want to set up a hot key and/or leave the notification icon visible to be able to open the Folder Guard application even in the stealth mode.
When deciding which folders you want Folder Guard to protect, consider the following issues:
- The folder in which Windows is installed (usually C:\Windows) must NOT be restricted with the No access or Hidden protection attributes. The same applies also to the folders where the user profiles are stored (usually it is C:\Documents and Settings or C:\Users). As a matter of fact, Windows needs to be able to write data into the files located in such folders to operate properly; if you restrict access to such folders, it may cause Windows to display error messages or even fail to boot. Make sure you know how to reboot Windows in the "safe mode" before trying to protect such folders!
- Many Windows applications on your computer are installed into subfolders of the C:\Program Files folder. If you hide or restrict access to this folder or its subfolders, the applications installed there may become inaccessible.
- If you assign the Empty attribute alone to a folder, it does not make the folder inaccessible. The contents of such a folder will be invisible for Explorer, but the user will still be able to access files in the folder by other means, such as shortcuts. To make the contents of a folder inaccessible, use the no access attribute as well.
The following recommendations will help you prevent others from bypassing the protection of folders performed by Folder Guard:
- Restrict access to the Registry editing tools. A user can disable the protection by editing the Registry and then rebooting Windows. You can deny access to the Registry Editor by restricting access to the file regedit.exe. If you have third-party registry editing tools, you will need to restrict access to them, too.
- Restrict access to the system tools. A user can disrupt the operation of Folder Guard by using the Msconfig.exe tool and other similar programs. You can restrict access to such tools with Folder Guard.
- Restrict access to the direct drive access tools. A user can see the files protected with Folder Guard by using the tools that access the contents of the disks directly (that is, by bypassing the usual operating system services that most regular programs use). If you have such tools installed on your computer, you can restrict access to them with Folder Guard.
- Enable the stealth mode of Folder Guard. This will hide Folder Guard files from other users. If operating in the stealth mode is not desirable for some reason, assign the read-only attribute to the installation folder of Folder Guard, to prevent other users from deleting or modifying Folder Guard files. (Folder Guard assigns the read-only attribute to its folder for you automatically).
- Prevent users from booting the computer with a system disc. Most modern computers allow you to change the booting preferences by modifying the BIOS settings. You may also be able to protect the BIOS settings with a password to prevent others from changing them. The exact procedure of making changes to the BIOS depends on the model of the computer; please contact your computer manufacturer for the instructions specific to your system.
- Prevent access to the System Restore tool. When you install Folder Guard, you have the option to create a system restore point. To stop other users from using the System Restore utility to remove Folder Guard through its system restore point, assign the no access attribute and (optionally) an unlocking password to the file rstrui.exe, usually located in the folder C:\Windows\System32\Restore.
The Emergency Recovery Utility is a small program that can help you restore control of Folder Guard if you ever forget its Master Password. It is especially important to have the Emergency Recovery Utility available if you are going to configure Folder Guard to operate in the stealth mode, because you will have no way of disabling the protection or running Folder Guard without the Emergency Recovery Utility!
In order to be able to use the Emergency Recovery Utility, you need to create it first. When you run Folder Guard for the first time after installing Folder Guard, the following prompt to create the Emergency Recovery Utility is displayed automatically for you:
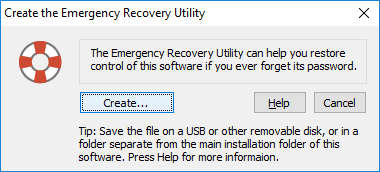
You can also open this window by using the Emergency Recovery command on the Tools menu of Folder Guard.
To actually create the Emergency Recovery Utility, press the Create... button on the window shown above, and then navigate to the folder where you want to store the file of the Emergency Recovery Utility. This should be a folder separate from the installation folder of Folder Guard, because when the stealth mode is enabled, the installation folder will be hidden from you, and you will not be able to run the Emergency Recovery Utility from it! A better choice would be to store the file on a USB or some other removable disk, and store that disk in a safe location.
The Emergency Recovery Utility is also available for free download ![]() from our web site. You may find this option useful if you cannot locate the copy of the Emergency Recovery Utility that you yourself have created as described above. However, even though we make the Emergency Recovery Utility available for download from our web site, we still strongly recommend creating and storing a local copy of it by yourself, because when the need to use the emergency recovery procedure arises, you may not have handy access to the Internet available to download the file.
from our web site. You may find this option useful if you cannot locate the copy of the Emergency Recovery Utility that you yourself have created as described above. However, even though we make the Emergency Recovery Utility available for download from our web site, we still strongly recommend creating and storing a local copy of it by yourself, because when the need to use the emergency recovery procedure arises, you may not have handy access to the Internet available to download the file.
To use the Emergency Recovery Utility, simply locate and run the file you have previously created with the Create the Emergency Recovery Utility command described above. If the utility detects that a copy of Folder Guard is operating on your computer, and the protection is in effect, it first asks you to enter your password as you would normally do when you need to disable the protection:
If you no longer remember your password, you can click on the Reset password link to begin the Emergency Recovery procedure. First, it asks you to enter your licensing information into the form:
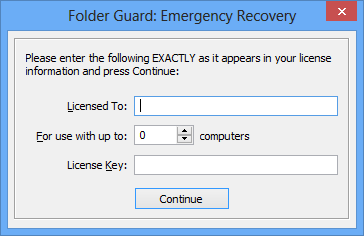
This step is necessary to stop other users from using the Emergency Recovery Utility to remove protection without your permission. If you have not purchased a license yet, and your copy of Folder Guard is operating in the evaluation mode, simply press the Continue button, and it will perform the Emergency Recovery procedure: the Master Password will be erased, and the protection of your computer will be disabled.
If you don't want anyone to be able to use the Emergency Recovery Utility to erase your password and disable the protection, simply purchase a license for continued use of Folder Guard, and enter your license key into the program. This way, only you will be able to use the Emergency Recovery Utility, since it will not proceed unless a valid license key is entered into it first.
Solving problems with Folder Guard failing to start or operate properly
If you run Folder Guard but it reports that is cannot load its driver, it most probably means that your computer has an older version of Windows that was not updated by Microsoft to support the new SHA256 digital signatures. Consider upgrading to a newer version of Windows, such as Windows 10 or 11, which have been properly updated by Microsoft to recognize such digital signatures. Or, if upgrading Windows is not an option, consider enabling the test signing ![]() mode of Windows.
mode of Windows.
If the above does not solve the problem, there could be several other possibilities:
- You have installed Folder Guard into a folder that has restricted NTFS access permissions. To solve this, please install it into a folder located under the C:/Program Files folder, and make sure that the SYSTEM account has the full access rights to that folder.
- Your local security policy prevents you from loading device drivers. You could solve this by running the Local Security Policy tool (located in the Administrative Tools menu of Windows), navigate to Local policies - User Rights Assignment, and enable the "Load and unload device drivers" policy for your user account.
- Your anti-virus or anti-spyware software may prevent other programs from running properly. Please try to temporarily disable such software and see if it makes a difference.
- If you use some software that controls which programs may start automatically at Windows startup, such software may interfere with Folder Guard, too. (Folder Guard needs to be able to start automatically when Windows starts, to be able to perform the protection).
Solving problems with Windows failing to start properly
If Windows cannot start properly after you have enabled protection with Folder Guard, it could be because you have configured Folder Guard to restrict access to some system file or folder that Windows uses during its work. For example, if you assign the no-access attribute to the C:\Windows folder, or to the C:\Users or C:\Documents and Settings folders, or to the whole C: drive, it will most probably cause Windows to fail. If that happens, reboot Windows in the safe mode, run Folder Guard in that mode, and remove protection from the folders in question, then restart your computer as usual.
If you experience the black screen problem, displayed by Windows for a few minutes after you have entered your Windows password, before the actual desktop appears, try the following:
- Wait for the black screen to go away and your desktop to appear (usually about 5 minutes);
- Run Folder Guard application to change its settings;
- Use the Deactivate and Exit command on the Protect menu; confirm you want to deactivate Folder Guard;
- Use the Start - Power - Restart command of Windows to restart the computer;
- Run Folder Guard application again and resume the protection.
Solving problems with Folder Guard not applying the restrictions properly
For example, you've restricted a folder with the no access attribute, but you are still able to access the folder. Or, you've protected a folder with a password, but there is no Unlock button when you open the folder. If it appears that Folder Guard is not operating properly, check the following:
- Verify that your user name does not appear in the Trusted Users list. Folder Guard does not apply any of its restrictions to the users listed there.
- Verify that the program you use is not in the Trusted Programs list. Folder Guard does not apply any of its restrictions to the programs listed there.
- Verify that you have not set up different restrictions for your user account that override the default restrictions.
- Verify that you have not set up a filter that overrides other restrictions.
Solving problems with applications failing to start or operate properly
If some application that you have on your computer started to display errors or does not start at all after you have enabled protection with Folder Guard, it could be because you have configured Folder Guard to restrict access to a file or folder that the applications uses during its operation. For example, many programs need to be able to save files into their installation folders, and if you assign the read-only or no-access attributes to such folders, it may cause such applications to fail. Other applications may need to be able to write information into the files located in the C:\Windows folder. Again, if you restrict access to the C:\Windows folder, such applications may start displaying errors. To solve such problems, review the folder restrictions you have set up with Folder Guard, and remove protection from the folders that you suspect may be causing the errors. You may also find the To protect or not to protect section of this guide of use.
Performing a clean test of Folder Guard
If you suspect that the error you see is caused by a restriction that you have configured with Folder Guard, try the following: completely uninstall Folder Guard from your computer (choose to erase its settings, when prompted), then install it back and configure it to protect just one test folder, such as C:\Test. Assign the No access attribute to the test folder, and do not set up any other restrictions. If the problem does not occur in this case, try to restrict other folders, as needed, one at a time, testing the condition that previously resulted in an error after each significant change. This could give you an idea of which restriction is causing the problem.
Solving problems caused by incompatibility between Folder Guard and some other program
If the problem persists even when you've protected just one test folder as described above, then another reason could be an incompatibility between Folder Guard and some other program you have (such as anti-virus, disk utilities, programs that install icons in the taskbar next to the system clock, etc.) You may want to try to temporarily disable such programs, one at a time, and see if that corrects the situation. If you discover which other program is causing the conflict, please let us know and we will investigate.
Using Event Viewer to monitor actions taken by Folder Guard
If you enable the option Report events to Windows Event Log, Folder Guard will to report some events, such as users pausing or resuming the protection, or unlocking and locking the password-protected folders, to Windows Event Log. You can view such events using the built-in Event Viewer tool of Windows. The events are recorded under the Windows Logs - Application log.
Using the File System Events log of Folder Guard
If you enable the option Log file system events, Folder Guard will record file system events into a file, that could provide insight into the factors that affect the protection of files and folders performed by Folder Guard.
The Folder Guard Administrator's Kit is a set of tools designed to help system administrators with the deployment and management of Folder Guard on a large network using Active Directory and Group Policy.
The kit contains the following files:
- The "enterprise build" of Folder Guard that does not require license validation over the Internet.
- The client installation packages of Folder Guard in the MSI format, to be used with the x86, x64, and ARM64 Windows clients.
- The text of Folder Guard Volume License Agreement.
Note: This Kit is not necessary if all you want is password-protect a folder on the server and allow the client computers to unlock the folder over the network. In such a case, install Folder Guard on the server as usual and use it to set up the password protection of a shared folder on the server itself. The client computers connecting to the server do NOT need the Folder Guard software installed on them, they can unlock the password-protected folder on the server directly.
For other uses, such as to protect client computers from downloading unauthorized programs, etc., you do need to install Folder Guard software on the client computers. This Kit may help you automate such a task.
If you used an older version of the Kit that included an Administrative Template (.ADM) file to manage the restrictions, note that the current version of the Kit no longer includes such a file, because it is no longer necessary: Folder Guard can now be used to store the necessary settings directly in the GPOs, without the need to use the ADM files. If you used a previous version of Folder Guard that used to come with an ADM file, you should remove that ADM template from the GPO object and use Folder Guard program instead.
The basic steps involved in using the Administrator's Kit are as follows:
- Create a new GPO using the Group Policy Management tool on the domain controller.
- Configure the GPO to install the MSI files of Folder Guard software on the network.
- Configure the GPO to enforce Folder Guard settings on the network.
- Link the GPO to the appropriate Organizational Units of your network.
The Folder Guard Administrator's Kit is available as a separate download. Please contact us if you are interested in ordering the kit.
In order to manage Folder Guard software and enforce its settings on the network using Active Directory, a Group Policy Object (GPO) must be created first.
Note that, depending on the complexity of your organization, you may find it necessary to create several GPOs, each serving a different purpose. For example, you may want to create one GPO to control the installation of the x86 MSI package of Folder Guard on the 32-bit computers, another GPO to install the x64 MSI package on the 64-bit computers, and yet another GPO to enforce the settings of Folder Guard. In our example, however, to keep things simple, we use just one GPO to control both the installation of Folder Guard on the network and to enforce its settings.
To create a GPO, run the Group Policy Management tool on the server and select Group Policy Objects in the left pane. Right-click on it, and choose New from the menu:
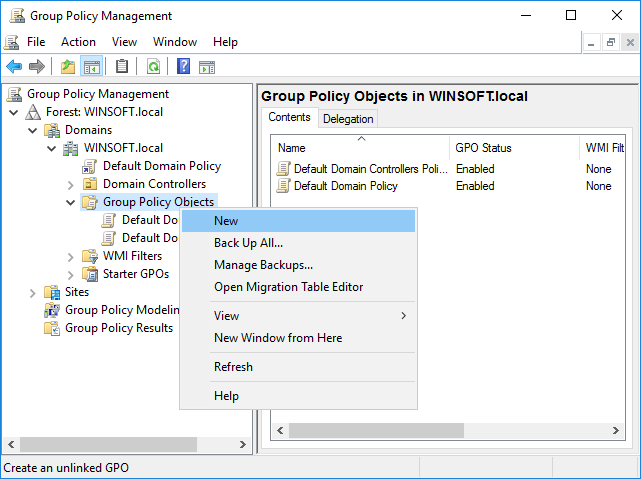
In the New GPO dialog, enter a name for the GPO (such as Folder Guard):
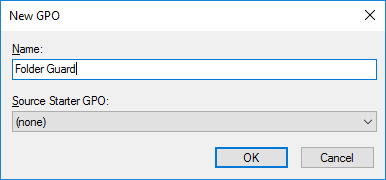
Now that the GPO has been created, we will use it to configure Folder Guard.
Folder Guard uses the MSI files to install its software on the client computers. As such, configuring the GPO to install Folder Guard on the client computers is not different from any other software that is using the MSI files for its installation.
This task should be done just once, when Folder Guard is first installed on the network. You should also repeat it when upgrading Folder Guard to a new version.
Before configuring the GPO, first copy the MSI files to a shared folder that is accessible from the client computers. The usual C:/ServerFolders/Company folder should work just fine for that; verify that the client computers are able to open this folder using the UNC path, such as \\SERVER\Company (replace SERVER with the actual server name, such as SRV16ESS that we use in the example below.)
You may want to create subfolder there named Folder Guard packages, and copy both the Folder Guard-NNN-x86.MSI and Folder Guard-NNN-x64.MSI files into it.
Now we can configure the GPO to install the MSI files of Folder Guard on the client computers. Using the Group Policy Management tool, right-click on the Folder Guard GPO and select Edit from the shortcut menu:
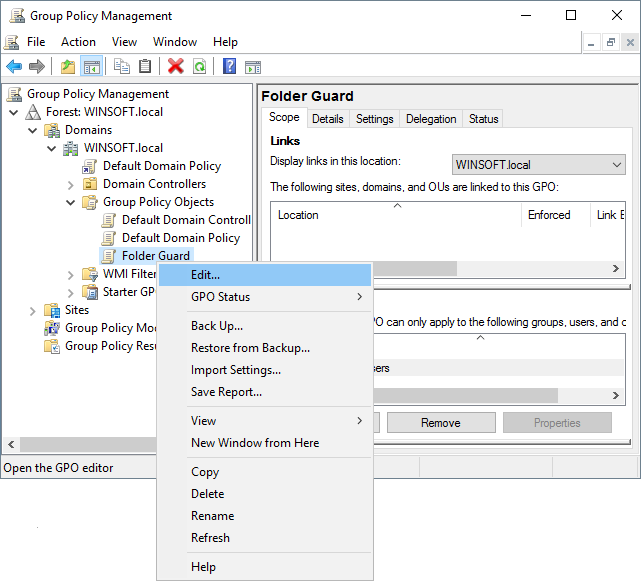
In the left pane, expand Computer Configuration, Policies, Software settings, and select Software installation. In the right pane, right-click on an empty space and choose New - Package from the shortcut menu:
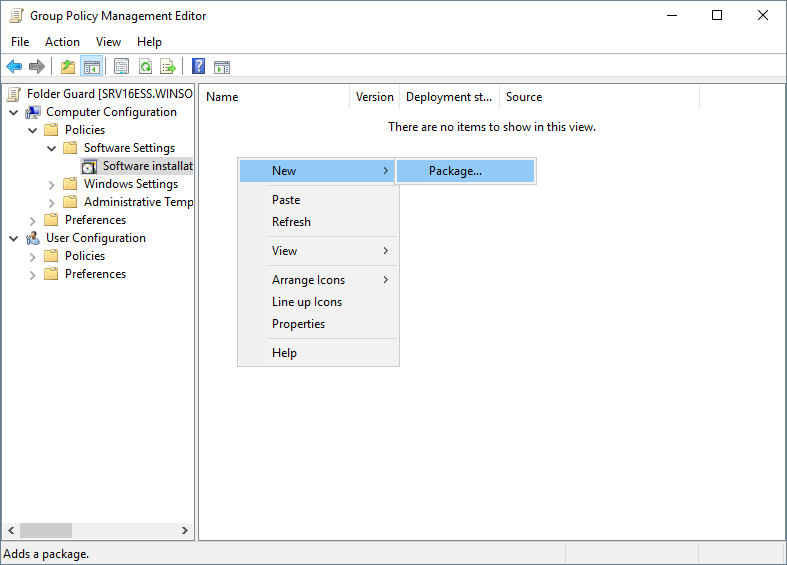
Now navigate to the shared folder Company/Folder Guard packages, but do not start from the C: drive; instead, start from the Network folder, then open the server, and then proceed to the shared folder from there. This should ensure that the MSI files are specified using their UNC paths, as they appear to the client computers:
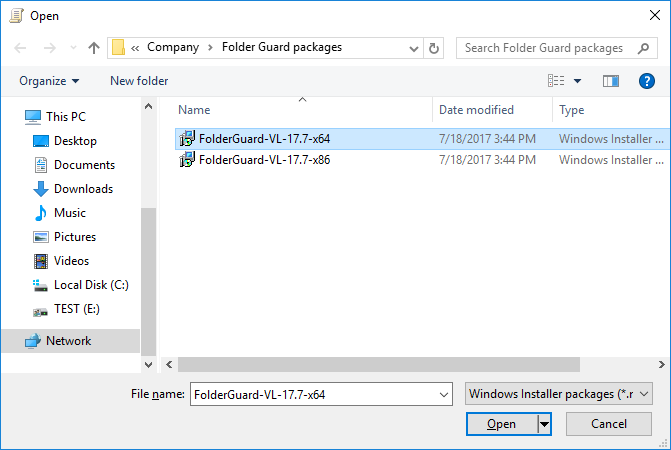
Select one of the MSI files (x86 or x64, depending on the bitness of Windows that the client computers have), and on the next screen select the Assigned option:
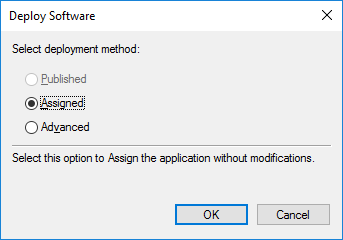
The selected file should now appear in the right panel of the Group Policy Editor. If your network has a mixture of 32-bit and 64-bit installations of Windows, repeat the same procedure to add the other MSI file. When done, make sure that the path(s) in the Source column start(s) with \\SERVER\... rather than C:
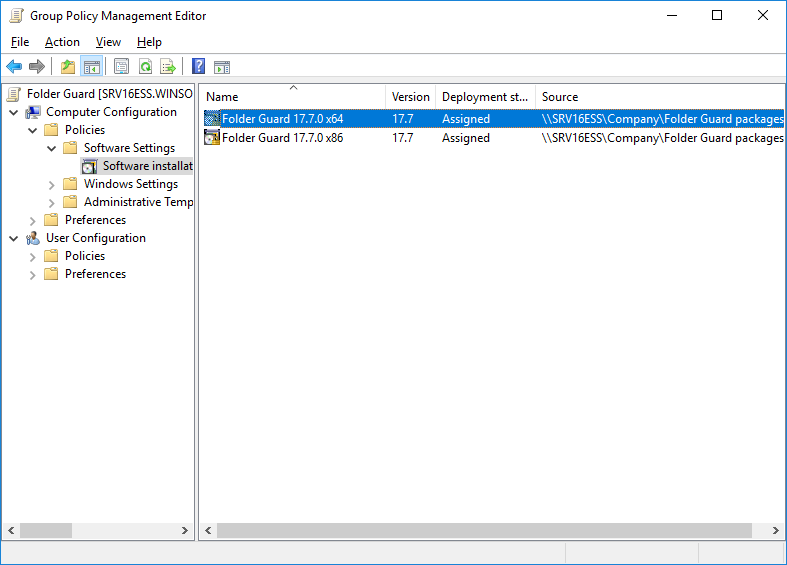
Close the Group Policy Editor. Note that at this point even though the GPO is configured to install Folder Guard on the client computers, no installation is taking place yet: you must link the GPO to the appropriate Organizational Unit(s) in order for the installations to actually take place.
Note that the MSI files contain only a subset of the Folder Guard that is necessary to perform the protection on the client computers. The MSI files do NOT install the Folder Guard application that is used to configure the protection settings. That's why you should not use the MSI files to install Folder Guard on the server; use the full setup program for that.
You can use the Folder Guard application to store the protection settings directly in the GPO. For this step, make sure Folder Guard software is installed on the server, by running its setup file.
Run Folder Guard software on the server (choose to change the protection settings link, if asked), and then select Protect - Manage - GPO from the menu:
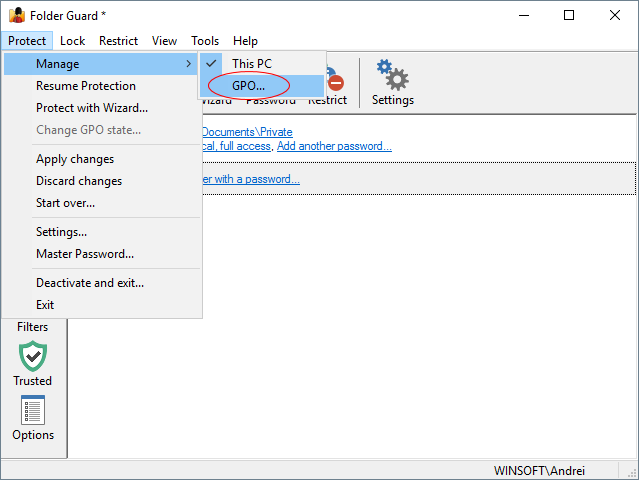
Select the Folder Guard GPO that you had previously created:
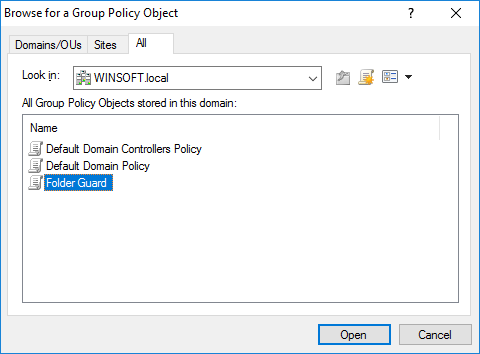
Now use this screen to adjust the settings, in the same way as you would do it for a computer. The difference is that these settings would be saved to the GPO, and they would be used by the client computers which are linked to this GPO:
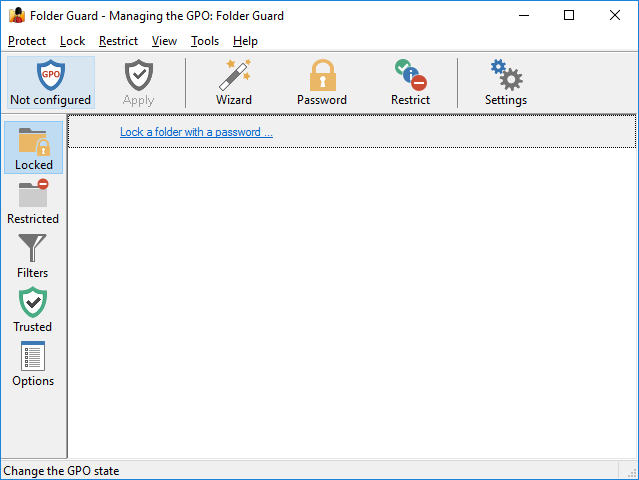
Notice that the title bar of the application now tells you which GPO object it's currently managing. Also notice that the Protect and Pause buttons no longer appear on the toolbar, and instead the GPO status button is shown there. Use this button to change the status of the GPO from Not Configured to Enabled when you have the protection settings configured as you need them.
When setting up the passwords and restrictions, remember that they will apply to other computers, not to the server! (Unless you happen to link the GPO to the server, too.) So, when specifying the paths of the files or folders to protect, you should enter them as they appear on the network computers rather than on the server. If you enter a path to an object that does not exist on the server, you would need to also specify whether that object should be treated as a folder, or as a file:
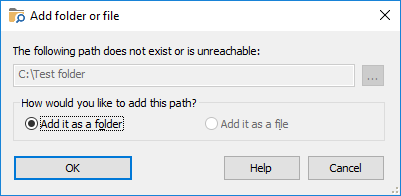
Since the protection settings that are stored in the GPO do not apply to the server, Folder Guard does not show the complete file system in its Folders view; it only shows the objects that you yourself added to the tree:
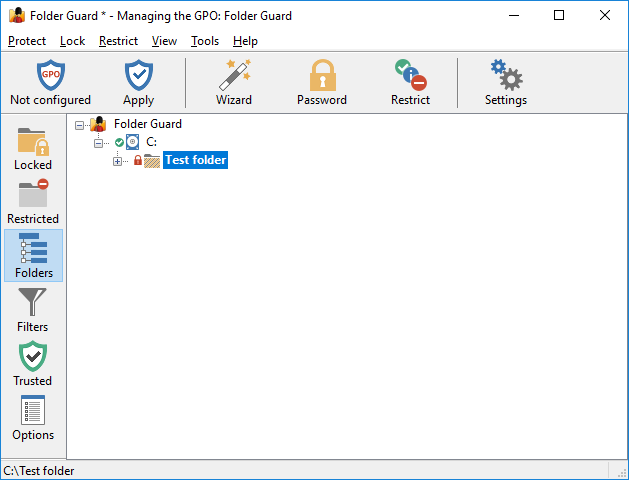
When specifying the paths of the folders to protect, keep in mind that for some of them Windows creates the alternative names (such as the 8.3 DOS names). Since Folder Guard application is running on the server, it cannot obtain the alternative names of the folders located on other computers, so you need to enter such alternative names yourself, when necessary. To do so, switch to the Folders view, right-click on the object for with you want to enter the alternative name, and choose Rename from the shortcut menu:
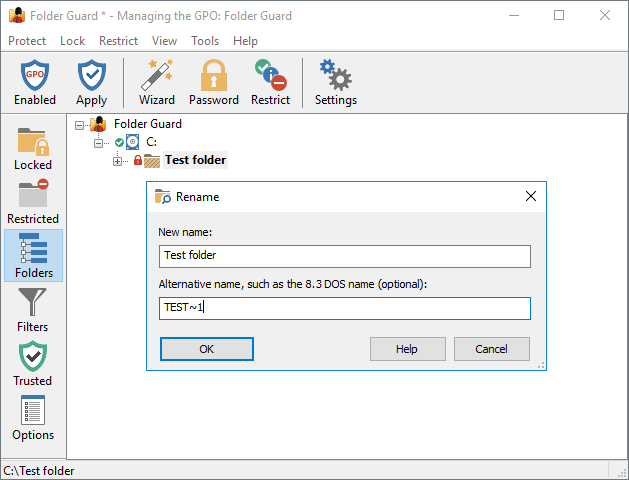
Remember to press the Apply button to save the current settings to the GPO, after making changes.
Also remember to use the GPO button on the toolbar (or the Protect - Change GPO state command on the menu) to change the state of the GPO from Not Configured to Enabled when you have the GPO configured and ready to be used on the network. (If you don't set the GPO status to Enabled, its settings will not be applied to the network.
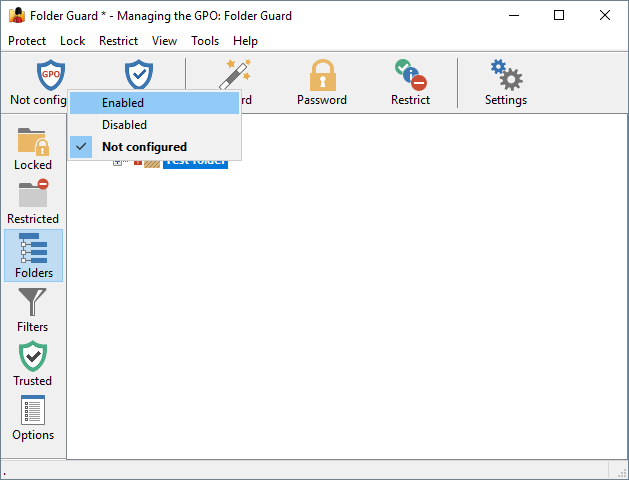
At this point the GPO is configured and ready to use. To specify which parts of your network should use the settings of this GPO, link it to the appropriate Organizational Units (OU), just like any other GPO. In our example, we have only one OU, and we will link this GPO to it, by right-clicking on it in Group Policy Management tool, and choosing Link an Existing GPO from the shortcut menu:
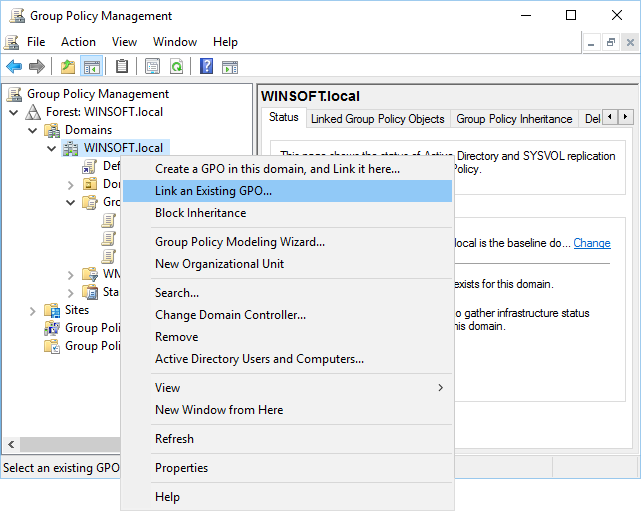
Select Folder Guard GPO from the list, and press OK. From this moment on, the computers in the OU will start to download the GPO from the server and apply the GPO settings. You are done!
Well, not quite. If you are new to the GPO world, you will probably notice that nothing seems to change on the client computers for some time. This is because the Group Policy updates are not performed immediately, it may take as long as 90 or 120 minutes for the changes to take effect on the network computers.
It's possible to force the update to the Group Policy, though. On the client computer where you want the Group Policy to be updated (not on the server!) open the command prompt as Administrator, and enter the gpudate command. It should force the client computer to obtain the current Group Policy from the server and apply it in real time, without waiting a couple of hours for the update to happen automatically:
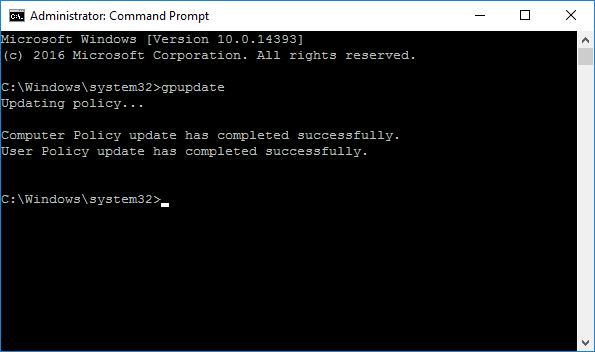
Keep in mind, however, that some changes to the Folder Guard settings become effective only when a user logs in to the computer. So, after you have changed the Folder Guard GPO on the server, and issued gpudate on the client, you may still need to log off the client and log back on for the new settings to take effect.
In some situations it's not enough to log off and log back on, but a full computer restart is required. For example, if you have linked the Folder Guard GPO to a computer for the first time, and performed gpudate on the client, the client computer must be restarted in order for Folder Guard software to be actually installed on it. The restart is also needed after you post an updated version of Folder Guard software on the server: the software update can only happen after the client computer is restarted.
Please consult your Windows Server documentation for more information on GPOs and Group Policy.
If you need to temporarily pause the Folder Guard protection on the network computers (for example, to perform a maintenance task that the protection may interfere with), several methods are available:
Method 1. Set the state of the Folder Guard GPO to Not configured or Disabled:
After the Group Policy is updated on the network computers, the protection will be paused on them. To resume the protection, set the GPO state back to Enabled.
Method 2. Execute remotely the appropriate commands.
Method 3. If you need to disable the protection on only one specific computer, log in to it via the Remote Desktop and use the usual tools such as the notification icon to pause and resume the protection.
If you want to stop using Folder Guard on the network, do NOT delete Folder Guard GPO or uninstall Folder Guard software from the server as the first step! Before that, you need to undo the configuration steps:
First, run Folder Guard software on the server, open the Folder Guard GPO with it, and set the status of the GPO to Not Configured. This will cause the Folder Guard settings to be removed from the client computers after the next Group Policy update.
Second, edit the Folder Guard GPO with Group Policy Editor on the server, and delete the Folder Guard MSI packages from the GPO. This should uninstall Folder Guard software from the client computers after they've updated their Group Policy and restart.
Now wait for the Group Policy to be updated on the client computers, or use the gpudate command on them to force the updates. Restart the client computers after the update to force them to actually uninstall Folder Guard software.
After all client computers performed this procedure, use Group Policy Management tool on the server to unlink the Folder Guard GPO, and then delete the GPO itself. If necessary, use Windows Control Panel on the server to uninstall Folder Guard, and that should complete the removal procedure.
Please consult your Windows Server documentation for more information on GPOs and Group Policy.
If you make changes to the GPO on the server but the changes are not reflected on the managed computers, remember that the propagation of the Group Policies is not instanteneous! It may take 90 or 120 minutes for the changes to take effect on their own. To speed it up, use the gpudate command on the client computers whenever you want them to get the updated Group Policy settings.
If you manually install and run Folder Guard on a computer that is managed via a GPO, it displayes the following message:
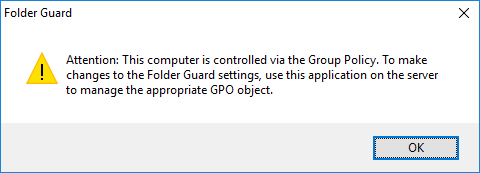
This situation occurs because the computer is managed from the server, via a GPO. If you install Folder Guard application on such a computer, any protection you would set up in such a way would be ignored, because the GPO settings have precedence over the local settings. To change the protection settings in such a situation, make the changes to the GPO on the server. If instead you want to allow the users of the client computers to make changes to the Folder Guard settings directly, you must set the state of the GPO on the server to Not Configured or Disabled, rather than Enabled. This should cause the GPO settings to be deleted from the client computers during the next Group Policy update, and that would allow the users to change the Folder Guard settings on each client computer directly.
Please consult your Windows Server documentation for more information on GPOs and Group Policy.
The Protect menu of Folder Guard offers the following commands:
Manage - This PC or GPO
Use this command to specify whether you want to use Folder Guard to manage the protection settings that would apply to your computer, or to a Group Policy Object (GPO).
Resume/Pause Protection
Resumes or pauses the protection performed by Folder Guard. When the protection is paused, all files and folders become unprotected, as if Folder Guard was not present on the computer. Note that if you pause the protection, it may be resumed automatically next time you restart the computer, or when you log in or log out of Windows. If you don't want the protection to resume automatically, use the Deactivate and Exit command described below.
Pause for local accounts
Pauses or resumes the Folder Guard protection for the local accounts of the current computer while keeping the protection in effect for the network users acessing the resources of this computer over LAN. You may find this command useful in situations when you need to pause the protection of a network server for maintenance, while keeping it protected from the rest of the network.
Protect with Wizard
Starts the Wizard of Folder Guard that guides you through the steps to set up the protection of a folder or a file.
Apply changes
Use this command to make the changes to the protection settings to take effect. (The changes to the protection settings do not take effect immediately. They take effect only when you use the Resume Protection command, or, if the protection is already in effect, use the Apply changes command make the changes effective.)
Discard changes
If you've made changes to the protection settings that have not been applied yet, and you changed your mind about the changes, you can use this command to discard such changes. Note that if you have used the Resume Protection or Apply changes commands, such changes cannot be discarded: you must revert them manually.
Start over
This command removes all passwords and restrictions from all files and folders that you might have previously set up. Use this command if you want to start setting up the protection from scratch, as if Folder Guard was just installed.
Settings
Use this command to adjust the settings of Folder Guard by displaying the Folder Guard Settings screen.
Master Password
Use this command to change the Master Password of Folder Guard.
Deactivate and Exit
Use this command if you want to disable Folder Guard without uninstalling it. This command stops the folder protection, and also prevents Folder Guard from resuming the protection automatically when you restart the computer. If also disables the hot key and the notification icon of Folder Guard, if you have previously enabled them. If later on you decide to enable the folder protection again, run Folder Guard and use the Resume Protection command described above.
Exit
This command prompts you to resume (or continue) the folder protection, and then exits Folder Guard.
The Lock menu of Folder Guard offers the following commands:
Password-protect selected folder
This command starts the Wizard that guides you through the steps necessary to password-protect the folder currently selected in the Folder Guard window. You can use this command to add a new password, or change or delete an existing password. This command is disabled if no folder is currently selected.
Remove passwords from selected folder
This command removes any the passwords from the currently selected folder. This command is disabled if no folder is currently selected in the Folder Guard window, or if the selected folder is not password-protected.
The Restrict menu of Folder Guard offers the following commands:
Restrict selected
This command starts the Wizard that guides you through the steps necessary to set up restrictions the file or folder currently selected in the Folder Guard window. You can use this command to hide the folder or file, or to restrict access to it, without an individual password. This command is disabled if no file or folder is currently selected.
Unrestrict selected
This command removes any restrictions from the currently selected file or folder. This command is disabled if no file or folder is currently selected in the Folder Guard window, or if the selected file or folder is not restricted.
The Filter menu appears only when you switch its window into the Filters view. It offers the following commands:
New
Creates a new filter of Folder Guard.
Rename
Lets you rename the currently selected filter.
Delete
Deletes the currently selected filter from the list.
Properties
Lets you change the properties for the currently selected filter by opening the Filter Properties dialog box.
Move Up
Move Down
Let you change the position of the currently selected filter in the list.
Reset the filter list
Let you reset the list of the filters as it was when you first installed Folder Guard.
The View menu of Folder Guard offers the following commands:
Language
Switches the user interface of Folder Guard to a different language.
Font
Selects the font to be used in the user interface of Folder Guard.
Locked folders
Switches to the Locked view.
Restricted folders and files
Switches to the Restricted view.
Folder Tree
Switches to the Folders view.
Filters
Switches to the Filters view.
Trusted users and programs
Switches to the Trusted view.
Blocked programs
Switches to the Blocked view.
Options
Switches to the Options view.
Toolbar
Shows or hides the toolbar.
Status bar
Shows or hides the status bar.
View bar
Shows or hides the View bar.
User bar
Shows or hides the User bar.
Add network location
Adds a network folder to the tree to make you able to protect access to the network folders at that location from this computer. Note that if you add a mapped network drive with this command, it will be automatically replaced with the target network location that the drive letter is mapped onto.
Remove network location
Removes the network folder from the tree of Folder Guard. It also removes any restrictions from any files or subfolders under that network location that you might have previously set up with Folder Guard. This command is disabled if the currently selected item is not a top-level network folder.
Expand/Compact the tree
This command is only available in the Folders view. It collapses all branches of the folder tree which have only subfolders with the default attributes and it also expands all branches which have subfolders with the non-default attributes.
Refresh all
Updates the all folders in the main window of Folder Guard. Use this command after you have renamed or created a new folder or file, to make Folder Guard display the updated names of the files and folders in its window. If you want to refresh only a specific folder, switch to the Folders view, right-click on the folder, and use the Refresh command on the context menu displayed.
The Tools menu of Folder Guard offers the following commands:
Emergency recovery
Use this command to create the Emergency Recovery Utility for Folder Guard.
Add/remove users
Use this command to manage the users that appear in the User List of Folder Guard.
Stealth mode
Use this command to enable or disable the stealth mode of Folder Guard.
Go to special folder
Use this command to quickly navigate to one of the special folders in the Folders view.
Restore default options
Use this command to quickly restore the default protection options in the Options view.
Generate temporary password
Use this command to create a temporary password to pause the protection or unlock any password-protected folder.
Verify temporary password
Use this command to verify a previoulsy generated temporary password.
Export configuration
Use this command to save the current protection configuration in a file.
Import configuration
Use this command to load the previously saved protection configuration from a file.
Windows tools - Explorer
Runs Windows Explorer.
Windows tools - Control Panel
Opens the Control Panel.
Windows tools - Registry Editor
Runs the Windows Registry Editor (RegEdit.exe).
Windows tools - Policy Editor
Runs the Windows Policy Editor (PolEdit.exe) or opens the Group Policies management window. Note that your computer may not have either of these tools installed.
The Help menu of Folder Guard offers the following commands:
User's Guide
Opens the User's Guide of Folder Guard (the one you are reading now).
Restore hidden messages
Use this command to bring back the messages which you had previously turned off by selecting the Don't show this message again option.
Is this copy legal?
Lets you check the validity of your Folder Guard license.
Enter License Key
Lets you enter or display your license key for Folder Guard.
Buy now!
Takes you to the Online Store at the WinAbility.Com web site.
Upgrade
Takes you to the Upgrade Center at the WinAbility.Com web site.
Support
Takes you to the customer support center at the WinAbility.Com web site.
Rate this app
Takes you to the Rate Folder Guard web page.
WinAbility.Com
Opens WinAbility.Com web site in your default web browser.
About Folder Guard
Displays the version number and copyright notice.
The User bar menu of Folder Guard appears when you press the button located next to the User list on the User bar of the Folder Guard window:
This menu offers the following commands:
Add/remove users
You can use this command to manage the User List of Folder Guard.
Remove all restrictions for the current user
If you have previously set up restrictions for the user currently selected in the User List, this command will remove all such restrictions. It does NOT remove restrictions for other users, and it does NOT remove any passwords from the password-protected folders.
Copy all restrictions to another user
This command gives you a quick way to copy all restrictions from one user to another.
The context menu of Folder Guard appears when you right-click an element of its user interface. As the name implies, the set of commands on such menu depends on the element that was right-clicked. For example, if you right-click on an item that describes a password-protected folder, the following menu will appear:
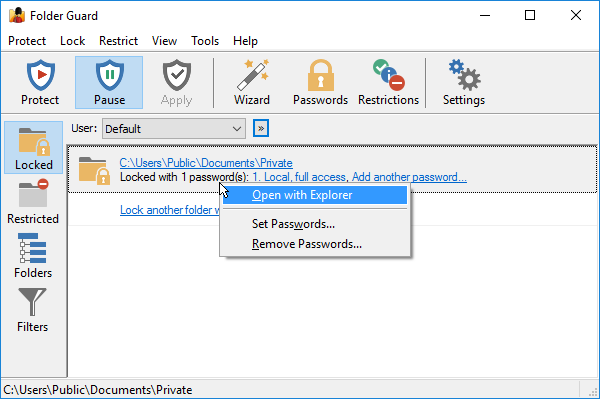
However, if you right-click on a folder that has not been protected yet, a different context menu will appear:
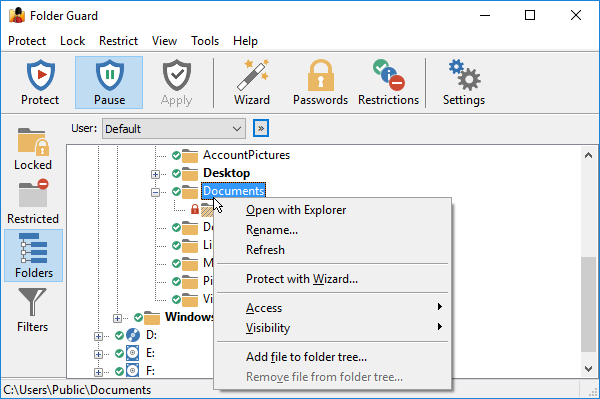
The commands on the context menu usually are self-explanatory and most of them can also be accessed from the main menu bar of the Folder Guard window or through other means.
Command line switches supported by Folder Guard
You can control the operation of Folder Guard by running the file FG32.exe (or FG64.exe, or FGARM64.exe if you use Windows x64 or Windows Arm64) with the command line switches described below:
/PAUSE
/UNPROTECT
/DISABLE
Either of these switches disables the protection of your computer. You can also specify the /PASSWORD:master-password switch on the same command line, to suppress the prompt for the Master Password that this command would otherwise display.
/RESUME
/PROTECT
/ENABLE
Either of these switches enables the protection of your computer according to the settings you have previously set up with Folder Guard.
/TOGGLE
This switch toggles the protection. That is, if the protection is paused at the time this switch is used, then the protection is resumed. If, however, the protection is already in effect, it pauses it. You can also specify the /PASSWORD:master-password switch on the same command line, to suppress the prompt for the Master Password that this command would otherwise display when pausing the protection.
/PAUSE_LOCAL
Pauses the protection for the local user accounts only, while keeping the protection effective for the network users accessing this computer over LAN.
/RESUME_LOCAL
Resume the protection for the local user accounts.
/UNLOCK:path-to-folder
This switch unlocks the specified folder, if you have previously set up a password for it. If the path contains spaces, it must be enclosed in the double-quotes. You can also specify the /PASSWORD:folder-password switch on the same command line, to suppress the prompt for the folder password that this command would otherwise display.
/LOCK:path-to-folder
This switch locks the specified folder, if you have previously set up a password for it. If the path contains spaces, it must be enclosed in the double-quotes.
/TOGGLE:path-to-folder
This switch unlocks or locks the specified folder, depending on whether the folder is locked or unlocked at the time this command is used. Note that you must have previously set up a password for this folder in order to be able to lock or unlock it. If the path contains spaces, it must be enclosed in the double-quotes. You can also specify the /PASSWORD:folder-password switch on the same command line, to suppress the prompt for the folder password that this command would otherwise display when unlocking the folder.
/LOCKALL
This switch locks all currently unlocked folders, if any, for which you have previously set up the folder passwords. You can also specify the /PASSWORD:master-password switch on the same command line, to suppress the prompt for the Master Password that this command would otherwise display.
/UNLOAD
This switch deactivates the protection, and then unloads the driver of Folder Guard from the computer memory. You can also specify the /PASSWORD:master-password switch on the same command line, to suppress the prompt for the Master Password that this command would otherwise display. Note that in order for this operation to succeed, it must be launched "as administrator".
CAUTION: unloading the driver is an unsafe operation that may crash Windows with the blue screen error; use this switch only if absolutely necessary. It's safer to just deactivate the protection using the Deactivate protection and Exit command of Folder Guard application.
/LOAD
This switch loads the driver of Folder Guard into the computer memory without enabling the protection. You can also specify the /PASSWORD:master-password switch on the same command line, to suppress the prompt for the Master Password that this command would otherwise display. Note that in order for this operation to succeed, it must be launched "as administrator"
/PASSWORD:the-password
This switch can be used in addition to any switch listed above, to supply the password required by the operation. If the password contains spaces, it must be enclosed in the double quotes. Note that /LOCK:, /UNLOCK:, and /TOGGLE: switches require the password for the folder you want to lock or unlock, while other switches expect the Master Password of Folder Guard.
/SILENT
/VERBOSE
These switches suppress or reinstate some non-essential messages displayed while performing other commands. Note that the password prompts or error messages are always displayed regardless of these switches.
Command line switches supported by the file Setup.exe
You can also use the following command line switches with the file Setup.exe (or Setup64.exe if you use Windows x64) of Folder Guard:
/U
Use this switch to uninstall Folder Guard from your computer.
Note that the Setup.exe file does NOT support the /PASSWORD switch.
Examples
Suppose that you have installed Folder Guard in the folder C:\Program Files\Folder Guard, and that you have chosen the word Apple as the Master Password of Folder Guard. Also, you have used Folder Guard to restrict access to the folder C:\My Private Files, and you have set up the word green as the unlocking password for this folder. You can use the following commands to perform the following actions:
|
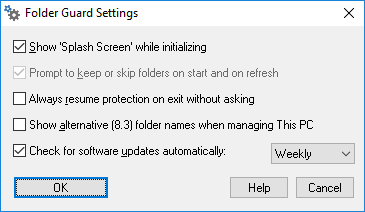
Use these screens to change the way Folder Guard operates to suit your requirements. To display this screen, use the Settings command on the Protect menu. This screen contains the following areas:
Show "Splash Screen" while initializing
If selected, this option allows Folder Guard to display the splash screen with information about Folder Guard when its main application is starting. If you don't want to see the splash screen, clear this option.
Prompt to keep or skip folders on start and on refresh
If selected, this option causes Folder Guard to display the prompt to keep or skip the folders that you have previously protected, but no longer exist when you are starting Folder Guard or refreshing its window. To clear this option, use one of the Always keep or Always skip buttons on the prompt when it is shown.
Always resume protection on exit without asking
Normally, while this option is cleared, when you close the Folder Guard application, it asks you whether to resume the protection:
If you clear this option, Folder Guard will no longer display such a prompt and will always resume the protection when you exit its application.
Show alternative (8.3) folder names when managing This PC
If selected, this option causes Folder Guard to display the alternative folder names in the Folders view when managing This PC. (When managing a GPO, the alternative names are always displayed regardless of this option.)
The alternative names are usually the old-style (8.3) DOS names that Windows maintains for compatibility reasons in some situations. Some items, such as the drives, use their device names as the alternative names.
Note that this option only controls the visibility of the alternative names within the Folder Guard window. This option is off by default, because in most situations, there is no need to see the alternative names when managing This PC: Folder Guard detects and uses such names automatically, regardless of the status of this option.
Check for software updates automatically
If selected, this option causes Folder Guard to periodically connect to our web site to check for the availability of a newer version. If this option is not selected, then Folder Guard will display a message reminding you to check for the updates manually.
The Add/remove users screen is displayed when you use this command on the Tools menu.
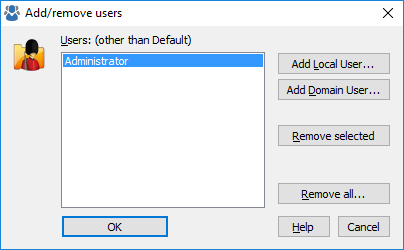
You can use this screen to manipulate the list of the user accounts that appear in the User List of Folder Guard. Then, you can restrict access to your files and folders differently for different users. Note that Folder Guard uses a special Default user that always appears in the User List and cannot be removed. This screen contains the following areas:
Users
The list of users currently included in the User List, in addition to the Default user account.
Add Local User
Press this button to add a new name to the User List by choosing the name from the list of the local users of your computer.
Add Domain User
Press this button to add a new name to the User List by choosing the name from the list of the domain users (if your computer is connected to a domain).
Remove selected
Press this button to remove the selected name from the User List. (It will NOT delete the user account itself!)
Remove all
Press this button to remove all user names from the User List. (It will NOT delete the user accounts themselves!)
See also:
When setting up the protection of folders or files that do not currently exist on the computer where you are running Folder Guard, you may see the following screen:
This screen is displayed because Folder Guard cannot determine the type of the object that does not exist yet, so you need to use this screen to clarify whether the path you want to protect would specify a folder or a file.
The Go to Special Folder screen is displayed when you use this command on the Tools menu. (This command is enabled only when the Folders view of the main window is active.)
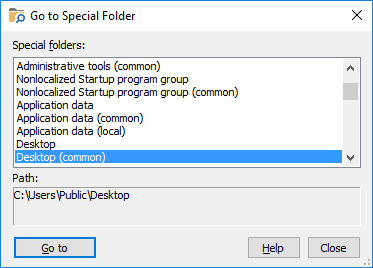
You can use this screen to quickly locate one of the special folders of Windows and select it in the folder tree window of Folder Guard. A special folder is a folder used by Windows for special purposes. For example, the Desktop folder is used to store the items displayed on the Desktop, the Start Menu folder is used by Windows to keep the shortcuts that appear on the Start Menu, and so on. This screen contains the following areas:
Special folders
The list of the special folders defined for the current user account, as well as the common special folders (used for all user accounts). Note that the content of this list depends on the version of Windows that you use, as well as on the configuration of the user's accounts that you have set up.
Path
Displays the full path of the currently selected special folder.
The Copy All Restrictions screen is displayed when you use the Copy all restrictions to another user command from the User bar menu:
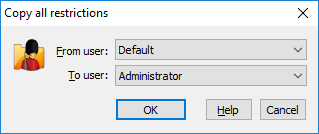
You can use this screen to quickly copy the restrictions of all folders, files, and filters between different users listed in the User List of Folder Guard. This dialog box contains the following areas:
From User
The name of the user whose restrictions should be copied to another user account.
To User
The name of the user account the restrictions should be copied to.
This operation makes the restrictions of all folders, files, and filters for the user specified in the To User field identical to those of the user specified in the From User field. Note that this command has no effect on the folder passwords, because such passwords are not user-specific, they apply to all users.
See also:
You can use the Filter properties screen to modify the properties of the filters of Folder Guard. To display this screen, select the filter you want to change in the Folder Guard window, and choose Properties command from the Filter menu. (You can also double-click the filter with the mouse or press the Enter key.)

This screen contains the following areas:
Apply to files
A mask that specifies the names of the files to which this filter should apply. If a file has a name that matches the mask entered in this box, this filter would apply to that file, unless the name of the file matches the mask entered in the Except for files box. Empty box means ALL (the same as *), that is any file would match the filter.
Except for files
The mask that specifies the file names the filter should NOT be applied to. Empty area means NONE, that is no files are excluded from the filter. If a file name matches the mask entered in this area, the filter will not be applied to such a file, even if its file name matches the Apply to files mask.
Apply to subfolders
A mask that specifies the names of the subfolders to which this filter should apply. If a subfolder has a name that matches the mask entered in this box, this filter would apply to that subfolder, unless the name of the subfolder matches the mask entered in the Except for subfolders box. Empty box means ALL (the same as *), that is any subfolders would match the filter.
Except for subfolders
The mask that specifies the names of the subfolders that the filter should NOT be applied to. Empty area means NONE, that is no subfolders are excluded from the filter. If a subfolder matches the mask entered in this area, the filter will not be applied to such a subfolders, even if its name matches the Apply to subfolders mask.
Apply to locations
The mask of the folders to which the filter should apply. Only files and subfolders located in the folders listed in this box would be subject to this filter. Empty area means ALL (the same as *), that is any folder would match the filter.
Except for locations
The folders the filter should NOT be applied to. Empty area means NONE, that is no folders are excluded from the filter. If a file or a subfolder is located in a folder that matches the mask entered in this area, the filter will not be applied to such a file or a subfolder, even if its folder matches the Apply to folders mask.
Apply to programs
The list of programs to which this filter should apply. Only files accessed by the programs defined by this mask would be subject to this filter, unless the path matches the mask entered in the Except for programs box. If a program that does not match this mask, the filter would not apply to it. Each program should be specified using the full path to the program file. Empty area means ALL (the same as *), that is files opened by any program would match the filter.
Except for programs
The programs this filter should NOT apply to. Empty area means NONE, that is no programs are excluded from the filter. If the program's path matches the mask entered in this area, the filter will not be applied to the files accessed by that program, even if the program matches the Apply to programs mask.
Comments
Any text (such as explanatory notes) may be entered here. The content of this box is not used by Folder Guard when restricting access to files with the filters.
Note: The name of a filter can be changed using the Filter - Rename command. Folder Guard does not use this name while performing the protection; it is just a label to help you identify the filter.
See also:
The Keep it or skip it screen is displayed by Folder Guard when you start its main application (or refresh the folder tree in its Folders view) and Folder Guard encounters a folder that you had previously protected with Folder Guard, but it no longer exists or is unreachable:
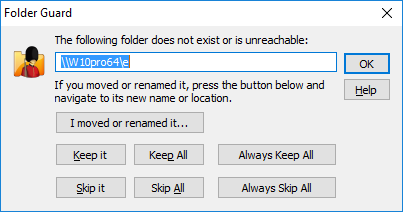
You can use this screen to tell Folder Guard how to handle the folder in question. This screen contains the following areas:
I moved or renamed it
Press this button if you have moved or renamed the folder and it actually still exists and is reachable, then select the new name (or navigate to the new location) of the folder. Folder Guard will transfer the restrictions and/or passwords that you had previously set up for this folder to its new name and/or location.
Keep it
Press this button if the folder no longer exists or is currently unreachable, but you want Folder Guard to remember the restrictions and/or passwords you had previously set up for this folder. You may want to use this option if, for example, the folder is a network folder on a computer that is currently disconnected from the network, but you still want the folder to be protected when that computer connects back to the network.
Keep All
Press this button if you want the Keep it action apply to the current and all future folders for which Folder Guard may display this screen during this update. You may want to use this option if there are many folders that are not reachable, but you want Folder Guard to remember all of them. In other words, pressing the Keep All button has the same effect as pressing the Keep It button for each unreachable folder individually.
Always Keep All
Press this button if you want the Keep all action to apply now and also in the future, when you start Folder Guard again, or refresh its folder view. If you press this button, it will essentially suppress the Keep it or skip it screen from being shown again. If you decide that you want to see this screen again in the future, enable the Prompt to keep or skip folders on start and on refresh option of Folder Guard.
Skip it
Press this button if you no longer want Folder Guard to remember the restrictions and/or passwords you had previously set up for this folder. You may want to use this option if, for example, you had deleted the folder and you do not plan to create the folder back again.
Skip All
Press this button if you want the Skip it action apply to the current and all future folders for which Folder Guard may display this screen during this update. You may want to use this option if there are many folders that no longer exist, and you don't want to press the Skip it button for each one individually.
Always Skip All
Press this button if you want the Skip all action to apply now and also in the future, when you start Folder Guard again, or refresh its folder view. If you press this button, it will essentially suppress the Keep it or skip it screen from being shown again. If you decide that you want to see this screen again in the future, enable the Prompt to keep or skip folders on start and on refresh option of Folder Guard.
The Options for file system events log screen is displayed when you click the Options link next to the option Log file system events in the list of options of Folder Guard.
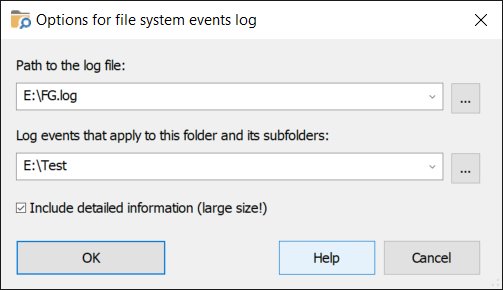
You can use this screen to control the location of the file where the events are recorded and to specify which events should be recorded in the log.This screen contains the following areas:
Path to the log file
The path to the file in which the file system events should be recorded.
Log events that apply to this folder and its subfolders
Path to the folder that should be monitored and which file system events should be recorded in the log file. The events related to any file or subfolder within this folder will be recorded as well. Keep in mind that if you specify a folder that experiences a large number of file system events (such as C:\) it may slow down the computer and create a log file of a very large size.
See also:
I've lost Folder Guard password. What should I do?
If you have lost the Master Password of Folder Guard, you can reset it by running the Emergency Recovery Utility.
If you have forgotten an unlocking password for a folder, or some other password used by Folder Guard, simply run Folder Guard and use its appropriate command to set up a new password.
What are the differences between the Home and Professional licenses?
Folder Guard offers many different ways of protecting access to the files or folders, including some advanced methods that are useful mostly in the business environments and have little practical use at home. We thought it would be unfair to expect the home users of Folder Guard to pay the full price of the software for the features they would not use anyway, so we created a less expensive option specifically designed for the home users. If you have registered Folder Guard with a Home license that was described as for the home, personal use only, the following limitations apply:
- The filters are not available for use. You can still see the list of filters in the Filters view, but you would not be able to enable them for actual use.
- The shared folders cannot be protected with passwords for use by the network users. You should still be able to set up folder passwords for the local users.
- The temporary passwords are not available.
- Even if you are a business user who doesn't need the filters or the network passwords, you are still not authorized to use the Home license on a business computer. The Home license can be used only on a personal computer that is not used for any business or employment-related tasks.
- To install Folder Guard on a Windows Server, an office license for 10 computers or more must be purchased. Without such a license, you can install Folder Guard on a server in the trial mode only.
How do I enter the License Key?
Folder Guard prompts you to enter your license key when you run it: simply press the Enter License Key button on the Welcome screen and enter your licensing information into the form.
Alternatively, you can run Folder Guard, choose the Help - About command from its menu, and click on the Enter License Key button.
IMPORTANT: When entering your license information, make sure you enter your name and the license key exactly as they are shown on your purchase receipt, including all capitalization and punctuation. Otherwise, Folder Guard may not accept the license key or may not register your information properly. You may wish to copy and paste the name and key from our message into the form, to avoid typos.
Can I use the same license key to install Folder Guard on several computers?
Yes, you can use the same license key, provided that you are installing it on no more computers than included in your license. Please refer to the file License.txt (installed along with other files of Folder Guard) for the detailed description of the terms of using this software on more than one computer. For information on our site license and quantity discounts, please visit our Online Store ![]() .
.
If you plan on protecting a large number of computers with Folder Guard, you may want to order the Folder Guard Administrator's Kit that contains the tools to help you automate the installation and licensing of Folder Guard on a large network.
How do I transfer Folder Guard to another computer?
First, uninstall Folder Guard from the old computer, using Windows Control Panel. (If the old computer is no longer operational, then Folder Guard is automatically treated as uninstalled from that computer.)
Then, install Folder Guard on the new computer, by running its installation file and entering your license key, when prompted.
What happens when the evaluation period expires?
This software comes with a built-in license that allows you to use it for free for the first 30 days after the installation. When this initial evaluation period expires, Folder Guard continues to operate as usual, except that it starts to display a reminder message informing you that the evaluation period has expired.
Note that if another user is using your computer while the reminder message is displayed, the user can click on the message and that would disable the protection performed by Folder Guard. To prevent other users from being able to access your protected files and folders, you must purchase a license for the continued use before the expiration of your evaluation period.
Will I lose my files if Folder Guard crashes?
No: Folder Guard does not encrypt or modify your files in any way, it protects them dynamically.
Can someone disable Folder Guard by ending its process?
No: if someone uses Task Manager to end the process of Folder Guard, it only stops the user-mode operations, such as the hot key, or the notification icon, and it may stop Folder Guard from displaying the Unlock buttons for the protected folders. However, the protection itself remains in effect, because it is preformed in the kernel, which is not affected by the user-mode processes.
Will Folder Guard encrypt my files?
No, Folder Guard does NOT encrypt or otherwise modify your files in ANY WAY. Folder Guard protects your files dynamically, that is, it intercepts requests from other programs to open files or list the contents of folders, and then rejects such requests for the files in the folders you have chosen to protect. The files and folders themselves remain undisturbed during this process, in their original condition.
As a result of such design, there is no danger of losing your documents if you lose your encryption key. On the other hand, the protected folders are protected only on your computer, where Folder Guard is installed and configured. If you require your private files to be protected even when taken to another computer, or when Windows or Folder Guard is not running, then you need an encryption program, such as Encryptability ![]() or USBCrypt
or USBCrypt ![]() .
.
Can someone remove the protected hard drive and attach it to another computer?
Yes: if someone who has a physical access to the computer removes the hard drive and then attached it to a different computer, without Folder Guard running on it, the hard drive will no longer be protected and such user would be able to access the previously protected files. (This is true for any protection that does not use encryption: for example, one can easiliy bypass the NTFS permissions by attaching the drive to a Linux computer.)
If you are concerned about such a possibility, you should use an encryption program such as Encryptability ![]() or USBCrypt
or USBCrypt ![]() to protect your files, not Folder Guard.
to protect your files, not Folder Guard.
Can I see the log of events such as locking/unlocking folders, etc.?
Yes: select the option Report events to Windows Event Log in the Options list of Folder Guard, and Folder Guard will keep a record of the events such as someone pausing or resuming the protection, or unlocking a password-protected folder. You can view the events using the standard Event Viewer tool of Windows.
Folder Guard cannot load its driver. What should I do?
Please see the troubleshooting tips for a possible solution.
I've reinstalled Windows and cannot access my protected folders. What should I do?
If you have not installed a fresh copy of Folder Guard yet and you still cannot access your protected folders, it means that the problem is not related to Folder Guard: when Folder Guard is not installed, it is not protecting anything. Most probably, the NTFS permissions of Windows prevent you from accessing your files and folders. To restore access, you need to "take ownership" of your files and folders. Please refer to Windows Help for more information or for the instructions on how to do that.
Can I protect my MP3 collection with Folder Guard?
Yes, you can use the filter named Lock MP3 files to prevent someone from copying your MP3 files to any external drive attached to your computer. You would still be able to listen to your MP3 files as usual, because the filter would not restrict access to the MP3 files located on the main C: drive.
Can I protect the "virtual" folders such as My Computer?
No, Folder Guard does not currently protect such folders, only the "real" folders (that is, the folders that actually exist on your hard disk and which you can use to store arbitrary files) can be protected with it.
Can I protect the cloud folders such as OneDrive or Dropbox?
Yes, you can use Folder Guard to protect the local copies of the cloud folders stored on your computer. Keep in mind, however, that such protection would only be in effect on your computer, where Folder Guard is installed and enabled; it would have no effect on other copies of the files, such as the "cloud" ones or on your smart phone. Also, while the protection is in effect, the protected folders may not be synchronized with the cloud. To allow them to synchronize, unlock the protected folder(s) or pause the protection of Folder Guard.
Can I password-protect the shared folders?
Yes, such protection is available for the business license customers.
How do I protect icons on my Desktop?
You can hide or prevent access to your desktop icons in the same way as you would protect any other file or folder. The only trick when protecting the desktop items is to determine the correct locations of these items on your hard disk. (Use the Go to Special Folder command to locate such folders.) Keep in mind that there are two physical folders which are used by Windows to display icons on your desktop: one is your personal desktop folder, and the second one is the "common" desktop folder, used to store the items common to all users of your computer. The Go to Special Folder command of Folder Guard lets you locate either of these folders easily.
How do I protect my Start Menu?
Windows stores the Start Menu items in a special folder on your hard disk. (You can use the Go to Special Folder command to locate this folder.) Keep in mind that there are two physical folders which are used by Windows to display icons on your Start Menu: one is your personal folder, and the second one is the "common" folder, used to store the items common to all users of your computer. You can restrict access to the Start Menu items by restricting access to such folders, or to the shortcuts they contain.
How do I protect Control Panel of Windows?
You can do it by restricting access to the CPL files, located usually in the C:\Windows\System32 folder. Each of the CPL files is a module responsible for one or several groups of settings of Control Panel:
| Module | Control Panel icons |
| ACCESS.CPL | Accessibility Options |
| APPWIZ.CPL | Add/Remove Programs |
| DESK.CPL | Display |
| HDWWIZ.CPL | Add/Remove Hardware |
| INETCPL.CPL | Internet settings, user accounts on Windows 95,98,Me |
| INFRARED.CPL | Infrared |
| INTL.CPL | Regional settings |
| JOY.CPL | Game Controllers |
| MAIN.CPL | Fonts, Keyboard, Mouse, PC Card (PCMCIA), Printers |
| MMSYS.CPL | Sounds |
| MODEM.CPL | Modems |
| NCPA.CLP | Network connections |
| NETCPL.CPL | Network settings |
| NUSRMGR.CPL | User manager |
| ODBCCP32.CPL | ODBC Data Source Administrator |
| PASSWORD.CPL | Passwords |
| POWERCFG.CPL | Power Management |
| SYSDM.CPL | System |
| TELEPHON.CPL | Telephony |
| THEMES.CPL | Desktop Themes |
| TIMEDATE.CPL | Date/Time |
(You may have other CPL files, or not all of the files listed above, depending on the software installed on your computer).
To restrict access to Control Panel, use Folder Guard to restrict access to the appropriate CPL files, by using the no access restriction.
Why does Search show the protected files?
If you've just protected a folder that you used to have for some time, then it's quite possible that if you use Windows Search command to search for the files in that folder, the search results would display the protected files. The problem is, the search results are displayed from the search index that Windows builds and keeps separate from the original files. That's why the file names of the protected files may appear in the search results even though the files themselves are protected with Folder Guard.
To solve this problem, you need to configure the search command of Windows not to index the protected folders. The procedure depends on the version of Windows that you have. Please refer to Windows Help for the specific instruction on how to exclude the protected folders from the search indexing.
Can I protect folders on removable drives, such as USB flash drives and others?
You can use Folder Guard to restrict access to folders located on the removable drives, but such protection will be in effect only on your computer, where Folder Guard is installed and configured properly. If you connect the removable drive to some other computer (that does not have Folder Guard on it), the folders on the removable drive will NOT be protected.
If you need your removable drives to be protected on other computers as well, you need to use an encryption program, such as our software USBCrypt. Please visit the following web page for more information:
https://www.winability.com/usbcrypt/ ![]()
What if my computer can boot more than one operating system?
If your computer is configured to boot more than one version of Windows, and you want Folder Guard to protect the resources of the computer for each of such versions, then you need to install and configure Folder Guard under each version of Windows that your computer is able to boot with.
For example, if you can boot your computer with either Windows 32-bit or Windows x64, then you need to install and configure one copy of Folder Guard after booting with Windows 32-bit, and then reboot with Windows x64 and install another copy of Folder Guard, into a separate folder, and configure it separately.
If your computer can boot a non-Windows operating system, such as Linux, then the folder protection will NOT be in effect when you boot it. To protect your files in such a case, you need to use an encryption program, such as Encryptability ![]() or USBCrypt
or USBCrypt ![]() , instead of Folder Guard.
, instead of Folder Guard.
Will my anti-virus program protect files in the restricted or hidden folders?
If you restrict access of hide a folder with Folder Guard, then virtually no program, including the anti-virus one, will see or be able to open the files in the protected folder. To allow your anti-virus program check all files for viruses, you need to either disable the protection before scanning your hard drive for viruses, or add your anti-virus program to the Trusted Programs list.
Will my backup program back up the files located in the protected folders?
It depends on the backup program you have. If the backup is performed in while Windows is not loaded, (for example, by starting your computer from a bootable CD) then Folder Guard will not be protecting your files, and the backup program should be able to backup all your files, as usual. If, however, your backup program runs under Windows, when folder protection is in effect, then it will have no access to your protected files, and it will not back them up! To allow your backup program to backup your protected files, you need to either disable the protection before starting the backup program, or add your backup program to the Trusted Programs list of Folder Guard. Don't forget to test your backup set of files to make sure your protected files have actually been backed up! To prevent other users from running the backup program and being able to access your protected documents that way, you may want to protect the backup program itself.
May I give a copy of Folder Guard software to a friend?
Yes, you may give the installation file of Folder Guard to your friends and associates. However, you may NOT share your license key, if any, with anybody else. Please remember that the license key we provide you with is for your own use only. If your friends like our programs, please direct them to our web site to purchase their own license keys.
There are several other simple, but important conditions which we impose on further redistribution of our products. Please refer to the file License.txt in the folder where you have installed Folder Guard for the complete description of our distribution requirements.
How can I get a printed version of this guide?
This user's guide is available online in the printer-friendly format:
https://www.winability.com/folderguard/users-guide-printable.htm
Simply open the link above in your web browser and use the web browser's Print command to print it out on your printer.