The software described in this guide is furnished under a license agreement and may be used only in accordance with the terms of the agreement.
Information in this document is subject to change without notice. The names of companies, products, people, characters, and/or data mentioned herein are fictitious and are in no way intended to represent any real individual, company, product, or event, unless otherwise noted. Complying with all applicable copyright laws is the responsibility of the user. No part of this document may be reproduced or transmitted in any form or by any means, electronic or mechanical, for any purpose, without the express written permission of WinAbility Software Corporation. WinAbility Software Corporation may have patents, patent applications, trademarks, copyrights, or other intellectual property rights covering subject matter in this document. Except as expressly provided in any written license agreement from WinAbility Software Corporation, the furnishing of this document does not give you any license to these patents, trademarks, copyrights, or other intellectual property.
NO WARRANTY
The technical information in this document is provided AS-IS and WinAbility Software Corporation makes no warranty as to its accuracy or use. Any use of the information contained herein is at the risk of the user. This document may include technical or other inaccuracies or typographical errors.
Copyright Notice
© 2024 WinAbility Software Corporation. All rights reserved.
Trademarks
WinAbility, WinAbility.Com, Encryptability, and "The Way Software Should Be!" are either registered trademarks or trademarks of WinAbility Software Corporation and/or its suppliers in the U.S.A. and/or other countries. Other product and company names mentioned in this document may be the trademarks or registered trademarks of their respective owners and are hereby acknowledged.
Thank you for choosing Encryptability!
Encryptability® is a software utility that you can use to create secure local storage on your computer to keep your sensitive files from unauthorized access.
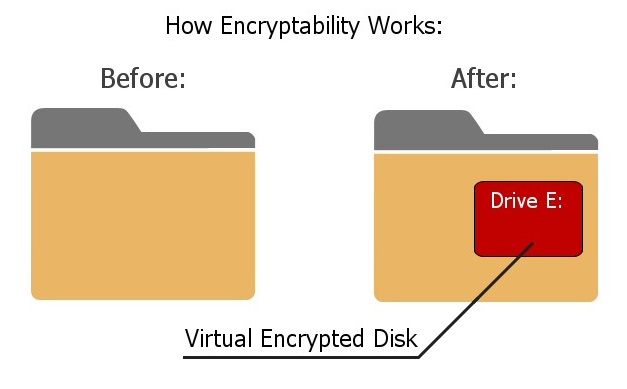
Encryptability is the "on-the-fly" encryption software, that works by creating a Virtual Encrypted Disk inside the host folder and protecting it with the password of your choosing. You decide how large the Virtual Encrypted Disk should be: it can take all of the available space of the host disk, or only a fraction of it. After you've created a Virtual Encrypted Disk with Encryptability, you can enter your password to start the Virtual Encrypted Disk and use it just like any real disk: you can browse it with Windows Explorer or any other software you have, copy files to it, or move them back to your main hard disk, save documents to the Virtual Encrypted disk and open them when needed, and so on. Any file that you move to the Virtual Encrypted Disk gets encrypted transparently, without you having to do anything special. When you open a document or move a file out of the Virtual Encrypted Disk, it gets decrypted automatically on the fly. When you no longer need to work with the private files, stop the Virtual Encrypted Disk and it will become locked with your password again.
When you run Encryptability software, it displays the list of the Virtual Encrypted Disks you have created that you can use to rename, move to different locations, delete the Virtual Encrypted Disks you no longer need, and so on:

How strong is the encryption of Encryptability?
Encryptability uses the Advanced Encryption Standard (AES) ![]() with the key strength of 128 or 256 bits. (Business customers have the option of using several other encryption algorithms, as well). This encryption is very strong: there is currently no realistic method that can break such encryption. Checking all possible keys would take a long, long time
with the key strength of 128 or 256 bits. (Business customers have the option of using several other encryption algorithms, as well). This encryption is very strong: there is currently no realistic method that can break such encryption. Checking all possible keys would take a long, long time ![]() (longer than the age of the Universe). The only way to get access to the files protected with Encryptability is to provide the correct password. This is the good news; the bad news is that if you forget your password, there would be no way to get your files back. To protect you from such an unpleasant situation, Encryptability offers you an option to create a spare key file on your computer.
(longer than the age of the Universe). The only way to get access to the files protected with Encryptability is to provide the correct password. This is the good news; the bad news is that if you forget your password, there would be no way to get your files back. To protect you from such an unpleasant situation, Encryptability offers you an option to create a spare key file on your computer.
Is there a limit for the number of Virtual Encrypted Disks that can be created with Encryptability?
No, there is not such a limit: you can create as many Virtual Encrypted Disks as you like. For example, you may want to create one Virtual Encrypted Disk to keep the family photos, another one for the tax returns or financial documents, and yet another one for that novel you've been writing. Or, you may want to create just one large Virtual Encrypted Disk and organize different files by keeping them in separate folders. If you decide to have several Virtual Encrypted Disks, each of them can have its own password, or you can use the same password for each one, it's all up to you. And if you change your mind at some point, you can always delete the Virtual Encrypted Disks you no longer need and create new ones, any time you like.
Is administrator access needed to use Encryptability?
Just like with most other software, the administrator rights are required to install Encryptability on a computer. The administrator rights are also necessary to create or delete the Virtual Encrypted Disks. However, after you've created a Virtual Encrypted Disk, the administrative rights are NOT required to actually use the encrypted files.
Any other questions?
Please see the answers to the Frequently Asked Questions.
Version 23.9 (September 15, 2023)
This update offers several improvements and corrections, such as:
- A problem has been corrected that in some situations caused a delay of several seconds when contacting the license validation server;
- A problem has been corrected that prevented the standard users from using some commands of the software.
- Several other minor improvements and corrections have been made.
Version 22.10 (October 26, 2022)
This update offers several improvements and corrections, such as:
- Improved support for the ARM 64-bit processor architecture;
- A problem has been corrected that in some situations caused the Encryptability notification icon to close unexpectedly.
Version 21.3 (March 20, 2021)
This update offers several improvements and corrections, such as:
- Native support for the ARM 64-bit processor architecture;
- Several other minor improvements and corrections have been made.
Version 21.1 (January 31, 2021)
The first release of Encryptability: everything is new!
The installation and operation of Encryptability software is supported on the versions of Windows that are fully supported by Microsoft. At the time of this writing, the supported versions of Windows are:
- Windows 11
- Windows 10
- Windows Server 2022 (with Desktop experience)
- Windows Server 2019 (with Desktop experience)
- Windows Server 2016 (with Desktop experience)
Both the 32-bit and x64 editions of Windows (including ARM 64-bit) are supported.
Encryptability may be able to work on the following older versions of Windows in the test signing mode:
- Windows 8.1
- Windows 7 with Service Pack 1
- Windows Server 2012 (with Desktop experience)
- Windows Server 2012 R2 (with Desktop experience)
Note that Windows Vista x64 and Windows Server 2008 x64 are NOT SUPPORTED. The reason is that Microsoft chose not to update ![]() these versions to support the SHA256 digital signatures in the kernel mode, and without such support such systems cannot use the Encryptability kernel driver.
these versions to support the SHA256 digital signatures in the kernel mode, and without such support such systems cannot use the Encryptability kernel driver.
IMPORTANT: For each supported version of Windows, all available service packs and Windows updates must be installed. If your computer is not set to install updates automatically, use Windows Update to check for available updates and install them. Encryptability may not work properly if the latest updates are not installed.
Note that some features of Encryptability depend on support from Windows and not all versions and editions of Windows provide such support equally well. You are strongly advised to try the software before purchasing it to verify it's working well enough in your particular software environment.
Encryptability may work with some of the older versions of Windows, such as Windows XP, Vista, or Windows 7, but we do not support such configurations. You are advised to thoroughly test the software on the unsupported versions of Windows prior to purchasing it, to make sure it operates according to your requirements "out of the box".
Encryptability is NOT compatible with Windows RT, Windows 95, 98, Me, Windows NT, Windows 2000, or any older version of Windows. Encryptability is NOT compatible with Linux, OS X, or other operating systems that are not based on Windows.
Both Encryptability ![]() and USBCrypt
and USBCrypt ![]() are encryption products that are used to create and manage Virtual Encrypted Disks. Both of these products allow you to create Virtual Encrypted Disks on both the internal and external storage devices, and access the encrypted files via the virtual drive letters, just like the real drives. They both use the same encryption methods and algorithms, and offer the same strength and protection against unauthorized access to the encrypted files and folders.
are encryption products that are used to create and manage Virtual Encrypted Disks. Both of these products allow you to create Virtual Encrypted Disks on both the internal and external storage devices, and access the encrypted files via the virtual drive letters, just like the real drives. They both use the same encryption methods and algorithms, and offer the same strength and protection against unauthorized access to the encrypted files and folders.
They differ, however, in the ways they handle the Virtual Encrypted Disks: Encryptability was designed to better handle the Virtual Encrypted Disks on the stationary storage, such as non-removable hard drives, while USBCrypt is better suited for handling encryption of the removable drives.
Here are some of the specific differences you may want to consider when deciding which product, Encryptability or USBCrypt to use in each situation.
- When you encrypt a removable drive with USBCrypt, it adds a portable version its own software to the drive, to allow you to use the encrypted drive on the computers that do not have USBCrypt software installed on them. (The administrator approval is still required, though.) Encryptability does not add software to the removable drives, so they could be used only with the computers that already have Encryptability software installed.
- USBCrypt only supports one Virtual Encrypted Disk per each physical host drive, while Encryptability allows you to create any number of Virtual Encrypted Disks on the same physical storage device, as long as you choose to keep them in separate folders.
- When encrypting a removable drive, USBCrypt checks the NTFS permissions of the host drive. If such permissions pevent the use of the drive with other computers, USBCrypt offers to correct the situation, while Encryptability does not check for such a condition.
- Encryptability supports creating Virtual Encrypted Disk hosted on the shared folders located on other computers connected to your network, while USBCrypt does not support encrypting the network drives.
- USBCrypt displays a separate taskbar notification icon for each encrypted drive, while Encryptability displays only one such icon, that combines the menus for all available Virtual Encrypted Disks.
You can use both Encryptability and USBCrypt on the same computer, but keep in mind that each Virtual Encrypted Disk can be controlled by only one product as the same time. (You can convert the Virtual Encrypted Disks from the USBCrypt format to Encryptability and back.)
Or, you can choose only one of the products, Encryptability or USBCrypt, that matches the way you work. If you are not sure which one to choose, you are welcome to try them before purchasing: each product comes with a built-in license for a free 30-day evaluation use.
- Login to Windows as the administrator, or as a power user. If you login as a regular or limited user, you may not be able to install or use this software.
- To begin the installation, simply run the installation file. If you do not have the installation file, please visit our web site to download the latest version:
https://www.winability.com/download/

- Note that if you have a previous version of this software already installed on your computer, the installation utility may prompt you to restart the computer, in order to be able to replace the files currently in use by Windows.
- The installation program will walk you through the process of setting up Encryptability. You will be prompted to read and accept the End User License Agreement, and to select the installation options such as the folder where to copy the files.
- After you press the Finish button, the installation program will copy the files into the specified folder and configure Windows for using Encryptability. If the installation program detects that your version of Windows is 64-bit, it installs the 64-bit files. Otherwise, it installs the 32-bit files.
- IMPORTANT: Make a backup copy of the installation file of Encryptability that you have downloaded from our web site, as well as a copy of the message with your license key, on a CD-R or other removable disk, because if you ever need to reinstall the software, you will need both, the installation file and your license information to install the program in the fully-licensed mode. It's not enough to store the files on your hard disk, because when (not if) it crashes, you will lose the files. (Yes, hard disks do crash, believe us!) We provide for download from our web site the latest versions of the installation files only. When we release an updated version, we remove the older version from the download area, so the installation file with the version that you have purchased may not be available for download in the future. Remember, it's your responsibility to backup your important files! If you do misplace your license key or the installation file that we no longer offer for download, please use this link to order a replacement:
https://www.winability.com/store/?lost_key
To completely uninstall Encryptability, it's not enough to simply delete its program files from the installation folder. To completely remove Encryptability from your computer, follow the instructions below.
IMPORTANT: If your computer is configured for several user accounts, login into the same user account that you were logged in when you were installing Encryptability. If you use Windows Fast User Switching, log off from all other accounts before trying to uninstall Encryptability.
If you have used Encryptability to create Virtual Encrypted Disks to keep your files, it's important to understand that after you have uninstalled Encryptability, you will not be able to start the Virtual Encrypted Disks and use the files they contain. So before uninstalling Encryptability, you may want to use Encryptability to start any Virtual Encrypted Disks, examine their contents, and move any files you want to keep out of them onto the regular storage devices of yours.
After making sure a Virtual Encrypted Disk does not contain any important files of yours, delete it, while you still have Encryptability installed on your computer. Deleting a Virtual Encrypted Disk will release the resources of your computer and free up the disk space on your storage device.
Note that if you plan to reinstall Encryptability later on, you do NOT need to delete the Virtual Encrypted Disks: you should be able to continue using them, as before, after you install Encryptability back. However, make sure that each such Virtual Encrypted Disk is stopped before uninstalling Encryptability. If Windows refuses to stop any Virtual Encrypted Disk because it still has files in use, restart the computer to release the files. (Do not start any Virtual Encrypted Disks after restarting Windows.)
After all Virtual Encrypted Disks have been stopped or deleted, go to Windows Control Panel, open the Apps, Programs and Features, or Add/Remove Programs item, and use it to uninstall Encryptability.
You may also be prompted to restart your computer, in order to deactivate Encryptability and release its files that are currently in use by Windows, before the removal can be completed.
If you want to install a new version of Encryptability on a computer that already has an older version of Encryptability installed, you do not need to uninstall the old version first. What you need to do, though, is stop all Virtual Encrypted Disks currently active on the computer before starting the upgrade. (If you forget to stop such a disk, the installation utility of Encryptability should remind you about it.)
After you've stopped all Virtual Encrypted Disks, run the installation file with the new version of Encryptability, and it should replace the old version with the new one (that is, upgrade your version of Encryptability).
Encryptability is the "try-before-you-buy" software. It means that you can download the fully functional software from our web site and give it a try to see whether it suits your needs and works well enough for you. If it's not up to your expectations or requirements, simply uninstall it from your computer, you have no obligation to continue using the software or pay for it unless you want to. If you do decide to keep the software and continue using it, you can purchase a license for the continued use, enter your license key into the program, and then start using Encryptability for real, not just for evaluation.
During the evaluation, Encryptability works in exactly the same way as after you purchase a license for its continued use: there is NO functional difference between the evaluation and the fully licensed versions of this software. We make the evaluation versions this way so you can have a real look at them to decide whether or not they fit your needs.
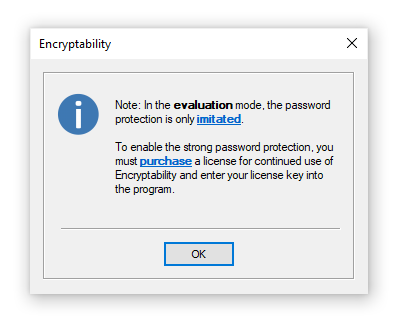
The only thing different during the evaluation of Encryptability is that it uses a "weak" password protection of the encrypted data: it allows anyone to recover the "weak" password of a Virtual Encrypted Disk within a few minutes or hours (depending on the computer speed). Encryptability displays the following message when you set up a new password for Virtual Encrypted Disk during the evaluation period:
Note that the "weak" password protection does not affect the speed of encryption, or the performance of the file operations on the encrypted volumes, or anything else: Encryptability operates in exactly the same way, with the same speed. After you purchase a license for continued use of Encryptability, the next time you start the Virtual Encrypted Disk, it prompts you to remove the "weak" password protection from it:
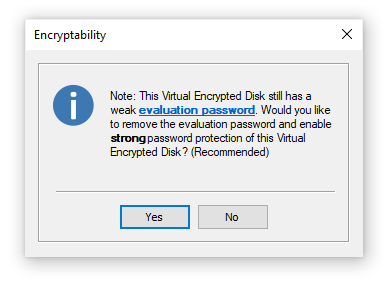
All you need to do is press the Yes button, and Encryptability will instantly remove the "weak" password protection from the Virtual Encrypted Disk and enable the full, strong password protection.
We accept all major credit cards, and we also offer many other payment options.
Open one of our web sites listed below, click on the Purchase or Buy Now link, and it will take you directly to our secure online store, where you can see the latest pricing and discount information, our money-back guarantee, privacy policy, and other related information:
We provide free upgrades to the updated versions of the same product that we may release within one year from the date of your purchase. For example, if you have purchased your license on March 1, 2020, you may use that license key for all updated versions of the same product that we may release during the next year, up to March 1, 2021 (both minor and major upgrades are covered by this offer). In other words, within one year after the purchase you get all upgrades to the product free of any charges.
After that, if you would like to upgrade to a newer version, you will be able to do so after purchasing a discounted upgrade license. (Of course, you are in no way obligated to upgrade to the new versions: you may continue using the version that you have purchased for as long as you like, if it works for you well enough, without paying any additional upgrade fees.)
Please visit our web sites for the latest information:
Encryptability can check for the updates for you, either manually or automatically:
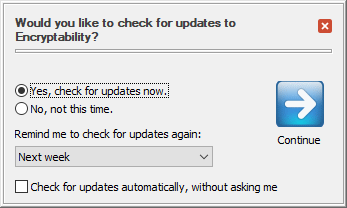
You can choose how often you want Encryptability to remind you to check for the updates (daily, weekly, monthly, or never). You can also set up Encryptability to check for the updates automatically, without asking you.
Note that you may need to configure your firewall, anti-virus, and/or anti-spyware software to allow Encryptability to connect to the Internet, otherwise it may not be able to receive the information about the updates.
Related topics:
We provide free online support to the licensed customers through our web site, for at least one year after the purchase. The prospective customers evaluating the software are welcome to use our support area, too. Before requesting technical or customer support, however, please check out this manual, it may already contain the answer to your question. In particular, be sure to look through the FAQ (Frequently Asked Questions) section of this guide.
Please DO NOT send us email messages, because due to the spam, worms, and spyware problems the reliability of email has diminished greatly in the last few years. The email messages that you send us often do not arrive, and if they do, our replies are often get blocked by your anti-spam or anti-virus software, causing frustration and unnecessary delays in communication.
Please visit our web site to request technical or customer support:
In order to encrypt files with Encryptability, first you need to create one or several Virtual Encrypted Disks to hold the files you want to be encrypted and password-protected.
To create a Virtual Encrypted Disk, run Encryptability (using its desktop icon, for example) and choose File - Create New from the menu:
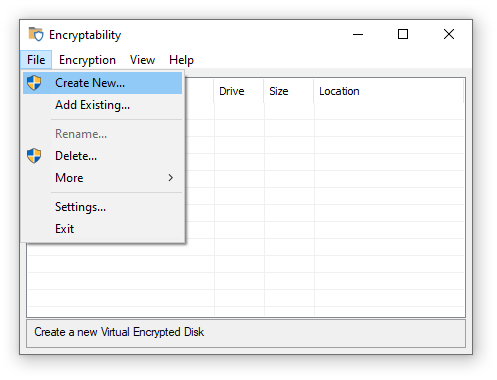
Encryptability should launch the encryption wizard that will guide you through the process of creating a Virtual Encrypted Disk. (If you are using the computer as a non-administrator, you will need to provide the administrator credentials to continue.)
Next step: Choose name
The first screen of the wizard prompts you to choose a descriptive name for the Virtual Encrypted Disk you are about to create:
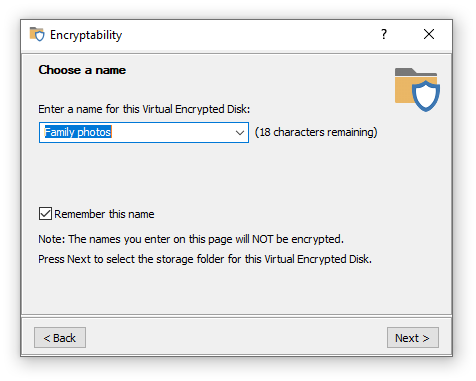
The name of the Virtual Encrypted Disk that you enter here will be displayed by Encryptability on its windows and menus later on, when you will be working with it. If you plan to create several Virtual Encrypted Disks, you may want to enter a descriptive name here to help you distinguish this Virtual Encrypted Disk from others later on. For example, if you plan to use this Virtual Encrypted Disk mainly to store your family photos, you may want to name it Family photos. Keep in mind that this name will NOT be encrypted: it will be shown on the Encryptability screens even before the correct password is entered.
Note that Encryptability can remember the names that you enter here: if you select the option Remember these names, then next time you run Encryptability you can see the previously entered names by clicking on the down arrows at the far right end of the Enter a name boxes. You can select one of the previous names in the list to use it without typing the name again. If you don't want the name to be remembered in this way, clear the Remember these names option before clicking on the Next button. You can also choose the Clear all command (the last item on the list of names) to erase the list and make Encryptability "forget" them.
Next step: Choose folder
For each Virtual Encrypted Disk that you create with Encryptability, the software creates several files that need to be stored on one of the physical storage devices of your computer, in a single host folder. Use this screen to specify the location for such folder:
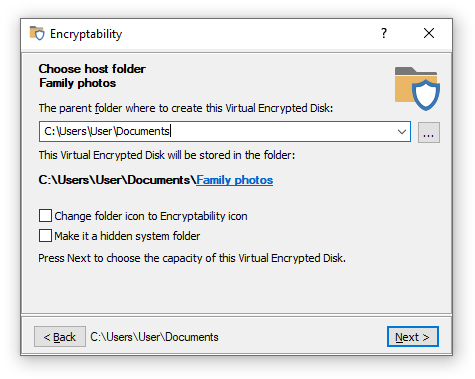
Each Virtual Encrypted Disk must be stored in a separate host folder. This screen offers you the options to specify both the parent folder under which several such folders could be located, and the name of the final folder to be used for this specific Virtual Encrypted Disk.
For the parent folder, you can choose almost any folder where you usually store your files and documents, or it could be a folder located on another drive attached to your computer, if you have one. The parent folder does not need to be the same, you can choose a different parent folder for each Virtual Encrypted Disk, or you can choose to have several Virtual Encrypted Disks stored under the same parent folder, it's all up to you.
To change the name of the final folder used for this Virtual Encrypted Disk, click on the link in the path displayed on the screen, and choose one of the options from the menu:
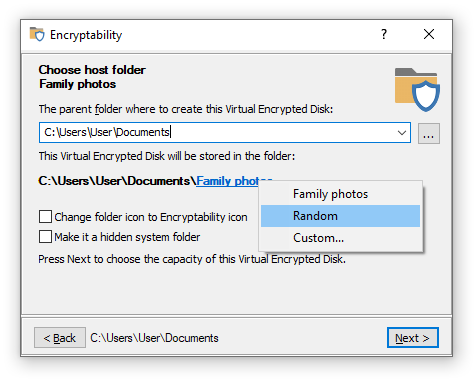
You can choose the name of the final folder to be the same as the name of the Virtual Encrypted Disk (which is Family photos in this example), or have a random name consisting from several letters and digits, or have a custom name of your choosing.
Remember that the names of the parent folder and the final folder you specify here are NOT ENCRYPTED, they may be visible to anyone browsing your computer.
This screen also offers several options related to the host folder for this Virtual Encrypted Disk:
- Change folder icon to Encryptability icon
Select this option if you want the folder icon (as it appear in File Explorer), to be the icon of the Encryptability application. You may want to select this option if you want to be able visually distinguish the folders which are used to store the Virtual Encrypted Disks from other folders you might have. This option only affects the visual appearance of the folders when browsing them with File Explorer; it does not have any impact on the operation of the Virtual Encrypted Disk.
- Make it a hidden system folder
Select this option if you want the host folder of this Virtual Encrypted Disk to be marked as hidden and system folder. If you select his option, the folder will not be visible in File Explorer under normal conditions. However, the folder may become visible if the user of the computer changes the File Explorer options to make it display the hidden system folders, so you should not rely on this option to make the host folder completely invisible to other users.
Next step: Choose size
The next step of the wizard lets you choose the size (or the capacity) of the Virtual Encrypted Disk you are creating:
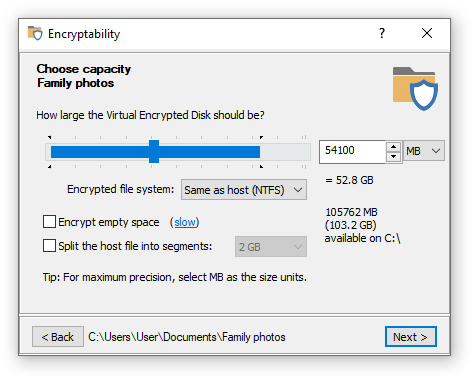
The size you would choose here would determine the maximum total size of all encrypted files you would be able to store in this Virtual Encrypted Disk later on.
You can use either the slider to choose the portion of the available space to encrypt, or enter the desired size directly into the box to the right. The minimum size is 1 MB, the maximum is only restricted by the available free space on the host drive and by the limitations of the operating system.
The portion of the slider displayed in the blue color indicates the available free space on the host drive. It shows the maximum size of the Virtual Encrypted Disk that can be created on the host disk. If you want a larger portion of the host drive to become available for encryption, you need to move some files out of the host drive, before creating the Virtual Encrypted Disk.
Besides the size, this screen also lets you choose the format of the file system to create within the Virtual Encrypted Disk by selecting it in the Encrypted file system list. (If you do not make the selection then by default the encrypted file system will of the same type as the file system of the host drive.)
Another important option available on this screen is Encrypt empty space. This option greatly affects the speed of creation of the Virtual Encrypted Disk. Read more...
Finally, the option Split the host file into segments offers you more control of how the Virtual Encrypted Disk is stored within the host folder. Normally, you don't need to change this option: it will be automatically selected for the FAT/FAT32 host drives, and deselected for the NTFS and exFAT drives, as needed. If you have a good reason for the host file to be split in segments even on the NTFS or exFAT host drives (an example of such a reason could be if you plan at some point to move the Virtual Encrypted Drive to another host drive, formatted with FAT or FAT32), then you are free to select this option. In such a case, choosing the largest segment size offered (2GB) is preferred, because it would reduce the number of the segments that Encryptability software would need to keep track of.
If this option is not selected, then Encryptability uses a single file to store the contents of the Virtual Encrypted Disk. This setting is recommended if the host drive is formatted with the NTFS or exFAT file systems, which allow for virtually unlimited sizes of the files. However, if the host drive is formatted with the FAT or FAT32 systems, such systems cannot store files of 4 GB or larger size. If you create a Virtual Encrypted Disk of 4GB or large size, then the host file must be split in smaller segments (2GB or smaller each). To accommodate for such a situation, this option becomes automatically selected (and you cannot deselect it) if the host drive is formatted with the FAT or FAT32 file system.
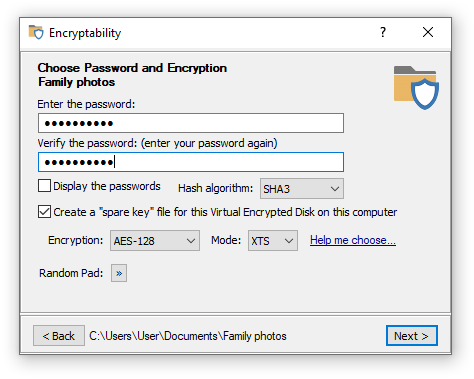
Next step: Choose password and encryption
The next step of the wizard lets you choose the password to protect the Virtual Encrypted Disk:
Of course, choosing a good password is tricky. It should be long and complex enough to be hard to guess by others, yet easy enough to remember for you. A strong password should contain a mix of the lower- and -upper-case characters, as well as a few digits and special characters.
Remember that the passwords used by Encryptability are case-sensitive (that is, Orange, ORANGE, and orange are considered different passwords. The maximum number of characters a password may contain is 64.
If you've decided to choose a complex password, you may find the Display password option handy: it lets you see the passwords you are entering in plain view, as they really are. (Just make sure no one is looking over your shoulder before choosing to reveal your password in this way!)
Note that if you are still evaluating Encryptability (that is, you have not purchased a license for its continued use yet), you will see the following warning:
This message reminds you that during the evaluation period Encryptability is using the "weak" password protection: it allows anyone to recover the "weak" password easily. If you have already purchased a license for the continued use of Encryptability and entered your license key into the program, then the full, strong password protection will be used and you will not see this message.
Besides choosing the encryption password, you can also select a few related options:
-
Hash algorithm
You can choose the hash algorithm to be used to derive the encryption key
from your password. The current choices are:
- SHA3 - Secure Hash Algorithm 3 with 512 bits of output.
- SHA2 - Secure Hash Algorithm 2 with 512 bits of output.
- SHA2 Combo - a combination of SHA2 and WHIRLPOOL algorithms with 512 bits of output.
Each of these choices offers comparable security, so it's up to you which one to choose.
- SHA3 - Secure Hash Algorithm 3
-
Create a "spare key" file for this Virtual Encrypted Disk on this computer
If you select this option then Encryptability will create a special file on the hard drive of your computer that it can use later on to reset the password of this specific Virtual Encrypted Disk. You should consider carefully whether you want to use this option or not: it may come very handy if you forget your password, but if someone else can get hold of your files on this computer, they would be able to bypass the password protection and access your encrypted files without knowing your password. If you are worried about the latter, you are perfectly free to clear this option, just remember that in such a case if you forget your password, you will lose your encrypted files forever!
Note that should you change your mind later on, you can use the Spare key commands on the Encryption menu of the Encryptability application to create or erase the "spare key" file after the Virtual Encrypted Disk has been created.
Note also that each Virtual Encrypted Disk you create requires its own "spare key" file: it's impossible to use one "spare key" file to unlock another Virtual Encrypted Disk. Even if you create exactly the same Virtual Encrypted Disk of the same size and protect it with the same password, you should create a new "spare key" file specifically for it: any other "spare key" file would not work.
-
Encryption and Mode
These options allow you to select the encryption algorithm and encryption mode that should be used for this Virtual Encrypted Disk. AES-128 stands for "Advanced Encryption Standard
with 128-bit key", and AES-256 selects the same AES algorithm but with the 256-bit key. If you have purchased a business license for Encryptability, you have the option of choosing among several other encryption algorithms: TF-128 stands for Twofish
algorithm with a 128-bit encryption key, and TF-256 means Twofish encryption with a 256-bit key. Finally, the choice of AES-TF-512 gives you the cascade encryption algorithm that is a combination of AES-256 and TF-256 with the effective key length of 512 bit. The XTS encryption mode
is considered the best choice at the time of this writing. Business customers can also select the CBC mode which is an older standard that has some deficiencies, but may be required for compliance with some requirements you might have. The default selection of AES-128 and XTS should provide the best encryption method for most situations. -
Random Pad
This button opens a small pop-up window that you can use to provide Encryptability with random data by moving the mouse around that window randomly for a few seconds:
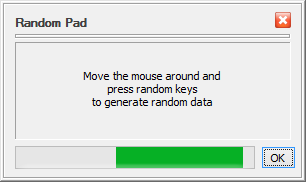
Encryptability needs random data to generate the encryption keys and related parameters when creating the Virtual Encryption Disk. It collects such random data by monitoring the motion of the mouse and the keystrokes you make while using the previous screens of Encryptability. Usually it is not necessary to use the Random Pad, because by the time you reach this screen Encryptability has usually collected enough random data from your use of the previous screens. However, if you want to provide more randomness, you are certainly welcome to use the Random Pad window.
Next step: Formatting the Virtual Encrypted Disk
When Encryptability is ready to actually create the Virtual Encrypted Disk, it offers you to review the options that you have selected on the previous screens:
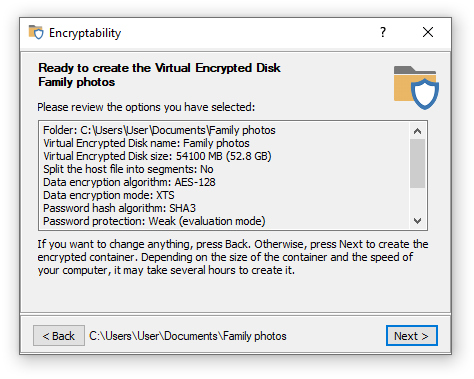
If you want to change anything, it's not too late: press the Back button to return to the previous screens and make the changes as desired. If everything looks OK, press the Next button and Encryptability will start creating a Virtual Encrypted Disk:
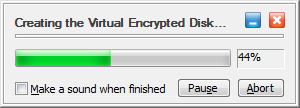
The process may take from a couple of minutes to several hours, depending on the size of the Virtual Encrypted Disk you are creating and the speed of the host drive. For the large or slow drives, you can pause the encryption process and resume it later, if you need to allow some other program to use the full processing power of your computer for a period of time.
Next step: The Virtual Encrypted Disk is ready for use!
After Encryptability is done creating the Virtual Encrypted Disk, you can start using it right away:
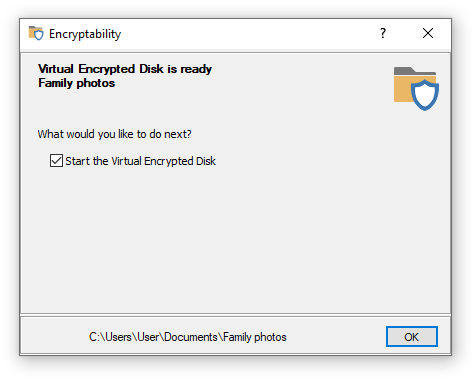
If you select the option to Start the Virtual Encrypted Disk, after verifying your password, Encryptability would start the Virtual Encrypted Disk and assign a drive letter to it, as if you would have attached a separate storage device to the computer. The Virtual Encrypted Disk you've just created would be initially empty: it would contain no files or folders. You can start moving or copying the files and folders that you want to be encrypted into the Virtual Encrypted Disk, using the usual tools provided by Windows, such as drag-and-drop. You are also free to use any third party file manager (such as our AB Commander ![]() ) to copy the files into the Virtual Encrypted Disk. After that you can work with your encrypted files in the same way as you would with the regular files: you can rename or move them, open or delete them, create new folders or delete the existing ones - all such operations are completely supported by Encryptability.
) to copy the files into the Virtual Encrypted Disk. After that you can work with your encrypted files in the same way as you would with the regular files: you can rename or move them, open or delete them, create new folders or delete the existing ones - all such operations are completely supported by Encryptability.
When you are done working with the files inside of the Virtual Encrypted Disk, it's time to make them protected. You do that by stopping the Virtual Encrypted Disk, using any tool offered by Encryptability: the menu of the Encryptability taskbar button, or by running Encryptability from the Start menu and selecting the Stop Virtual Encrypted Disk command.
After you've stopped a Virtual Encrypted Disk, all files you've placed in it become completely inaccessible until next time you enter the password while starting the Virtual Encrypted Disk.
When you run Encryptability application, it displays the list of the Virtual Encrypted Disks that you've created:
The Virtual Encrypted Disks that have been started have the green shield icons in front of their names, and their assigned drive letters are shown in the Drive column. If a Virtual Encrypted Disk has not been started yet, it has the red shield icon instead.
You can use Encryptability application to manage the Virtual Encrypted Disks, using the commands on its menu, available on the top bar below the title, or by using the shortcut menu displayed when you right-click with the mouse. Most commands operate on the currently selected items. You can select one item at a time by clicking it with the mouse, or you can select several items by using the checkboxes next to each item. Note that some commands (such as Rename) can operate only when exactly one item is selected and they would apply to the selected items only, while some other commands can operate on several selected items at once. Note also that some commands can only be used when the selected Virtual Encrypted Disks are stopped; if that's not the case Encryptability will prompt you to stop the Virtual Encrypted Disks when necessary.
The File menu offers the following commands:
- Create New...
Use this command to launch the wizard that guides you through the steps necessary to create a new Virtual Encrypted Disk.
- Add existing...
If you've previously used the Remove command to remove a Virtual Encrypted Disk from the list without deleting it, you can use this command to add that Virtual Encrypted Disk back to the list.
- Rename...
Use this command to change the name of the selected Virtual Encrypted Disk as it is shown in the list and on various other screens displayed by Encryptability.
- Delete...
Use this command if you no longer want to keep the selected Virtual Encrypted Disks and want them to be deleted from the list AND from the storage device. This command will release all resources previously used by the selected Virtual Encrypted Disks (such as the space of the storage device occupied by the encrypted files) and make such resources available for use by other programs or to create new Virtual Encrypted Disks. After this command is finished, any files that used to be in the Virtual Encrypted Disks will be destroyed without any chance of their recovery, so please double-check that the selected Virtual Encrypted Disks contain no important files of yours before deleting them.
- More
Use commands on this sub-menu to move, copy, and perform other operations on the selected Virtual Encrypted Disks.
- Settings...
Use this command to change the settings of the Encryptability application.
- Exit
Use this command to exit the Encryptability application. Note that after Encryptability is closed, you can still use the taskbar icon to start or stop the Virtual Encrypted Disks.
The Encryption menu offers the following commands:
- Start selected...
Use this command to start the selected Virtual Encrypted Disks.
- Stop selected...
Use this command to stop the selected Virtual Encrypted Disks.
- Spare key
Use this command to create or delete the spare keys of the selected Virtual Encrypted Disks.
- Properties
Use this command to display a screen with the properties the selected Virtual Encrypted Disk. Note that the encryption properties are not displayed unless the Virtual Encrypted Disk has been started.
The View menu offers the following commands:
- Select
Use these commands to quickly select or deselect Virtual Encrypted Disks in the list.
- Refresh Selected/Refresh all
Use these commands to refresh the list Virtual Encrypted Disks by analyzing each host folder and updating the information displayed in the list, if necessary.
- Restore default columns
Use this command to restore the default widths of the columns of the list. You may find this command of use if, for example, you have accidentally changed the width of a column so that it become invisible.
- Restore messages I've hidden
Use this command to restore the messages for which you had previously selected the Don't show this again options.
- Use drag and drop to rearrange items
Use this command when you want to rearrange the Virtual Encrypted Disks in the list. Note that when this command is used, it becomes possible to drag each item of the list with the mouse, but the check boxes next to the Virtual Encrypted Disk's names become hidden.
- Use check boxes to select items
Use this command when you want to use the check boxes next to the names of the Virtual Encrypted Disks to select or deselect them. Note that when this command is used, the check boxes next to the Virtual Encrypted Disk's names become available, but the drag-and-drop mode is turned off.
The Help menu offers the several maintenance commands that you can use to open the User's Guide, enter or update the license information, or check for updates to Encryptability software.
You have probably noticed that after you've installed Encryptability, it put a small icon on the system tray (also known officially as the "taskbar notification area"):
![]()
If you don't see this icon, it could be because your computer is configured not to display all icons available. To make it display the Encryptability icon, right-click on an empty area of the taskbar, choose Taskbar settings from the menu, and then click on the link in the Notification area part that reads Select which icons appear on the taskbar. (This procedure may be different in your version of Windows).
When the Encryptability taskbar icon is visible, you can click (or right-click) on it to display a menu that you can use to perform different actions related to Encryptability:
![]()
Besides the commands to stop, start, or display properties of the Virtual Encrypted Disks, the menu contains other commands that you may find useful:
-
Start All
This command appears on the menu if you have created more than one Virtual Encrypted Disks. It gives you a quick way of starting all Virtual Encrypted Disks at once, without having to choose the Start command for each Virtual Encrypted Disk individually.
-
Stop All
This command appears on the menu if you have started several Virtual Encrypted Disks. When you choose this command, Encryptability attempts to stop all active Virtual Encrypted disks. Note that if a Virtual Encrypted Disk cannot be stopped because, for example, it still has open files, Encryptability displays a notification about such a situation and waits for your response before actually stopping it.
-
Run Encryptability
This command has the same effect as running Encryptability application using its Desktop icon.
-
Forget ... password(s)
This command appears on the menu only if you have previously used the Remember this password for this session command when starting a Virtual Encrypted Disk. You may want to use this command if you want Encryptability to "forget" such passwords until next time you choose to remember them.
-
Stop All and Forget all password(s)
This command appears on the menu if you have previously started one or more Virtual Encrypted Disks or if you have previously used the Remember this password for this session command when starting a Virtual Encrypted Disk. When you choose this command, Encryptability attempts to stop all active Virtual Encrypted disks and also "forgets" the previously remembered password. Note that if a Virtual Encrypted Disk cannot be stopped because, for example, it still has open files, Encryptability displays a notification about such a situation and waits for your response before actually stopping it.
-
PANIC
This command appears on the menu only if you have enabled the appropriate option and if you have previously started one or more Virtual Encrypted Disks or if you have previously used the Remember this password for this session command when starting a Virtual Encrypted Disk. This command has the same effect as the Stop All and Forget all password(s) described above, except that if a Virtual Encrypted Disk cannot be stopped because, for example, it still has open files, Encryptability unconditionally ("brutally") stops such a disk without displaying a notification and waiting for your response.
If for some reason you don't want the Encryptability icon to appear on the taskbar, you can hide it using the Windows Taskbar Settings screen, or by deselecting the appropriate option on the Encryptability Settings screen.
After you've used Encryptability software to create new Virtual Encrypted Disk, the disk is initially created in an inactive state, waiting for you to start using it. In order to actually start using the Virtual Encrypted Disk to store your files and folders, you need to start it first.
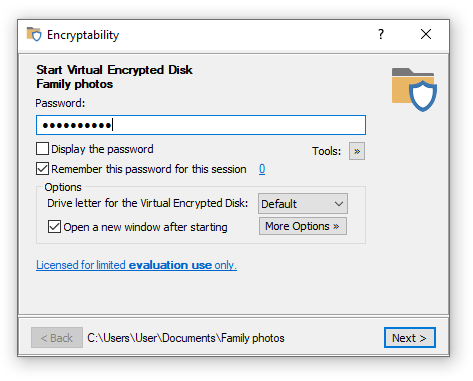
There are several ways of starting a Virtual Encrypted Disk. If the Encryptability application is running and the disk already appears in its list, you can double-click on the Virtual Encrypted Disk to begin the process. Or, if there is no Encryptability window on the screen, you can use the Encryptability taskbar icon, by clicking on the icon with the mouse and selecting the Start command from the menu. You can use the method that's most convenient for you, either one should result in the same password prompt displayed:
This is the point where those in the know are separated from the rest. If you know the password, you will be let in: the Virtual Encrypted Disk will be started and all files and folders it contains will become available for use. If you don't know the password, the Virtual Encrypted Disk will remain the cold pile of useless 1s and 0s and no power in the whole Universe will be able to decrypt them.
Be sure to enter the password exactly as you've supplied it when creating the Virtual Encrypted Disk: the password is case-sensitive, and if you've entered any spaces or special characters when creating the Virtual Encrypted Disk, you need to enter them here as well, in the exact same order. If your computer has several input languages installed, you need to select the correct one, too, by pressing the input language switch key combination defined in Windows Control Panel. You can see the currently selected input language to the right of the password box.
If you are not sure what you've typed in, you can click on the Display the password box and the plain text of the password you've typed in will be shown. (Before you do that, you may want to check your room for hidden cameras watching your screen. Yes, the bad guys eager to get your secrets could be very sneaky!)
Remember this password for this session option
If you plan to start and stop this Virtual Encrypted Disk several times during the day without stepping away from the computer, or if you plan on starting several Virtual Encrypted Disk protected with the same password, you can save yourself a bit of typing and select this option. If this option is selected, then Encryptability will remember the password you've just entered until your computer is restarted. Then, when starting the same or another Virtual Encrypted Disk protected with the same password, you would not need to enter the same password again: when the password prompt appears again, leave the password box empty and press the Next button. In such a case, Encryptability would try the passwords that you have chosen to remember and use them to start the Virtual Encrypted Disk(s) (If the remembered password does not work for a particular Virtual Encrypted Disk, Encryptability will inform you about that and ask you to enter a different password.
If you use the Remember this password for this session option, the password will be remembered until you restart Windows, or choose the Forget passwords command, available under the Encryption menu of the main window of Encryptability. This command is also available on the menu of the Encryptability taskbar icon, for quick access when you need it.
(In case you are wondering: Encryptability does not store the plain text of the password, it only stores its hash value. This way, if someone gets hold of your computer and scans its memory looking for the stored passwords, s/he won't find any.)
Other options
Note also a few more options on the same window that you can select before pressing the Next button. These options let you control what happens after the Virtual Encrypted Disk is started:
Drive letter for the Virtual Encrypted Disk
This option lets you choose the drive letter to be assigned to the Virtual Encrypted Disk after it's started. If you select Default, then the next available drive letter will be used. If you want some other specific drive letter to be used, select it in the list.
Open a new Explorer window
If you select this option, then Encryptability will open a new Explorer window to display the contents of the Virtual Encrypted Disk.
More Options
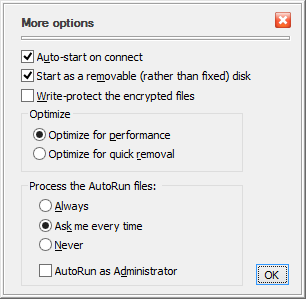
You can click this button to open a list of several additional options:
-
Auto-start on connect
If this option is on, then Encryptability will automatically display the password entry window when when you log in to Windows, or when you connect the host drive to your computer. If this option is off, then you will need to use some other method (like the Start command on the menu of the taskbar icon) to start the Virtual Encrypted Disk off the host drive after you've connected it.
-
Start as a removable (rather than fixed) disk
When it comes to the auto-play functionality, the Recycle Bin, optimizations, etc., Windows treats the fixed disks slightly differently than the removable ones. If you require the Virtual Encrypted Disk to be treated as a removable disk, select this option.
-
Write-protect the encrypted files
If you want to protect the contents of the Virtual Encrypted Disk from the accidental (or intentional) changes, select this option: you will still be able to open the files off it and read them but it won't save any changes you make nor will it let you create or delete files or folders on the Virtual Encrypted Disk.
-
Optimize for performance
This option allows Windows to use its file cache mechanism when reading from and writing to the Virtual Encrypted Disk. (This does not pose a security risk because the cache is used only for the already encrypted data.) This option offers the best possible performance for the Virtual Encrypted Disk. However, it increases the risk of data loss or data corruption, should your computer lose power or crash at a very unfortunate moment.
-
Optimize for quick removal
If you often encounter the situation that you cannot stop the Virtual Encrypted Disk because it's in use by Windows, you may want to select this option. Note however, that it may slow down the data transfer between the Virtual Encrypted Disk and the rest of the system.
-
Process the AutoRun files
You can use this option to control the automatic execution of the AutoRun file off this Virtual Encrypted Disk on this computer.
-
Of course, you can also leave the options as they are for now, and just enter the password and click Next. What happens then is very much like sort of a digital magic: the random bytes of the Virtual Encrypted Disk that previously were not making sense, are suddenly starting to come together in an orderly way, and the Virtual Encrypted Disk "starts" to come alive: it appears like a regular disk in the Computer folder:
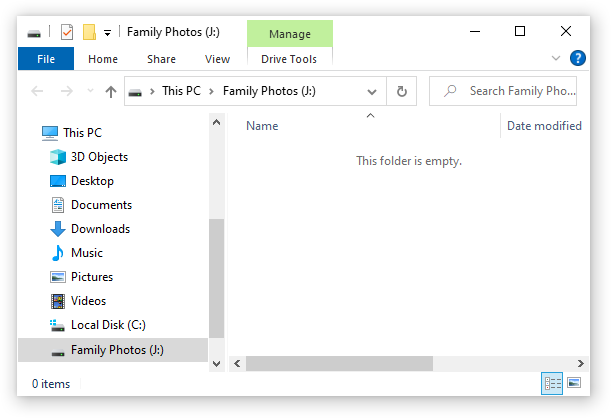
If this is the first time that you've started the Virtual Encrypted Disk, it will be empty. You can start filling it up with the files and folders that you want to be encrypted.
You can see why this disk is called "virtual": there is no actual physical disk with that letter attached to you computer. The C: disk is the main hard drive, the D: disk is your CD-ROM drive, you may or may not have other disks (such as the E: and F: disks shown in the example above). The G: disk is the host USB drive (encrypted with Encryptability). And, finally, the H: drive, is the virtual disk that appears just like any other disk you might have, but that represents the encrypted area that you have created on the host disk G:.
You can use the Virtual Encrypted Disk just like any real disk: you can create folders inside of it, rename and delete files, change their attributes, open files off it, and so on. You can even defragment the Virtual Encrypted Drive, or share it on your network, if you want. For most practical purposes, the Virtual Encrypted Disk is indistinguishable from any regular disk of the same kind. The only (and very important) difference is that the Virtual Encrypted Disk becomes a disk only after you have entered the correct password. This is something that the regular disks are incapable of.
Go ahead, move your personal files that you want to be encrypted into the Virtual Encrypted Disk that you've just started. If you are only starting learning Encryptability, you may want not to move, but copy the files for now: in this case, if something goes wrong, and you want to start over, you would still have the original unencrypted copies left on your hard disk. When you are comfortable with the Encryptability software and the whole concept of the Virtual Encrypted Disks, and also when you have a reliable backup, you can "securely" delete the original unencrypted copies of the private files, and have only the encrypted ones to work with, inside of the Virtual Encrypted Disk.
Now that you've had the Virtual Encrypted Disk started and running, what do you do to lock its back and make the encrypted files protected and inaccessible to no one besides you? For that, you need to stop the Virtual Encrypted Disk and return it to the cold conglomerate of the random 1s and 0s.
When you are done working with the encrypted files located inside of a Virtual Encrypted Disk, you need to stop the Virtual Encrypted Disk, that is, return it into the state in which its contents is inaccessible to anyone who does not know your password.
Encryptability offers several methods of stopping Virtual Encrypted Disks. If you have the Encryptability application open on the screen, you could select the Virtual Encrypted Disk(s) in its list and choose Stop command from the Encryption menu. However, you don't need to run the Encryptability application specifically to do that: a faster is by using the system tray icon menu:
![]()
When you choose the Stop command from the menu, Encryptability attempts to stop the Virtual Encrypted Disk. If there are no files in use on the Virtual Encrypted Disk, it usually takes just a second or two to stop it. However, if some files are still in use, you may see the following message instead:
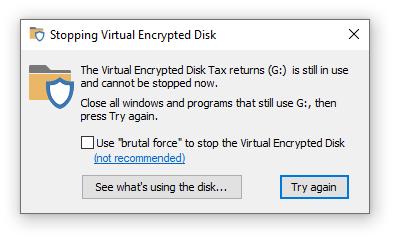
If you see this message, the first thing to try is to do what it suggests: close any program that might still be using files off the Virtual Encrypted Disk, including any Explorer windows that might be displaying the contents of the Virtual Encrypted Disk, then press Try again.
If you are not sure which programs are still using the Virtual Encrypted Disk, press the Show what's using the disk button and it should open a popup showing the processes that still have files open on the encrypted disk, such as this:
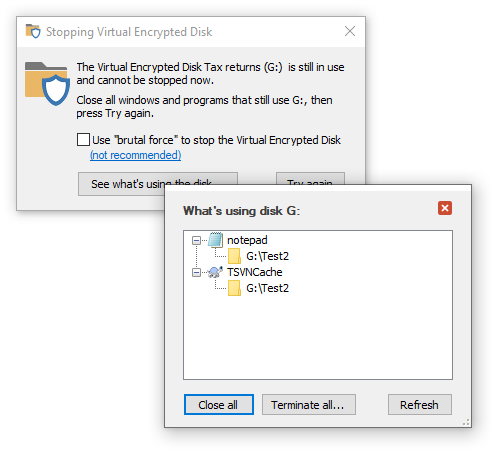
Here, you can right-click on each process and choose to close or terminate it. Or, press the Close all button to make Encryptability to try to close all listed processes. If some of them refuse to close, you can choose to Terminate them instead.
After closing the processes in this way, press the Try again button to try to stop the Virtual Encrypted Disk again. If the same message keeps appearing, it might be that some system process or a hidden window is still using a file on the Virtual Encrypted Disk. If you are sure there are no windows or programs that you can close to remedy the situation, there are two courses of action you can take:
The safest method is to restart your computer. (Note that putting the computer to sleep and then waking it up may not work, a complete restart may be required). When the computer restarts, any Virtual Encrypted Disk that stops unconditionally, and when the computer starts again, the Virtual Encrypted Disk remain stopped, until you start it by entering the correct password.
If you are in a hurry and don't want to wait for the computer to restart, you can try the brutal force option shown on the screen above. However, this option is not safe and should be used only in case of emergency. It is not safe because if some file happens to have unsaved changes to it, the unsaved changes will be lost when you stop the Virtual Encrypted Disk "brutally".
In any case, after you stop the Virtual Encrypted Disk (normally or "brutally") its contents becomes locked. All files and folders that the Virtual Encrypted Disk contains at that point become encrypted and completely inaccessible to anyone. The only way to get to the files stored inside of the virtual Encrypted Disk is to start it again, by entering the correct password.
That describes the typical cycle of the use of an encrypted USB drive: when you need to use the encrypted files, you start the Virtual Encrypted Disk. When you are done working with the files, you stop the Virtual Encrypted Disk.
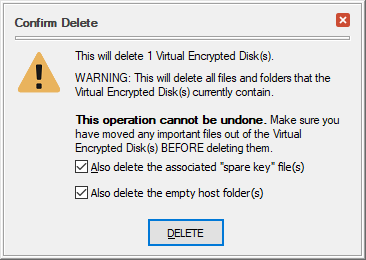
If you no longer want to use a Virtual Encrypted Disk, you can delete it, by running the Encryptability application, selecting the Virtual Encrypted Disk in its list, and choosing the Delete command from the menu. Before you do that, however, you may want to start the Virtual Encrypted Disk, and make sure it contains no important files. If there are any files that you want to keep, copy them to some other location, onto the main hard drive, or to another encrypted disk, because after you've deleted the Virtual Encrypted Disk, all previously encrypted files it contained will be deleted as well!
Having moved all important files out of the Virtual Encrypted Disk, stop it, and choose the Delete command from the menu of Encryptability application. You will be prompted to confirm your choice and also choose whether you also want to delete the spare key file associated with this encrypted disk and also the empty host folder that used to keep the files related to this Virtual Encrypted Disk:
After you have deleted the Virtual Encrypted Disk, all space it used to occupy on the host drive becomes immediately available for use to store the regular files and folders, as usual, without encrypting them. Or, you can start over and create a new Virtual Encrypted Disk on the same host drive, if that's what you want.
Encryptability application offers several commands that you can use to change Virtual Encrypted Disks after they've been created.
For example, to change the descriptive name of a Virtual Encrypted Disk, select the Virtual Encrypted Disk in the list, and choose Rename from the File menu. (You can also right-click on the Virtual Encrypted Disk with the mouse and choose Rename from the shortcut menu.) You can rename only one Virtual Encrypted Disk at a time.
Several other commands for managing the Virtual Encrypted Disks are also available via the More sub-menu of the File menu:
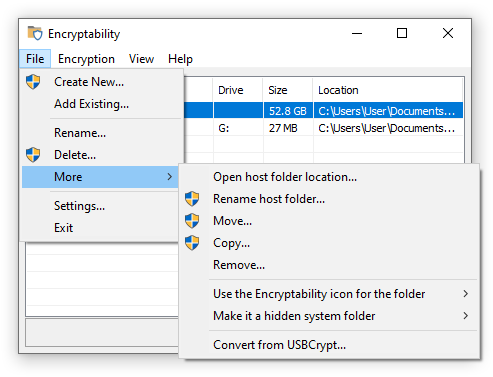
- Open host folder location...
Use this command to open the folder where the Virtual Encrypted Disk files are stored. Keep in mind that you should not rename, move, or otherwise modify any files in that folder, because it may leave the Virtual Encrypted Disk in an inconsistent state and make it inoperable. If you need to perform such actions, use the commands offered by Encryptability, described below.
- Rename host folder...
Use this command to rename the host folder where the Virtual Encrypted Disk files are stored. Remember that this name is not encrypted and may be visible to other users of the computer, when they browse the contents of the storage with File Explorer. You can rename only one host folder at a time. If you want to rename several host folders, select and rename each of them in turn.
- Move...
Use this command to move one or more of the selected host folders of the Virtual Encrypted Disks to another location. This will keep the names of the host folders the same, but move them to a different parent folder of your choosing. If the new parent folder is located on the same physical drive, the moving should take no more than a couple of seconds, but if you are moving the Virtual Encrypted Disks to a different drive, and the size of the Virtual Encrypted Disks is large, it make take a considerable time. After the Virtual Encrypted Disks have been moved, Encryptability will show the new locations in its list.
- Copy...
Use this command to copy one or more of the selected host folders of the Virtual Encrypted Disks to another location. This will create a copy of each selected Virtual Encrypted Disk. If one of the Virtual Encrypted Disks being copied has a spare key, the spare key will be copied as well, to make you able to restore the password of the new Virtual Encrypted Disk, if necessary. After the Virtual Encrypted Disks have been copied, Encryptability will add the new Virtual Encrypted Disks to its list.
NOTE: We do not recommended duplicating Virtual Encrypted Disks in this way, because each copy would get the same encryption key as the original. To avoid that, the proper procedure would be to create a new Virtual Encrypted Disk of the same size (it would get its own encryption key), then start both the original and the new Virtual Encrypted Disks, and copy the encrypted files and folders from the original to the new Virtual Encrypted Disk. (When copying the files this way, they would be automatically decrypted with the original encryption key and then encrypted again with the new encryption key.) If the original Virtual Encrypted Disk is only partially filled, this procedure would also be faster than using the Copy command.
- Remove...
Use this command if you want to remove one or more of the selected Virtual Encrypted Disks from the list maintained by the Encryptability application, without deleting the host folder(s). You can then add the Virtual Encrypted Disks back to the list using the File - Add Existing command. If you want to not only remove the Virtual Encrypted Disks from the list, but also delete the host folders and release the space they occupied for use by other files, use the Delete command instead of the Remove command.
- Use the Encryptability icon for the folder
Use this command to change the images of the host folders for the selected Virtual Encrypted Disks that are displayed when browsing the storage of the computer with File Explorer. Note that you may need to sign off and sign back on to Windows for the change to the icons to take effect.
- Make it a hidden system folder
Use this command to control the visibility of the host folders for the selected Virtual Encrypted Disks in File Explorer. If you turn this option on, then the host folders will not be normally visible, unless the File Explorer option to hide protected operating system files has been turned off by the user. If you turn this option off then the host folders will be visible in File Explorer just like regular folders.
- Convert from USBCrypt...
Use this command to convert a Virtual Encrypted Disk created with USBCrypt software into the format used by Encryptability. After a Virtual Encrypted Disk has been converted, Encryptability will show it in its list.
If you have encrypted a drive with the USBCrypt ![]() software, and would like to manage such a Virtual Encrypted Disk with Encryptability software instead, you can convert the Virtual Encrypted Disk from USBCrypt to Encryptability format by using the command Convert from USBCrypt from the File - More menu of the Encryptability application, which displays the following screen:
software, and would like to manage such a Virtual Encrypted Disk with Encryptability software instead, you can convert the Virtual Encrypted Disk from USBCrypt to Encryptability format by using the command Convert from USBCrypt from the File - More menu of the Encryptability application, which displays the following screen:
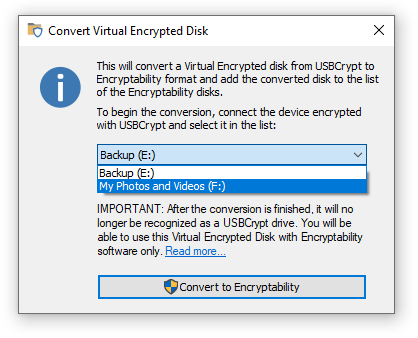
Select the drive you want to convert from the list and press the Convert to Encryptability button to begin the conversion. (If you don't see the drive you want to convert in the list, connect the drive to your computer.)
The conversion should take no more than a few seconds. After it's finished, USBCrypt may display a message that a Virtual Encrypted Disk has been deleted, and a new Virtual Encrypted Disk should appear in the list of Virtual Encrypted Disks displayed by the Encryptability application. (The converted Virtual Encrypted Disk will be located on the same physical drive, in the host folder named Encryptability.) Note that USBCrypt will no longer recognize the drive as encrypted, and you should use the Encryptability application to start, stop, or manage the converted Virtual Encrypted Disk instead of USBCrypt.
After a Virtual Encrypted Disk has been converted, you can use the Encryptability application to move it to a different host folder, if necessary, or to rename it, if you wish, and perform other operations, as with any other Virtual Encrypted Disk created with Encryptability.
Can I convert the Virtual Encrypted Disk back to USBCrypt?
Yes, but you need to use the USBCrypt ![]() software to convert a Virtual Encrypted Disk from the Encryptability to USBCrypt format. Please refer to the USBCrypt documentation for more information about the process.
software to convert a Virtual Encrypted Disk from the Encryptability to USBCrypt format. Please refer to the USBCrypt documentation for more information about the process.
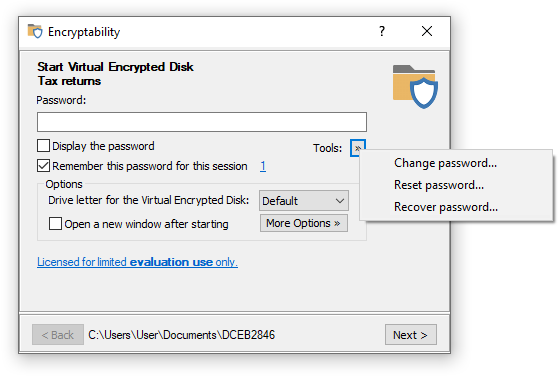
If you want to change the password of a Virtual Encrypted Disk, use the same command as if to start the Virtual Encrypted Disk to display the password prompt, but before (or instead of) entering the existing password, click on the Tools button:
Choose the Change password command from the menu, and Encryptability will prompt you to enter the old password first. If you have entered the old password correctly, it will prompt you to enter a new password:
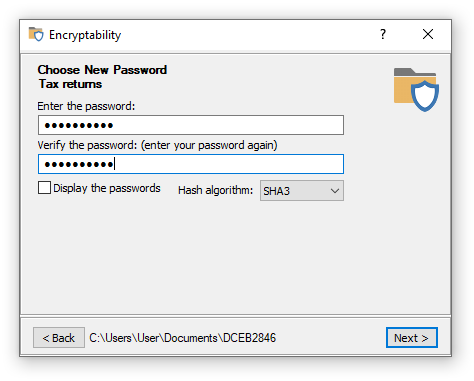
After you've entered the new password (twice), Encryptability will replace the old password of the Virtual Encrypted Disk with the new password that you have just set up. After that, you should be able to start the Virtual Encrypted Disk by entering the new password (the old password will no longer work).
If you forget the password for a Virtual Encrypted Disk, you may have the option to reset the password. You can access this command by clicking on the Tools command on the password-prompt screen:
If you choose the Reset password command, Encryptability will try to locate the "spare key" file for this specific Virtual Encrypted Disk, in the folder that is specified in the Encryptability settings screen. If Encryptability is able to find the "spare key" file, it prompts you to enter a new password:
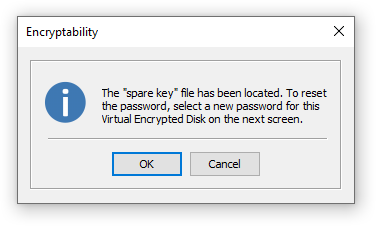
If you press OK and enter a new password on the next screen, Encryptability will replace whatever the old password of the Virtual Encrypted Disk had before with the new password that you have just set up. After that, you should be able to open the Virtual Encrypted Disk as usual, by entering the new password.
Of course, in order to be able to use the "spare key" file, it must have been previously created by you, for example, by selecting the Create a "spare key" file option when creating the Virtual Encrypted Disk:
If you have not chosen the option to create a "spare key" file when creating the Virtual Encrypted Disk, and later changed your mind, you can force Encryptability to create the "spare key" file later on, by using the Spare key commands on the Encryption menu of the Encryptability application.
When deleting a "spare key", you will be prompted to enter the current password for the Virtual Encrypted Disk, to make sure you don't accidentally erase a "spare key" file for the drive you no longer remember the password of. If you've entered the correct password, Encryptability will erase the "spare key" file using a multi-pass secure erase algorithm that leaves no chance of recovery of this file.
Should I have the "spare key"?
The option to create a "spare key" file can come very handy if you forget the real password to start the Virtual Encrypted Disk. However, keep in mind that just as you can use it, anyone else who can get into your computer can use it, too. If your adversaries are smart (and you should always assume that, even if in reality it's not so), all they need to do is have a physical access to your computer to be able to reset the password and start your encrypted drive whether you agree to that or not. Don't assume that if your computer prompts to enter the login password, you are protected from your adversaries: there are methods of getting to the files stored on your computer without knowing the login password, and if your adversaries want to get to your files badly enough, they will discover such methods, make no mistake about that.
So, having a "spare key" has both the positive and negative consequences, and you should weight the benefits against the risks carefully when deciding whether to use that option or not. Let's summarize:
Benefit: The "spare key" option lets you gain access to your Virtual Encrypted Disk in the event that you forget the real password.
Risk: Anyone who has physical access to your computer can use the "spare key" option to access your Virtual Encrypted Disk without your permission.
Should you NOT use the "spare key" option when encrypting the drives? Such a decision has the benefits and risks, too:
Benefit: Without the "spare key" option no one can peek inside of your Virtual Encrypted Disk. Everyone must provide the real password that you've set up to start the Virtual Encrypted Disk, no exceptions.
Risk: If you forget the password, you won't be able to start the Virtual Encrypted Disk (unless you've selected a very week password that could be recovered in a reasonable time).
So, what should you decide, to use the "spare key" option or not to use it? It's ultimately your decision. Here is some more information about this option to help you decide:
The "spare key" file can be used to reset the password only for that specific Virtual Encrypted Disk for which it was created. You cannot use a "spare key" file to reset passwords of other Virtual Encrypted Disks, even if they have the same real passwords. Even if you delete a Virtual Encrypted Disk and then create exactly the same one again, with the same password and the same size, etc., the original "spare key" file cannot be used to reset the password of the newly created Virtual Encrypted Disk. In other words, the "spare key" option must be enabled or cleared for each Virtual Encrypted Disk individually, and it has no effect on other Virtual Encrypted Disks you might have.
The "spare key" files are stored on your local hard disk, under the Application Data folder (unless you have selected a different folder for that). They are not stored within the host folders where the Virtual Encrypted Disks are located, or in any other place. It means that if your primary hard disk fails or becomes unusable for some other reason, all "spare key" files would go with it, too. Even if you replace your hard drive with another one of the same size and model, that would not replace the "spare key" files that were on the original hard drive, unless you have specifically taken the steps to backup your original hard drive and then restore it to the new drive.
Previously we've discussed the spare key option that could be of help if you forget the password for an encrypted disk of yours. However, what if you did not select the option to create a "spare key" the on your computer, or if you have replaced your computer at some point and the original "spare key" file is no longer available? Here comes the last resort, the command to recover the lost password, by trying all possible passwords from a specific set of characters, one at a time, until the one of them happens to match the original password.
To get to the password recovery command, start as usual, by running Encryptability and getting to the point where the password prompted appears in order to start the Virtual Encrypted Disk. Click on the Tools button, and the menu will be shown with the Recover Password command on it:
If you choose the Recover Password command, you will be presented with the following window that asks you to specify the kind of passwords you want to try:
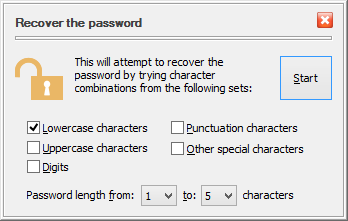
You can specify the minimum and maximum lengths of the passwords, as well the character sets to use when trying the passwords. For example, if choose only the lowercase characters, the minimum lengths 1, and the maximum length 3, then Encryptability will start applying the 1-character lowercase passwords: a, b, c, and so on, down to z. Each such password would be tested against the current Virtual Encrypted Disk. After all 1-character passwords have been tried, Encryptability will begin to try the 2-character ones: aa, ab, ac, and so on, down to zz. If none of them unlocks the Virtual Encrypted Disk, it will then try all possible 3-character passwords, until one of them is detected to be able to unlock the Virtual Encrypted Disk (if any).
If you try the Recover password command, you will see that trying each possible password combination in turn takes some time, depending on the speed of your computer. Encryptability estimates the time that is necessary to try all possible passwords from the set you've defined and displays that estimate on the progress window for you:
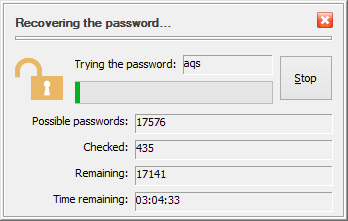
Of course, the estimate depends on the processor speed of your computer. Try it and see for yourself. That could be a good illustration of the importance of choosing the strong passwords. For example, the amount of time to try all possible 3-character lowercase passwords on a 2GHz dual-core processor is about 2 hours. If you recall that that's exactly how the evaluation passwords are imitated, you will see that if you use Encryptability in the evaluation mode, anyone should be able to start your Virtual Encrypted Disk by running the recovery password procedure for a mere couple of hours.
If you have purchased a license for continued use of Encryptability, then the evaluation passwords are not created for your encrypted drives and the strength of the protection is determined exclusively by the complexity of the passwords that you've chosen. For example, on the same processor, to try all possible 5-character passwords that may contain both the lowercase and the uppercase characters as well as digits and special characters, it would take about 30 years to actually try them all. Someone must want to get to your encrypted files badly enough to wait that long! Of course, if someone wants to know your secrets that bad, she could purchase 30 computers and run them simultaneously and that would make her able to recover your password in just one year. Keep that in mind when deciding whether your password is strong enough!.
You can change several options for Encryptability application by using the Encryptability Settings screen, which you can open by choosing the Settings command from the File menu:
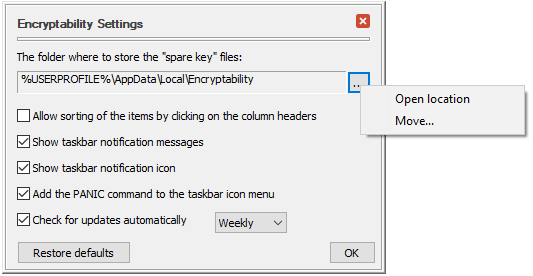
This screen contains the following areas:
The folder where to store the "spare key" files
This is the folder on your computer where Encryptability stores the "spare key" files. (And also where Encryptability is looking for the "spare key" files when you want to reset a password). You can open this folder to examine its contents or move the "spare key" files to a different folder by clicking on the button to the right of the folder area and using the commands on the menu that opens.
Allow sorting of the items by clicking on the column headers
If this option is selected, then you should be able to sort the list of the Virtual Encrypted Disks by clicking on the headers of the columns, similarly to how File Explorer allows you to sort files in its screens. You may want to clear this option if you find yourself often clicking on the column headers accidentally.
Show taskbar notification messages
If this option is selected, it allows Encryptability to display notification messages in the bottom right part of the screen) when a Virtual Encrypted Disk has been started or stopped, and in some other cases. You may want to clear this option if you find such messages unnecessary or distracting.
Show taskbar notification icon
If this option is selected, Encryptability adds its notification icon to the Windows taskbar notification area (next to the system clock, in the bottom right corner of the screen). You may want to clear this option if you prefer not to use the icon and want to leave more room for other icons in the notification area.
Add the PANIC command to the main and taskbar icon menu
If this option is selected, Encryptability adds the PANIC command to the menu bar of its application window and to its notification icon menu that you can use to quickly stop any Virtual Encrypted Disks and "forget" any passwords you've previously chosen to remember. However, since using the PANIC command may potentially cause the loss of the unsaved information, you may want to clear this option to protect yourself from accidentally invoking the PANIC command.
Check for updates automatically
If checked, this option causes Encryptability to periodically connect to our web site to check for the availability of a newer version. If this option is not selected, then Encryptability will display a message reminding you to check for the updates manually.
Restore defaults
Press this button if you want to restore the options shown on this screen to their default settings, as they were right after you've installed Encryptability.
If you want some tasks to be performed automatically each time after starting a Virtual Encrypted Disk, or right before stopping it, you can put an AutoRun file in the root folder of the Virtual Encrypted Disk, and Encryptability would automatically execute that file for you each time you start or stop the Virtual Encrypted Disk.
To be used by Encryptability in this manner, the file must have the name autorun, and it can have any extension allowed by Windows. Keep in mind that the extension of the file name determines what Windows does with it. For example, autorun.exe will be launched directly as any other program, autorun.bat would be executed by the command-line interpreter, and autorun.txt would be opened with Windows Notepad. And a file named autorun.inf has special processing rules, see below.
To be used by Encryptability, the AutoRun file must be placed in the root folder of the Virtual Encrypted Disk. If there are several different AutoRun files in the root folder (for example, if both autorun.exe and autorun.bat are present), then only one of them will be executed by Encryptability (and which one will be picked is generally unpredictable, so better have just one AutoRun file, to be sure about its execution).
If the AutoRun file is named anything but autorun.inf, Encryptability executes such a file twice: once right after the Virtual Encrypted Disk is started (before opening the Windows Explorer window for it), and then right before stopping the Virtual Encrypted Disk. Note, however, that if you shut down the computer while a Virtual Encrypted Disk is running, then the AutoRun file is NOT executed before shutting down the computer. You must explicitly stop a Virtual Encrypted Disk for the AutoRun file to be launched before stopping.
When executing the AutoRun file, Encryptability passes several command-line parameters to it that can be used by the AutoRun file to fine-tune its operation. For example, the autorun.bat file can access the parameters via the %1, %2, etc. variables as follows:
| Parameter | Value |
| %1 | Start when starting the Virtual Encrypted Disk, Stop when stopping it |
| %2 | The drive letter assigned to the Virtual Encrypted Disk |
| %3 | The path of the host folder, in double quotes |
| %4 | The computer name |
| %5 | The user name, in double quotes |
| %6 | The domain name, in double quotes |
The AutoRun file can use the first parameter to perform different actions when starting or stopping the Virtual Encrypted Disk.
Encryptability offers the option to run the AutoRun file "As Administrator". You should use this option with care and only if absolutely necessary.
If the AutoRun file is named autorun.inf, Encryptability uses a different method of running it: it imitates the algorithm that Windows uses when it encounters such a file on a CD. Specifically, the autorun.inf file is only processed when the Virtual Encrypted Disk is started; this file is not used when stopping the disk. Secondly, the autorun.inf file is not executed directly; instead, Encryptability looks for the SHELLEXECUTE statement the file may contain and launches the command that that statement specifies. If there is no such a statement in the autorun.inf file, Encryptability attempts to launch the command specified in the OPEN statement instead. If OPEN statement is not present either, then Encryptability stops processing the autorun.inf file and does not use any other statement the file may contain.
By default, Encryptability prompts you to confirm the execution of the autorun file every time:
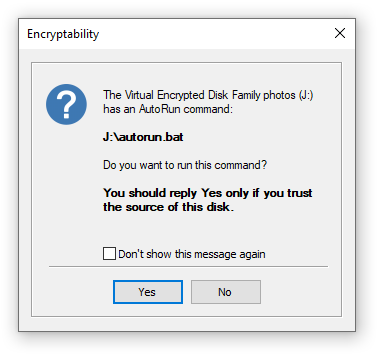
If you don't want to see this message again, you can select the Don't show this message again option, and press either Yes or No button: Pressing Yes would cause the autorun to always be executed in the future, while if you press No, it will never be executed again. If you change your mind, you can change the execution permission later on, by clicking on the More options button when starting the Virtual Encrypted Disk. Note also, that this selection has an effect only when using this specific Virtual Encrypted Disk on this computer only: if you use a different Virtual Encrypted Disk that has an AutoRun file, or use this Virtual Encrypted Disk on another computer, you need to allow or deny the execution of its AutoRun file separately.
The Encryptability Administrator's Kit is a set of tools designed to help system administrators with the deployment and management of Encryptability on a large number of computers.
The kit contains the following files:
- The "enterprise build" of Encryptability that does not require license validation over the Internet.
- The client installation packages of Encryptability in the MSI format, to be used with the x86, x64, and ARM64 Windows computers.
- The Administrative Template file that contains the Group Policies supported by Encryptability.
- The text of Encryptability Volume License Agreement.
- The document describing the kit and how to use it.
The Administrative Template (.adm) file can be used with the Group Policies to deliver the license key of Encryptability to the client computers without having to enter the license key manually on each computer. You can also use it to set up the restrictions for the Encryptability users: for example, you can allow them to use the existing Virtual Encrypted Disks but prevent them from creating the new ones, or you can set up the policy for the password complexity to enforce when the users change the passwords, etc.
The Encryptability Administrator's Kit is available as a separate download. Please contact us for more information or if you are interested in ordering the kit.
When you encrypt a host disk (such as drive H:) with Encryptability, it uses a portion of the host disk to create a Virtual Encrypted Disk with its own drive letter (such as drive E:). The drive E: becomes available only after you have entered a valid password. Any file you put onto the drive E: will be encrypted and decrypted on-the-fly, in the background, as necessary.
What is a Virtual Encrypted Disk?
Virtual Encrypted Disk refers to the encrypted portion of the host disk that Encryptability creates to keep your files secure. It's a "disk" because after you've entered your password, the encrypted area appears as a separate disk, with its own drive letter, different from the drive letter of the host disk. (Yes, you can choose the drive letter to be assigned to the Virtual Encrypted Disk.) It's "virtual" because there is no actual physical disk involved there. And it's "encrypted" because, well, it's encrypted.
What is a "host folder"?
Host folder is a regular folder on one of the physical storage devices where Encryptability stores the files related to a particular Virtual Encrypted Disk. There are usually several such files, used to store the encryption key, as well as the encrypted data. You can see the contents of the host folder by selecting the Virtual Encrypted Disk in the list of the Encryptability application and choosing File - More - Open host folder location. Please be careful not to delete, rename, or otherwise change any file in that folder, because doing so may corrupt the encrypted data and prevent you from using the files stored in the Virtual Encrypted Disk. Note that each host folder may contain only the files belonging to one Virtual Encrypted Disk; if you decide to move files that belong to several Virtual Encrypted Disks into the same host folder, it may confuse the Encryptability application and prevent you from opening such Virtual Encrypted Disks.
How exactly does it do the encryption?
Please see a special web page that we've created to provide the technical details about our implementation of the encryption and other related algorithms: https://www.winability.com/go/?encryptability-encryption ![]()
Is there a portable version of Encryptability that I could use away from home or office?
No, Encryptability does not have a portable version. However, we offer another encryption product, USBCrypt ![]() , that does offers a portable version of its software and is specifically designed to better handle the encryption of the removable drives.
, that does offers a portable version of its software and is specifically designed to better handle the encryption of the removable drives.
Will the encrypted files be protected in the "safe mode" of Windows?
Yes, they will be protected no matter how you start Windows (in the safe mode or normally), or if someone were to remove the encrypted drive and attach it to another computer, even if another computer runs a different operating system (such as Linux). No matter what, your encrypted files will be protected until you enter the correct password. That's the power of strong encryption!
Does Encryptability require the administrator rights?
Just like with most other software, the administrator rights are required to install Encryptability on a computer. In addition, the administrator rights are also necessary for several operations, such as creating a new Virtual Encrypted Disk, deleting an existing Virtual Encrypted Disk, or moving a Virtual Encrypted Disk to a different location.
However, the administrative rights are NOT required to actually use the Virtual Encrypted Disks, that is to start, stop, rename, change passwords, etc.
Is there a limit to how many Virtual Encrypted Disks I can create with Encryptability?
No, there is no such a limit, provided that you only create them for use by yourself (or by your organization, if you have purchased a business license), and you do not distribute the Virtual Encrypted Disks to any third party. If your friends or associates want to have their own Virtual Encrypted Disks, please let them purchase their own copies of Encryptability. If you have an idea for a business that involves providing Virtual Encrypted Disks to your customers, a separate license must be obtained. Please contact us to discuss the possibilities.
How do I check the encrypted drive for errors?
If you suspect something is wrong with Virtual Encrypted Disk created with Encryptability, the first thing to do is check the host drive for errors:
- Stop the Virtual Encrypted Disk, if necessary;
- Open the This PC (or Computer) folder and right-click on the drive where the host folder is located;
- Choose Properties from the menu, select the Tools tab;
- Use the Error checking area to check the host drive for errors.
You can also run the chkdsk command line utility, as with any other drive. When selecting the error checking options, you may want to choose to scan the drive for bad sectors.
After the host drive has been checked, you may want to check the Virtual Encrypted Disk for errors, too: first, start the Virtual Encrypted Disk as usual, and then use the same steps shown above, but this time right-click on the drive letter that belongs to the Virtual Encrypted Disk, rather than the host disk. It's not necessary to scan the Virtual Encrypted Disk for bad sectors, because scanning the host drive should have been sufficient for that.
Is there a "back door" in Encryptability?
Encryptability gives you an option to create a "back door" for your own use, it's called the spare key file. If you select this option while creating a Virtual Encrypted Disk, Encryptability will store a special file on your computer that you can use later on as a "back door" to reset the password in case you forget it. We stress that this "back door" remains on your computer, not anywhere else. Only you (or someone who gets access to your computer) would be able to use this "back door".
There is no any other "back door" in Encryptability. It means that if you forget your password, neither we nor anyone else will be able to help you.
I've lost Encryptability password. What should I do?
If you've created a "spare key" file for your encrypted disk, you can use it to reset the password. Note that each encrypted disk must have a separate "spare key" created specifically for it. If you did not create the "spare key" file, then the only way to recover your password is by trying every possible combination of the password characters. Of course, if you've chosen a strong password and then forgotten it, the recovery process can take a very long time, so don't count on it as a reliable way of getting access to your encrypted files.
Will my anti-virus program protect files on the encrypted disk?
If you have not entered your password yet (and the Virtual Encrypted disk has not started) then all the files and folders it contains remain completely inaccessible to any program, including anti-virus. (The viruses cannot infect your encrypted files, either). After you've entered your password and started the Virtual Encrypted Disk, it becomes available to all programs, including anti-virus (and viruses!), just like any other regular disk. Unless you have excluded the Virtual Encrypted Disk from your anti-virus software, then it should be protected by the anti-virus, like any other disk.
Will my backup program back up the files located inside of a Virtual Encrypted Disk?
If the Virtual Encrypted Disk has not started, then you can backup the host disk, and that should backup the files of the Virtual Encrypted Disk, too. (They will remain encrypted in the backup set). If the Virtual Encrypted Disk has started, then you can backup individual files or folders that it contains, just like on a regular disk. Be aware, however, that in this case the files will be backed up in their plain, decrypted state.
How do I use Windows Backup with the Virtual Encrypted Disks?
Windows Backup software is very picky about the drives to backup your files to. To make it recognize your encrypted drive as a valid backup destination, you need to choose the NTFS file system for the Virtual Encrypted Disk when encrypting the drive, and also start it as a removable drive. (You can select this option by clicking on the More Options button when starting the disk). Even then, it may not let you backup the system image to such a drive. If you must backup the system image to an encrypted drive, you may want to use some other backup software that recognizes the encrypted drives as the valid backup destinations.
How do I enter the License Key?
Run Encryptability off the Start menu or desktop and click on the link Licensed for limited evaluation use only. This should open the About Encryptability window. Press the Enter License Key button and enter your license information into the form.
Or, use the Help - Enter License Key command from the menu of the Encryptability window, and then enter your license information into the form.
IMPORTANT: When entering your license information, make sure you enter your name, number of computers, and the license key exactly as they are shown on your license certificate, including all capitalization and punctuation. Otherwise, Encryptability may not accept the license key or may not register your information properly. You may wish to copy and paste the name and key from our message into the form, to avoid typos.
Will I need to re-encrypt the Virtual Encrypted Disks I created during the trial?
No, there is no need to re-encrypt the drives that you've encrypted during the trial period. After you have purchased ![]() a license for continued use and entered your license key into the software, it will automatically upgrade your encrypted drives for the full use, with the strong password protection. (It will ask you to confirm this action next time you start the Virtual Encrypted Disk.)
a license for continued use and entered your license key into the software, it will automatically upgrade your encrypted drives for the full use, with the strong password protection. (It will ask you to confirm this action next time you start the Virtual Encrypted Disk.)
What happens when the evaluation period expires?
This software comes with a built-in license that allows you to use it for free for the first 30 days after the installation. When this initial evaluation period expires, you can still run Encryptability, but you cannot use it to create any new Virtual Encrypted Disks. Also, you can start the previously encrypted drives in the write-protected mode only. This should allow you to extract your existing files out of the encrypted disks, but you won't be able to save the modifications back to them. The full functionality of Encryptability is restored immediately when you purchase ![]() a license for its continued use and enter your license key into the program.
a license for its continued use and enter your license key into the program.
Can I use the same license key to install Encryptability on several computers?
Yes, you can use the same license key, provided that you are installing it on no more computers than included in your license. Please refer to the file License.txt (installed along with other files of Encryptability) for the detailed description of the terms of using this software on more than one computer. For information on our site license and quantity discounts, please visit our Online Store ![]() .
.
May I give a copy of Encryptability software to a friend?
Yes, you may give the installation files of our programs to your friends and associates. However, you may NOT share your license key, if any, with anybody else. Please remember that the license key we provide you with are for your own use only. If your friends like our programs, please let them purchase their own license keys. To avoid possible confusion, please give out the original installation files that you may download from our web site.
There are several other simple, but important conditions which we impose on further redistribution of our products. Please refer to the file License.txt in the folder where you have installed Encryptability for the complete description of our distribution requirements.
I've upgraded Encryptability to a newer version. Will it read the encrypted files I created with the previous version?
Yes, Encryptability is backward-compatible: the new versions can read the files encrypted with the old versions of Encryptability. (Note that the opposite is not necessarily true: sometimes we make improvements in the new version such that they are not recognized by the older versions of Encryptability.)
How does the Encrypt Empty Space option affect the security of my files?
The Encrypt Empty Space option does not affect the security of your files: they are always encrypted and protected whether this option is enabled or not. What it does is it only affects whether the empty space of the Virtual Encrypted Disk is encrypted or not, when you first create it.
This option greatly affects the speed of creation of the Virtual Encrypted Disk. If this option is selected, then Encryptability will encrypt the empty space of the Virtual Encrypted Disk, even if it's initially not used to hold any useful information. The process of such encryption can take a rather long time, if the host drive is very large. For example, encrypting a 2TB (two terabytes or 2048 gigabytes) SATA drive connected via the SATA interface to a modern consumer-grade computer can take approximately 10 hours to complete.
However, if you clear the Encrypt empty space option, then Encryptability will allocate the empty space from the available space of the host drive without encrypting it. Such an operation can be performed significantly faster: creating the same 2TB drive can now take less than a minute! The price for such an increase in the speed is, of course, that the empty space will not be encrypted. However, as you start adding files and folders to such a drive, they will be encrypted, as usual.
How important is it to have the empty space encrypted? It depends on whether you want the adversary to be able to deduce some aggregate information about your encrypted data. For example, by analyzing the raw sectors of data allocated on the host drive, the adversary may be able to tell which portions of your Virtual Encrypted Disk image contain encrypted data and which contain the empty space. From that, the adversary could deduce, for example, whether your encrypted drive is almost empty, or almost full. By analyzing the distribution of the encrypted sectors and the unencrypted empty sectors within the Virtual Encrypted Disk image, the adversary can probably guess the type of the file system the Virtual Encrypted Disk has. However, in no case the adversary will be able to get to your actual files or folders or any information about them: they are encrypted as strong as ever, no matter whether the Encrypt empty space option was selected or not.
Ultimately, it's for you to decide whether it's acceptable for the adversary to be able to detect how much of your Virtual Encrypted Disk is empty and whether preventing that is worth sacrificing the significant increase in the speed of the creation of the Virtual Encrypted Disk.
Note that not all versions of Windows allow to clear the Encrypt empty space option for some file systems. For example, at the time of this writing, Windows does not allow to clear this option if the host drive is formatted with the FAT or FAT32 file system. Or, this option can't be cleared for the NTFS disks with the compression enabled. If Encryptability detects such a condition, it disables this option to prevent you from using it when it's not supported by your computer.
Why the NTFS compression or EFS encryption should not be used with the Encryptability files?
The NTFS file system allows one to enable the data compression and/or encryption for the files stored on it. However, neither NTFS compression nor the EFS encryption should be enabled for the files that Encryptability uses to store the Virtual Encrypted Disk image on the host disk. The reason for that is simple:
- The EFS encryption would be redundant: the data stored on the NTFS host disk is already encrypted with Encryptability. Encrypting them again with EFS would not add additional protection to your data: the encryption performed by Encryptability is already strong enough. Therefore, enabling the EFS encryption would only create additional work for the computer CPU, slowing the process down.
- The usual compression methods are effective only for the highly structured or repetitive data. They are not effective for the encrypted data. Enabling the NTFS compression would waste the CPU cycles for no good reason.
For these reasons, Encryptability disables the NTFS compression and EFS encryption for the files it uses to store the Virtual Encrypted Disk image.
I've shared a Virtual Encrypted Disk on a network, but Windows denies access to it from other computers?
If you have started the Virtual Encrypted Disk as a removable drive, and shared that drive on your local network, then Windows may display an Access denied message when attempting to open the shared drive from another computer. If you experience this problem, try to stop the Virtual Encrypted Disk, and then start it again, but this time choose to start it as a fixed drive. (You can change the type of the drive by clicking on the More Options... button when starting the disk, on the same screen where you enter its password.) If you share the fixed drive on the network, you should be able to open it from other computers without a problem.
I'm trying to use the Create System Image command of Windows, but it shows an error?
Apparently, Windows backup program gets confused when it encounters a Virtual Encrypted Disk while searching for a disk suitable for holding the system image. Instead of silently skipping the disk that it does not quite understand, it displays an error message with the error code 0x81000036, and it does not let you select the destination disk for the system image. To work around such a problem, simply stop any Virtual Encrypted Disk that you might have previously started, and then try to use the Create System Image command of Windows again. After the command is complete, start the Virtual Encrypted Disks again.
Can I create a Virtual Encrypted Disk hosted on a network?
Yes, you can select a mapped network drive or a shared network folder as the location for a Virtual Encrypted Disk when creating or moving it, however you should consider the risk of a possible data loss or corruption in such a situation. If the other computer where the hosted network folder is physically located (the server) is shut down, or restarted, or the network connection to that computer gets disrupted while the Virtual Encrypted Disk is operating, the normal flow of data between your computer and the server is disrupted. (The same disruption occurs when a local host drive malfunctions.) If you save a file to the Virtual Encrypted Disk under such a condution, the program you use may report that the file has been saved successfully, but when Encryptability attempts to send the encrypted data over the network to store it on the server, an error occurs and the data may be lost.
When Encryptability detects such a situation, it attempts to correct the problem by offering you to restart the Virtual Encrypted Disk after the connection to the network location is restored. After that, you should save any open documents you store in the Virtual Encrypted Disk to make sure no changes were lost during the network disruption.
Make sure you have a good backup procedure in place to keep a copy of your important data on a separate physical storage device and keep the backup set up to date. If you have a good backup, it can help minimize the loss of useful data in case of a network or hardware falure.
How can I get a printed version of this guide?
This user's guide is available online in the printer-friendly format:
https://www.winability.com/encryptability/users-guide-printable.htm ![]()
Open the link above in your web browser and use the web browser's Print command to print it out on your printer.