The software described in this guide is furnished under a license agreement and may be used only in accordance with the terms of the agreement.
Information in this document is subject to change without notice. The names of companies, products, people, characters, and/or data mentioned herein are fictitious and are in no way intended to represent any real individual, company, product, or event, unless otherwise noted. Complying with all applicable copyright laws is the responsibility of the user. No part of this document may be reproduced or transmitted in any form or by any means, electronic or mechanical, for any purpose, without the express written permission of WinAbility Software Corporation. WinAbility Software Corporation may have patents, patent applications, trademarks, copyrights, or other intellectual property rights covering subject matter in this document. Except as expressly provided in any written license agreement from WinAbility Software Corporation, the furnishing of this document does not give you any license to these patents, trademarks, copyrights, or other intellectual property.
NO WARRANTY
The technical information in this document is provided AS-IS and WinAbility Software Corporation makes no warranty as to its accuracy or use. Any use of the information contained herein is at the risk of the user. This document may include technical or other inaccuracies or typographical errors.
Copyright Notice
© 2024 WinAbility Software Corporation. All rights reserved.
Trademarks
WinAbility, WinAbility.Com, AB Commander, and "The Way Software Should Be!" are either registered trademarks or trademarks of WinAbility Software Corporation and/or its suppliers in the U.S.A. and/or other countries. Other product and company names mentioned in this document may be the trademarks or registered trademarks of their respective owners and are hereby acknowledged.
AB Commander is a powerful yet easy to use file management tool for computers running the Windows operating systems. It lets you manage your files and folders easier and faster, using the convenient double-panel framework (pioneered in Norton Commander), while maintaining close integration with the standard Windows user interface.
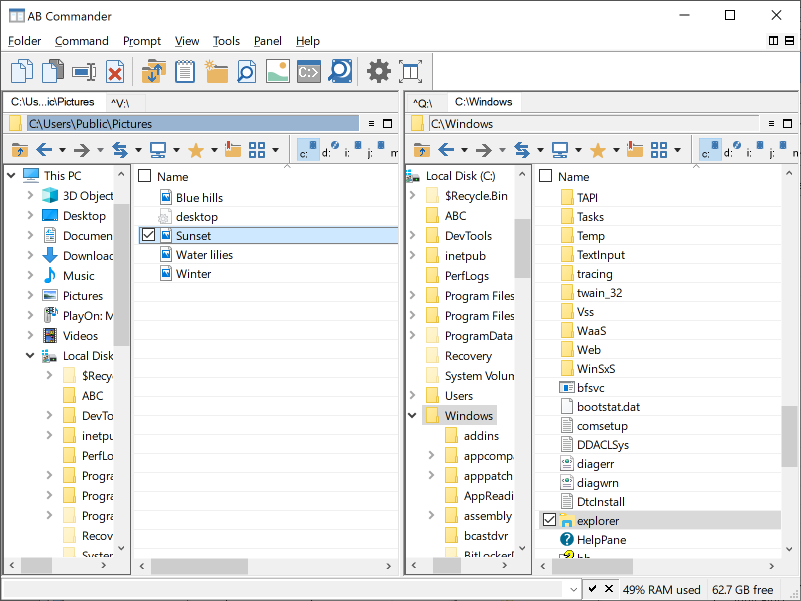
AB Commander in the light mode:
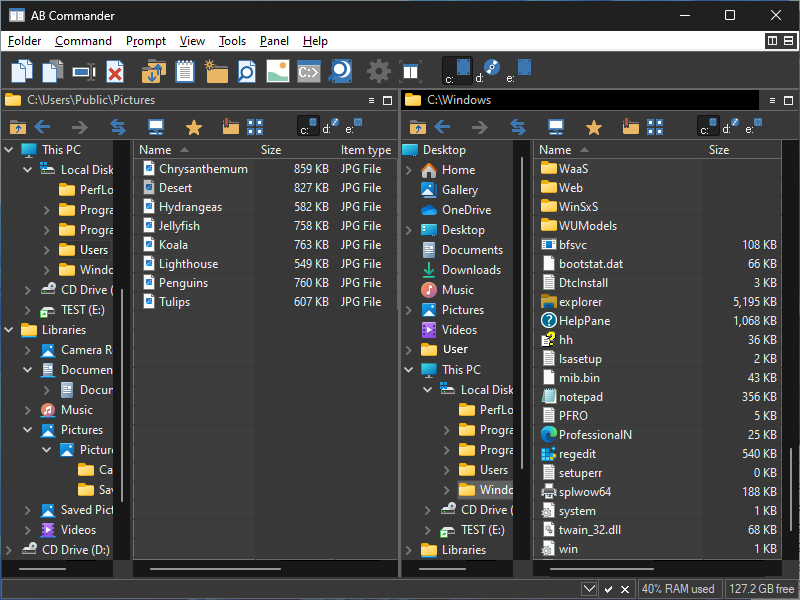
AB Commander in the dark mode:
With AB Commander you can:
Work with two folders at the same time, side by side
The main window of AB Commander hosts two panels, independently displaying the contents of folders of your computer, just like the built-in Windows Explorer does. Each panel may be used to browse all folders, both virtual and real ones, located on local or remote drives. Having two independent panels is especially convenient when copying or moving files, enabling you to see the contents of the source and destination folders simultaneously.
Work with many folders at the same time, using the tabs
If you are a file ninja who needs to keep track of the files in several folders at once, AB Commander lets you open several tabs, and use them to browse several folders at the same time.
Quickly navigate your computer and network
AB Commander offers several powerful means of navigation between folders: the Folder bar that lets you browse the whole hierarchy of folders, the Favorites list, the Most Recently Visited Folders (History) lists, the Drive bar and Drive menu, and more.
Directly manipulate files and folders
AB Commander offers commands to works with files and folders directly ( that is, copy, move, rename, delete, and more.) Unlike the built-in commands offered by Windows Explorer (which are still available and supported), AB Commander's commands do not involve the use of the clipboard. So now you can work with files in a direct and straightforward way.
Compare and synchronize files and folders
If you often move files between your desktop computer and a laptop, you will appreciate the commands to compare and synchronize folders.
Launch programs from the command prompt
The command prompt lets you quickly run programs that accept command-line arguments. AB Commander saves you time by allowing you to insert the names or full paths of the selected file objects directly into the command prompt.
Quickly edit text files
AB Commander includes a full-featured text editor that you can use to quickly view and edit text files. You can use the built-in text editor or set up your favorite text processor as the external Quick Editor to be used by AB Commander.
Quickly search for text in files
The built-in text finder lets you search for text fragments in a large number of text files and see the results.
Quickly preview images
The built-in image viewer lets you quickly preview image file, or see several images as a slide show.
Open folders in tabs
AB Commander supports the tabbed browsing, that you can use to have your favorite folders available for browsing in separate tabs, one click away.
Split and merge files
The built-in file splitter lets you split large files into smaller segments and then merge them back with ease.
Set up the external editor, viewer, and other tools
You can set up your favorite text editor or file viewer as the external editor or viewer of AB Commander to be able to quickly edit or view files right within AB Commander. You can also choose to use the standard Windows Search as an alternative method for finding files, or set up another file searching utility for that purpose.
Monitor the resources of your computer
Status bar indicators show various pieces of useful information, such as the current load of the RAM (Random Access Memory), free space left on the current drive, the current date and/or time, etc. You can control which indicators are displayed.
Use the traditional methods of file management
While providing new means to work with your files and folders, AB Commander fully supports the traditional tools and commands offered by the Windows user interface, such as the right-click accessible shortcut menus, the panel toolbars that let you copy, cut, and paste files via the clipboard (just like Windows Explorer does), drag-and-drop operations, etc.
Manage files on your network
AB Commander may be used both on a single machine and on a network. Each user can configure and use AB Commander independently on the others.
Customize the appearance and functionality to suit your personal working style.
AB Commander offers various ways of customizing the look and feel of the listings shown in the panels according to your preferences: single- or double-click activation, full row selection, underlining the hot or cold items, etc..
... and more!
If you have not done so yet, visit our web site now and download a free no-strings-attached-no-obligation installation file of AB Commander and see for yourself how AB Commander can be of use to you:
Version 24.2.2 (February 2, 2024)
This update corrects a problem that in some situations prevented text selection inside of the Jump box.
Version 24.2 (February 1, 2024)
This update offers several improvements and corrections, such as:
- A new command Refresh AB Commander has been added to the Tools menu.
- A problem has been corrected that in some situations prevented shortcuts to folders not being followed by AB Commander;
- A problem has been corrected that in some situations caused the status bar of the Quick Editor window not to update properly;
- The functionality of the Jump box has been improved;
- Several other minor improvements and corrections have been made.
Version 24.1 (January 17, 2024)
This update offers several improvements and corrections, such as:
- The option Enable Dark Mode support has been added;
- The option Use grey backround for non-primary columns has been added;
- The options Use with files and Use with folders have been added to the properties of the custom launchers;
- A problem has been corrected that in some situations prevented the current folders to be selected in the folder bars on start of AB Commander;
- Several other minor improvements and corrections have been made.
Version 23.11.4 (November 16, 2023)
This update corrects a problem that in some situations caused the error The destination drive is write-protected when coping or synchronizing files with AB Commander.
Version 23.11.2 (November 11, 2023)
This update corrects a problem that in some situations caused the error Cannot create folder to uncompress files when starting the installation of AB Commander.
Version 23.11 (November 5, 2023)
This update offers several improvements and corrections, such as:
- The Copy path to clipboard command has been added to the right-click menus of the links shown on the title bars of the file panels;
- The Copy path of location command now works for empty folders or when nothing is selected in a folder;
- Several other minor improvements and corrections have been made.
Version 23.8 (August 23, 2023)
This update offers several improvements and corrections, such as:
- A new option Show active panel number in title bar has been added to the Options screen.
- The Remove filter button has been added to the available toolbar buttons;
- Several other minor improvements and corrections have been made.
Version 23.7 (July 1, 2023)
This update offers several improvements and corrections, such as:
- Improved handling of files and folders with paths exceeding 259 characters;
- A new option Use Favorites labels for tabs has been added to the Options for Tabs screen. If you have set up a label for a favorite folder, this option makes the tab use that label instead of the path to the folder.
- The Tools menu has been updated with the Windows tools submenu offering links to several tools provided by Windows, such as Control Panel and Registry Editor;
- The Path to location command has been added to the Copy to clipboard menu, that copies the path of the parent folder of the selected item;
- Several other minor improvements and corrections have been made.
Version 23.4 (April 6, 2023)
This update offers several improvements and corrections, such as:
- A new option has been added, Sort the Most Recently Visited Folders lists chronologically;
- When searching for text within text files using Quick Editor, it's now possible to specify special characters, such as new line or tab;
- The context menu for the search results of the Find Text and Find Files commands now includes commands to opens the files, display their properties, etc.
- The Resize command has been added to the View menu that you can use to precisely control the dimensions of the main AB Commander window.
- Several other minor improvements and corrections have been made.
Version 23.1 (January 21, 2023)
This update offers several improvements and corrections, such as:
- You can choose what happens when you click with the scroll wheel of the mouse on different parts of the user interface, or disable the scroll wheel clicks altogether, if they get in the way of your normal workflow;
- You can now add the Undo button to the toolbars of AB Commander for quicker access to the Undo command;
- Several other minor improvements and corrections have been made.
Version 22.12 (December 12, 2022)
This update offers several minor improvements and corrections.
Version 22.10 (October 24, 2022)
The digital signatures of the executable files have been updated according to the latest security requirements of Windows 11 and Windows 10.
Version 22.9 (September 20, 2022)
This update offers several improvements and corrections, such as:
- A new command added to the internal Quick Editor that lets you reload the file contents in case the file was mofidied externally;
- The internal Quick Editor now detects when the file has been modified externally and prompts you to reload the file to keep it in sync with the latest updates;
- You can now open the same text file in a new internal Quick Editor window by selecting the file in AB Commander pressing the Ctrl+Alt+Q keys;
- A problem has been corrected that caused only one selected file to be launched from AB Commander even if more than one file were selected;
- Several other minor improvements and corrections have been made.
Version 22.1 (January 3, 2022)
This update offers several improvements and corrections, such as:
- A new option has been added, Confirm when changing from the Details view, which you might find useful for preventing accidental changes of the view of the file panels;
- A problem has been corrected that caused an error message displayed on Windows 11 when right-clicking on a file and selecting the Open with... command from the shortcut menu;
- Several other minor improvements and corrections have been made.
Version 21.12 (December 7, 2021)
This update offers several improvements and corrections, such as:
- Right-clicking on the This PC button in the AB Commander toolbar now opens the built-in context menu for the This PC folder;
- When switching to a tab that was displaing a folder that has been deleted, you are now prompted to close the tab;
- The option to show the UNC paths for the network drives is now used for other parts of the user interface, not just for the title bar of AB Commander;
- You can now use the Page Down and Page Up keys to cycle though the open tabs;
- Several other minor improvements and corrections have been made.
Version 21.10 (October 1, 2021)
This update offers several improvements and corrections, such as:
- AB Commander now supports custom launchers;
- A new option added for the internal Quick Editor that lets you use the Esc key to deselect text;
- Improved support for the ARM 64-bit processor architecture;
- Several other minor improvements and corrections have been made.
Version 21.6 (June 27, 2021)
This update corrects a problem that in several situations prevented opening some virtual folders within AB Commander.
Version 21.3.1 (March 12, 2021)
This update corrects a problem introduced in the previous update that prevented opening the Zip archives within AB Commander.
Version 21.3 (March 1, 2021)
This update offers several improvements and corrections, such as
- Native support for the ARM 64-bit processor architecture;
- New commands for the tabs: Open in New Tab in opposite panel, Move Tab to opposite panel, etc.
- The free space indicator is now showing the available space for the network folders, in addition to the local drives;
- A new option to find folders (in addition to files) on the Find Files screen;
- Several other minor improvements and corrections have been made.
Version 20.9 (September 24, 2020)
This is a maintenance update that offers several minor improvements and corrections.
Version 20.8 (August 1, 2020)
This is a maintenance update that offers several improvements and corrections, such as:
- Several options for the Synchronize command have been moved to a separate Advanced screen;
- A new option, Update empty files, has been added to the Synchronize command, accessible via the Advanced button;
- The relative positions of the toolbars and drive bars can now be changed: instead of using the drag-and-drop, the Layout submenu has been added to the right-click menu of the toolbars and drive bars;
- The result of the middle-click with the mouse has been tweaked: clicking on an empty space of the passive panel with the middle button now activates the panel, while middle-clicking on an empty space within the active panel now navigates to the parent folder;
- Several other minor improvements and corrections have been made.
Version 20.6 (June 1, 2020)
This update offers several improvements and corrections, such as:
- A new command, Linux, that serves as a shortcut to the root folder of the Linux file system, has been added to the Folder menu;
- A new option has been added to Quick Editor that allows changing the tab stop positions within the text;
- The Tab key can now be used within Quick Editor to change the indentation of the selected text, including multiple line selections;
- A new command, Copy to clipboard - Path (UNIX-style), has been added to the Command menu;
- A new command, Insert Path (UNIX-style), has been added to the Prompt menu;
- A problem has been corrected that caused AB Commander to become non-responsive when navigating to a subfolder within a Zip folder;
- The middle mouse button can now be used to select items instead of opening them when the Single click activation option is in effect;
- The middle mouse button can now be used to invoke the Go to Parent folder command when clicking on the panel toolbars, drive bars, title bars, or within an empty space of a file panel;
- Several other minor improvements and corrections have been made.
Version 20.5 (May 8, 2020)
This is a maintenance update that offers several improvements and corrections, such as:
- A new command, Select focused item only, has been added to the Command menu, and also to the context menu of AB Commander;
- A new option, Middle click should open a new tab, has been added that allow you to change the way AB Commander reacts when you use the middle button of the mouse;
- Several other minor improvements and corrections have been made.
Version 20.2 (February 15, 2020)
This update introduces a new option, Isolate shell extensions in a separate process, that is designed to mitigate problems caused by some third-party shell extensions that add commands to the shortcut menu invoked by right clicking on a file or a folder within AB Commander. Using a separate process to load such shell extensions greatly reduces the chance of a conflict between certain shell extensions and AB Commander.
Version 20.1.1 (January 21, 2020)
This is a minor update that corrects an error introduced in v.20.1 that prevented the This PC folder from displaying the sizes of the disk drives by default.
Version 20.1 (January 12, 2020)
This is a maintenance update that offers several minor improvements and corrections, such as:
- The Add to Favorites command now shows the path of the folder to be added to the Favorites list;
- Right-clicking on a link in the title bar of a file panel now shows the standard context menu for the folder, including the Navigate to... command;
- The Quick Find and Find Files commands can now operate on the real folders located under virtual parent folders (such as Libraries);
- Several other minor improvements and corrections have been made.
Version 19.8 (August 27, 2019)
- The Quick Find and Find Files commands can now search within virtual folders.
- New options have been added to the Find Files command to allow limiting the search results by the last modification date of the files.
- A problem has been corrected that in some situation prevented Windows from shutting down if AB Commander was running at the time the shutdown command was issued.
- The toolbars and drive bars of the user interface are now aligned automatically, without the need for you to drag them around with the mouse to position correctly.
- Several other minor improvements and corrections have been made.
Version 19.7 (July 30, 2019)
- Added an option to draw the path in the panel title bars using the "bold" typeface. You can access this option by right-clicking on a panel title bar and selecting Options from the menu.
- Added the option Ignore the "Group By" settings for all folders to the Options for panels screen. You may want to select this option if you don't like the way Windows groups items in some folders (such as This PC or Downloads.)
- Several other minor improvements and corrections have been made.
Version 19.1.1 (February 3, 2019)
- This is a minor update that corrects a problem that prevented the List command from working properly in some situations.
Version 19.1 (January 27, 2019)
- Enabled the per-monitor DPI awarness of AB Commander, to make it better adjust to different display resolutions when it is used on a multi-monitor system.
- Added the Options for tabs screen to make it possible to adjust some settings related to the tabs.
- Added the ability to lock the tabs to force the navigation within such tabs to specific folders and their subfolders only.
- Added the Undo Close Tab/Undo Close others commands to the tab context menu, to allow for a quick restoration of an accidentally closed tab/tabs.
- Added the Clear all history command to the View menu that erases all history waimtained by AB Commander. Also updated the Clear all history on exit option.
- Several other minor improvements and corrections have been made.
Version 18.8 (August 15, 2018)
- More options added for handling the pressing of the Delete key: you can now choose between letting Windows handle it, deleting the selected files to Recycle Bin without displaying a prompt, or always displaying the Delete screen.
- A problem has been fixed that in some situations caused a crash of AB Commander when it encountered files with paths longer than 260 characters.
- Several other minor improvements and corrections have been made.
Version 17.11 (November 1, 2017)
- Several improvements have been made to mitigate the 'blank file list' problem that was introduced in Windows 10 Creators Update.
- A new option has been added to allow you change the automatic selection of the next item after the 'delete' or 'move' operations.
- The Find files command now searches for the names of folders, in addition to the names of files.
- The Synchronize command now creates empty subfolders in the destination folder, if they exist in the source folder..
- Several other minor improvements and corrections have been made.
Version 17.1 (January 14, 2017)
- The version numbering has been changed to the "Ubuntu" style. So, for example, version 17.1 means it was released in January of 2017.
- The Go to folder command can now navigate to the folder that holds the Windows Spotlight images.
- The Resize images command now lets you select one of three resizing methods: fast, bilinear, or bicubic.
- Several other minor improvements and corrections have been made.
Version 9.8.2 (October 17, 2016)
- A problem in the Synchronize command has been corrected, that caused the include/exclude filters not to apply in certain situations.
- A custom font set with the View - Font command now applies to the Folder bar, as well.
- A custom color set with the View - Background color command now applies to the primary (sort) columns of the file panels, as well.
Version 9.8.1 (August 29, 2016)
- If some files are selected to be deleted as a result of the Synchronize command, they are no longer moved to the Recycle Bin, they are deleted directly now.
- Several improvements to the Synchronize command have been made to reduce the number of confirmation messages displayed in certain situations.
Version 9.8 (August 10, 2016)
- The Synchronize preview screen now shows the sizes of the files and folders to be synchronized.
- The Synchronize command now automatically excludes the Recycle Bin folder from the synchronization.
- A new option has been added to the Synchronize command: Respond with Yes or Continue to any confirmation message.
- The Rename command now offers to overwrite an existing file, in case of a file naming conflict, rather than offer a different name to rename to.
- Several other minor improvements and corrections have been made.
Version 9.7 (June 11, 2016)
- A new option has been added: Copy "Created" time when copying or synchronizing files.
- The Options window has been rearranged and simplified.
- The Create shortcut command has been added to the custom drag-and-drop context menu.
- If the Stamp command is about to change the time stamps of more than one file or folder, a message is now displayed asking the user to confirm the operation.
- A problem has been corrected that sometimes caused AB Commander to navigate to the root folder of a network drive after opening a document from a subfolder on that drive.
- A problem has been corrected that sometimes caused AB Commander to crash if the Quick Find operation was canceled by the user while the search was in progress.
- Several other minor improvements and corrections have been made.
Version 9.6 (August 7, 2015)
- AB Commander is now officially certified by Microsoft as software compatible with Windows 10.
- A new command has been added to the Tools menu: Find Files.
- Several other minor improvements and corrections have been made.
Version 9.5.1 (January 25, 2015)
This is a maintenance release that offers a number of fixes and improvements
- A problem has been fixed that sometimes caused AB Commander to crash after deleting and wiping a folder that contained several large files.
- A problem has beed fixed that prevented some RLE-encoded BMP files from being displayed by the Quick Viewer correctly.
- Several other minor improvements and corrections have been made.
Version 9.5 (November 10, 2014)
- The Quick Editor can now open and display files from some virtual folders, such as the Zip archives and virtual storage devices.
- After using the New Folder command, the current folder is no longer refreshed automatically. This change makes the behavior consistent with Windows Explorer and prevents the unnecessary scrolling in the Folder bar after the new folder has been created.
- Several other minor improvements and corrections have been made.
Version 9.4 (April 2, 2014)
- You can now safely remove the removable drives as well as eject the CD/DVD discs directly from the drive bar by right-clicking on the drive icon and selecting the Eject command, if it is present on the shortcut menu.
- More adjustments for the high-DPI display settings have been made.
- A problem has been corrected that prevented the Synchronize command from completing properly in some situations.
- A problem has been corrected that prevented the internal Quick Viewer from displaying some rotated images properly.
- Several other minor improvements and corrections have been made.
Version 9.3 (March 12, 2014)
- The Synchronize command has been updated: it now offers more options, including the ability to include or exclude files and/folders by masks, an option to restore the older versions of files, as well as an option to synchronize files that have the same last modification time but different sizes.
- A new option that simplifies the use of the Delete command: if AB Commander determines that a file can be deleted by moving it into Recycle Bin, it does that without asking for a confirmation of the operation. (And if you have deleted the file by accident, you can restore it from the Recycle Bin, or by using the Undo command of AB Commander.)
- A new tool, Resize Images, has been added to the Tools menu, that you can use to automate some frequently requested operations on a large number of images, such as to produce a smaller size versions of the images and/or to re-encode the images according to their Exif rotation tags.
- The internal Viewer has been updated to display the large images faster. It now also offers a command to save the rotated images in place, and an option to display the images rotated according to their Exif orientation tags.
- An option has been added that you can use to switch between the "new" flat buttons on the toolbars and their "old" non-flat versions.
- The user interface of AB Commander is updated to better adjust to the non-standard DPI display settings.
- A problem has been corrected that caused the columns of the file panels to grow very wide in some situations.
- A problem has been corrected that caused the Quick Finder not to return the correct results if the "Find text" box included the "less than" character.
- A problem has been corrected that sometimes caused a crash after adding certain folders to the Favorites list.
- A problem has been corrected that sometimes caused the single selection mode to be enabled within AB Commander by Windows after using an application that used the common Open/Save As dialogs in the single-selection mode.
- Several other minor improvements and corrections have been made.
Version 9.0 (August 20, 2013)
- The Synchronize command has been updated: it now offers more synchronization options, new preview window, early error detection, the opportunity to retry the errors, and more.
- More external tools are now supported: you can now set up an external synchronizer, as well as the external file and folder comparer applications, in addition to the external Editor, Viewer, and Finder applications that were supported in the previous versions.
- The internal Viewer updated to offer a better navigation in the full-screen mode.
- If your computer runs Windows 8, 7, Vista (or later), you can now use AB Commander to create the junctions points.
- The user interface is updated to follow the flat design style.
- Several minor improvements and corrections have been made.
Version 8.5.1 (November 23, 2012)
- Several minor improvements and corrections have been made.
Version 8.5 (October 11, 2012)
- Several improvements for the tabbed browsing: the Duplicate Current Tab command, the tooltips that show the full path, and more.
- A new option: "Invoke Go to Parent folder when double-clicking on empty space".
- The horizontal scroll bars now automatically appear or disappear as needed on the Folder bars.
- Several other minor improvements and corrections have been made.
Version 8.4 (May 14, 2012)
- The internal Quick Finder has been added that you can use to search for text fragments in the text files.
- A new option to set up the preferred Quick Finder.
- An option to set up an external Quick Finder application other than Windows Search.
- When the command prompt window is started "as Administrator", it now starts in the active folder rather than in the Windows system folder.
- The active folders are now restored if Windows was shut down while AB Commander was running.
- If the Delete key was used to delete a file, the next file in the list is now automatically selected.
- Several other minor improvements and corrections have been made.
Version 8.3 (June 1, 2011)
- The Rename and Delete commands are now faster and handle the selection of the files better.
- A new option Show Re-establishing/Closing Connections messages has been implemented.
- Better handling of some unusual situations that previously might have caused AB Commander to crash.
- Several minor improvements and corrections have been made.
Version 8.2 (March 17, 2011)
- A problem has been corrected that prevented the Synchronize command from working properly in some situations.
- You can now hide and unhide folders in the list of the Go to folder window.
Version 8.1 (February 12, 2011)
- An option for the internal Quick Editor has been added that allows you to enable or disable the warning message displayed when you attempt to open a write-protected file with the internal Quick Editor.
- When you sort files by clicking on the columns in the file panels, AB Commander no longer scrolls to the previously selected item.
- A problem has been corrected that caused AB Commander to navigate to the parent folder when changing to the Details view.
Version 8.0 (January 2, 2011)
- The Tabbed browsing option has been added. You can use the middle button of the mouse to quickly open and close the tabs, to have your favorite folders readily available for browsing. Of course, if you don't like the tabs, you can turn them off by using the commands on the View - Tabs menu.
- You can now set up an external file viewer of your choice to use with the file types not supported by the internal image viewer of AB Commander.
- Several minor improvements and corrections have been made.
The first version of this software was released on April 23, 1998, under the name Singularity.
The installation and operation of AB Commander software is supported on the versions of Windows that are fully supported by Microsoft. At the time of this writing, the supported versions of Windows are:
- Windows 11
- Windows 10
- Windows Server 2022 (with Desktop experience)
- Windows Server 2019 (with Desktop experience)
- Windows Server 2016 (with Desktop experience)
Both the 32- and 64-bit editions (including ARM64) of Windows are supported. (AB Commander is a native 64-bit application when installed on 64-bit Windows.)
AB Commander may be able to work on the following older versions of Windows in the test signing mode:
- Windows 8.1
- Windows 7 with Service Pack 1
- Windows Server 2012 (with Desktop experience)
- Windows Server 2012 R2 (with Desktop experience)
IMPORTANT: For each supported version of Windows, all available service packs and Windows updates must be installed. If your computer is not set to install updates automatically, use Windows Update to check for available updates and install them. AB Commander may not work properly if the latest updates are not installed.
Note that some features of AB Commander depend on support from Windows and not all versions and editions of Windows provide such support equally well. You are strongly advised to try the software before purchasing it to verify it's working well enough in your particular software environment.
AB Commander may work with some of the older versions of Windows, such as Windows XP, Vista, or Windows Server 2003 or 2008, but we do not support such configurations. You are advised to thoroughly test the software on the unsupported versions of Windows prior to purchasing it, to make sure it operates according to your requirements "out of the box".
AB Commander is NOT compatible with Windows 95, 98, Me, Windows NT 4.0, Windows 2000 or any older version of Windows.
- Login to Windows as the administrator, or as a power user. If you login as a regular or limited user, you may not be able to install or use this software.
- To begin the installation, simply run the installation file. If you do not have the installation file, please visit our web site to download the latest version:
https://www.winability.com/download/

- Note that if you have a previous version of this software already installed on your computer, the installation utility may prompt you to restart the computer, in order to be able to replace the files currently in use by Windows.
- The installation program will walk you through the process of setting up AB Commander. You will be prompted to read and accept the End User License Agreement, and to select the installation options such as the folder where to copy the files.
- After you press the Finish button, the installation program will copy the files into the specified folder and configure Windows for using AB Commander. If the installation program detects that your version of Windows is 64-bit, it installs the 64-bit files. Otherwise, it installs the 32-bit files.
- IMPORTANT: Make a backup copy of the installation file of AB Commander that you have downloaded from our web site, as well as a copy of the message with your license key, on a CD-R or other removable disk, because if you ever need to reinstall the software, you will need both, the installation file and your license information to install the program in the fully-licensed mode. It's not enough to store the files on your hard disk, because when (not if) it crashes, you will lose the files. (Yes, hard disks do crash, believe us!) We provide for download from our web site the latest versions of the installation files only. When we release an updated version, we remove the older version from the download area, so the installation file with the version that you have purchased may not be available for download in the future. Remember, it's your responsibility to backup your important files! If you do misplace your license key or the installation file that we no longer offer for download, please use this link to order a replacement:
https://www.winability.com/store/?lost_key
To completely uninstall AB Commander, it's not enough to simply delete its program files from the installation folder. To completely remove AB Commander from your computer, follow the instructions below.
IMPORTANT: If your computer is configured for several user accounts, login into the same user account that you were logged in when you installed AB Commander. If you use Windows Fast User Switching, log off from all other accounts before trying to uninstall AB Commander.
Open Windows Control Panel, open the Programs and Features (or Add/Remove Programs) item, and use it to uninstall AB Commander.
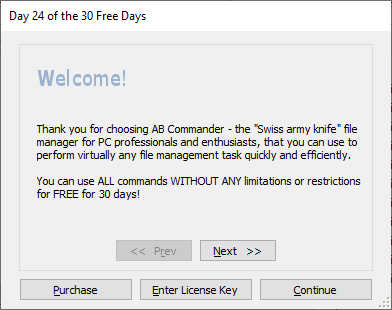
You can use AB Commander for the first 30 days FREE OF CHARGE, with no strings attached and absolutely no obligation to purchase anything!
During the 30 Free Days the operation of the software is not limited in any way, it is 100% functional. We make the software work without limitations so you can have a real look at it and decide whether or not it fits your needs. The only difference in the operation of the software during the free days is the Welcome screen that may be shown when you start AB Commander:
Please remember that AB Commander is NOT free or public domain software. It is free for the first 30 days only. If you want to use the software after that, you must either purchase a license for continued use of the program, or uninstall AB Commander from your computer. For the complete terms of use, please refer to file License.txt that is installed along with other files of AB Commander.
Related topics:
We accept all major credit cards, and we also offer many other payment options.
Open one of our web sites listed below, click on the Purchase or Buy Now link, and it will take you directly to our secure online store, where you can see the latest pricing and discount information, our money-back guarantee, privacy policy, and other related information:
We provide free upgrades to the updated versions of the same product that we may release within one year from the date of your purchase. For example, if you have purchased your license on March 1, 2020, you may use that license key for all updated versions of the same product that we may release during the next year, up to March 1, 2021 (both minor and major upgrades are covered by this offer). In other words, within one year after the purchase you get all upgrades to the product free of any charges.
After that, if you would like to upgrade to a newer version, you will be able to do so after purchasing a discounted upgrade license. (Of course, you are in no way obligated to upgrade to the new versions: you may continue using the version that you have purchased for as long as you like, if it works for you well enough, without paying any additional upgrade fees.)
Please visit our web sites for the latest information:
AB Commander can check for the updates for you, either manually or automatically:
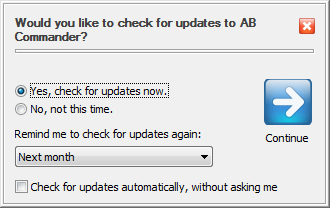
You can choose how often you want AB Commander to remind you to check for the updates (daily, weekly, monthly, or never). You can also set up AB Commander to check for the updates automatically, without asking you.
Note that you may need to configure your firewall, anti-virus, and/or anti-spyware software to allow AB Commander to connect to the Internet, otherwise it may not be able to receive the information about the updates.
Related topics:
We provide free online support to the licensed customers through our web site, for at least one year after the purchase. The prospective customers evaluating the software are welcome to use our support area, too. Before requesting technical or customer support, however, please check out this manual, it may already contain the answer to your question. In particular, be sure to look through the FAQ (Frequently Asked Questions) section of this guide.
Please DO NOT send us email messages, because due to the spam, worms, and spyware problems the reliability of email has diminished greatly in the last few years. The email messages that you send us often do not arrive, and if they do, our replies are often get blocked by your anti-spam or anti-virus software, causing frustration and unnecessary delays in communication.
Please visit our web site to request technical or customer support:
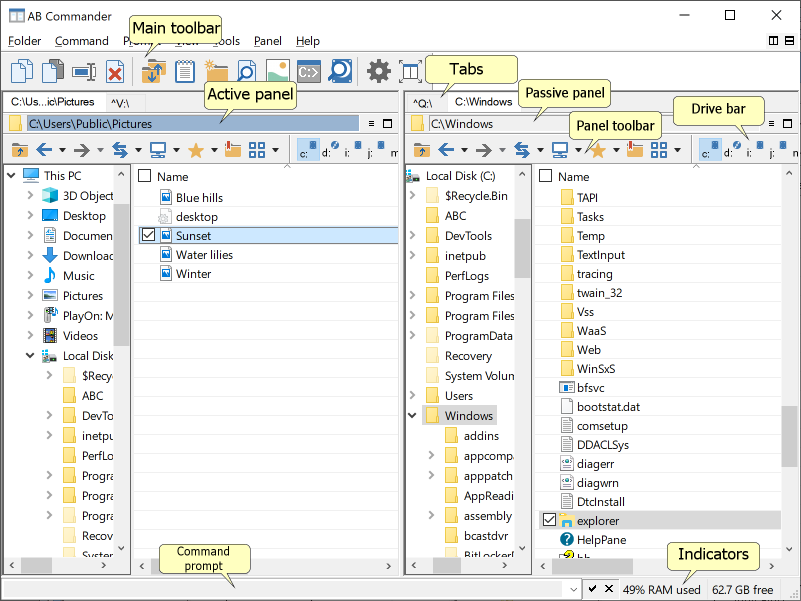
The main window hosts two panels, each displaying the contents of a folder, as if there were two Windows Explorer windows placed next to each other:
You can arrange the panels so that they are tiled vertically or horizontally, using the commands on the Panel menu, or the split buttons on the main menu bar. You can change the distribution of the available space between panels by using the mouse to drag the split bar that separates them.
Each panel has a folder bar shown to the left of the file list. You can use the folder bars to quickly navigate to different folders of your computer.
At any given moment, one of the panels is in the active state, while the other one is in the passive state. The active panel is indicated by a distinct color of its title bar. The active panel accepts the input from the keyboard. Most commands available in the menu and toolbar are also applied to the active panel.
You can change the active/passive state of the panels by pressing the Tab key, or simply by clicking with the mouse anywhere in the panel you want to make active.
As you can see on the illustration above, AB Commander has three toolbars: the main one and also two panel toolbars, one for each panel. You can customize each toolbar independently of the others. You can use all three toolbars or only some of them: if a button appears on more than one toolbar, its effect would be the same, no matter which toolbar you would use. The only difference would be that if you click a button on the main toolbar, the appropriate command would be applied to the currently active window, but if you click a button on a panel toolbar, that would activate the panel first and apply the command to that panel.
Besides the toolbars, AB Commander also offers three drive bars, the main one and two panel drive bars. They operate in the same way as the toolbars, except that you can press the drive bar buttons to quickly switch to a different drive of your computer.
The bottom part of the main window of AB Commander displays the status bar. Its left portion contains the command prompt that you can use to quickly launch programs that accept command line switches. The right portion of the status bar is used for various indicators.
AB Commander provides a wide range of commands to make you able to manage your files and folders easily and effectively:
Use the commands of the Folder menu to browse the folders, and see the contents of the folders in the panels. Remember that each panel may display different folder, so that, for example, you can visually compare the contents of two different folders.
Use the commands of the Command menu to copy, move, delete, etc. files and folders displayed in the panels. The files selected in the active panel usually become the source of the operation, and the folder displayed in the passive panel serves as the destination. For example, if you want to copy some files from one folder to another, you would simply display the destination folder in the passive panel, and select the files you want to copy in the active panel. Then, when you choose the Copy command, it would already be set up to copy the files between the folders you want.
Some of the file operations (such as Rename, Copy, Move, or Delete to the Recycle Bin) can be reversed using the Undo command. However, not all operations are reversible. For example, if you delete a file directly or use the Wipe the content option which deleting a file, the Undo command cannot restore the deleted file. Note also, that if you use Windows Vista, Windows 7, or later version of Windows, the Undo information is shared between AB Commander, Windows Explorer, and other file management tools that are integrated with Windows shell. This means that you can use the Undo command of AB Commander to reverse an operation performed with Windows Explorer and vice versa. (Sometimes this may cause confusion or an undesired effect!)
Use the commands of the Prompt menu to insert the file names into the command prompt of AB Commander. You can also type the commands into the command prompt directly.
Use the commands of the View menu to customize the appearance of AB Commander to suit your needs. You can, for example, change the font size used to display file listings, colors, show or hide the toolbar, etc.
Use the commands of the Tools menu to perform such commands as Quick Edit: simply select the file which contents you want to see, and choose this command to open it with the Quick Editor.
Use the commands of the Panel menu to customize the appearance of the file panels. You can also use the Set Filter command to limit the set of objects displayed in the panels according to various rules.
Finally, the commands of the Help menu let you display the User's Guide for AB Commander, enter you license key into the program, visit the technical support area at our web site, and so on.
To manage your files and folders efficiently, it's important to be able to quickly navigate to different folders of your computer. AB Commander offers various tools designed to speed up and simplify the navigation:
Title bars of the file panels
Each panel of AB Commander has a title bar that shows the path of the folder currently displayed in the panel. Each component of the path is usually a clickable link: if you hover the mouse over the component it becomes underlined (to indicate that it's clickable), and if you click it, the panel will navigate to that path of the component. You can use this feature to quickly navigate to one of the parent folders.
Another convenient navigation tool is the Jump command: you can select if from the Folder menu, or you have the option to invoke the Jump command by double-clicking the panel title bar. As a result, the title bar becomes an editable box where you can type in the destination path of the folder to navigate to. The Jump box has a history list of the paths that you previously entered there. It also supports the auto-complete navigation: if you type the backslash character after a path, the Jump box will display a list of subfolders you can choose from to complete the path, to save you from unnecessary typing.
You can change the options that affect the display and functionality of the panel title bars by right-clicking on a panel title bar and selecting Options from the menu.
Folder bars
Each panel of AB Commander has a Folder bar attached to the file list on the left side, that lets you browse the hierarchy of folders of your computer. To navigate to a specific folder, simply click on it in the folder bar, and the panel will display the list of objects that the folder contains.
You can also navigate the folder bars using the keyboard: press Shift+Tab to switch the input focus to a folder bar, then use the arrow keys to select the desired folder, and finally press the Enter key to navigate to it.
You can right-click on a folder in a folder bar to display a shortcut menu for that folder, just like Windows Explorer does. If you have Windows Vista or later, you can also drag and drop objects to and from the folder bars (the drag-and-drop operations with folder bars are not supported on Windows XP or Windows 2000).
You can adjust the width of a folder bar by dragging its right edge with the mouse. If you resize the main window of AB Commander, it will adjust the width of each folder bar as well, to keep it proportional with the width of the appropriate panel. (Note that you have the option to turn such automatic resizing off and keep the widths of the folder bars constant.) You can also turn the folder bars on and off for each panel, by right-clicking on an empty space within a folder bar and using the Show Folder bar command on the shortcut menu, by using the same command on the Panel menu.
Tabs
You can have several folders open in separate tabs, and quickly switch to such folders by clicking on their tabs. To open a folder in a separate tab, right-click on the folder in AB Commander and choose Open In New Tab command from the shortcut menu. Or, just click on the folder with the middle button of the mouse.
Drive bars
Drive bars are convenient tools that let you quickly display the current folder of any drive your computer has access to:
AB Commander offers three drive bars: the main drive bar that belongs to the main frame window, and two panel drive bars, one for each panel. The functionality of each drive bar is identical. You may find that using the panel drive bars is more convenient than the main drive bar, because you can activate a panel and change its folder to a different drive with just one mouse click. With the main drive bar, you have to first activate the panel (if it's not active), before using the buttons on the drive bar.
Of course, you don't have to keep all three drive bars visible on the screen, you can hide those you don't use:
To hide or display the main drive bar, choose the Drive bar - Show command from the View menu. To hide or display a panel drive bar, choose the Drive bar command from the Panel menu. You can also click any button on the drive bar with the alternative (usually, right) mouse button, and choose the appropriate command from the menu shown.
As you move the mouse pointer over the buttons on the drive bar, the current drive labels are shown in the tooltips for each button. In addition, the full path to the current folder for the drive is displayed on the status bar.
To display the current folder of a drive in the active panel, simply click the appropriate button on the drive bar with the left button of the mouse. If you press the Alt key and then click on a button (while the Alt key is pressed), the root folder of the appropriate drive is displayed instead of the current folder. Clicking on a button while the Shift key is pressed makes the passive panel (instead of the active one) display the current folder of the drive. Finally, clicking on a button while pressing both Alt and Shift keys simultaneously displays the root folder of the drive in the passive panel.
If you right-click on a button on the drive bar, a shortcut menu is displayed, letting you perform some common actions, such as eject the removable drives as well as the CD/DVD discs, see their properties, connect or disconnect the mapped network drives, etc.
You can also use the Layout submenu on the right-click menu of the drive bar to change the position of the drive bar relative to the toolbar.
You may also find it convenient to use the Alt+F1 and Alt+F2 keys: Alt+F1 displays the drive menu for the first panel (the left or the top one, depending on the way you split the panels); Alt+F2 displays the drive menu for the second (right or bottom) panel.
Network menu
Network menu is a tool that lets you quickly display the contents of the Network Neighborhood folder and quickly navigate to a computer on your network.
You can display the Network menu for the active panel using the Folder - Network command (available also on the panel control menu and as a toolbar button).
You may also find it convenient to use the Ctrl+F1 and Ctrl+F2 keys: Ctrl+F1 displays the Network menu for the first panel (the left or the top one, depending on the way you split the panels); Ctrl+F2 displays the Network menu for the second (right or bottom) panel.
Favorites
You can add the folders you visit often to the Favorites list maintained by AB Commander, by using the Folders - Favorites command. Then you will be able to quickly go to those folders by selecting them from the Favorites list.
You can use the Organize Favorites to modify the items of the Favorites list: you can assign labels to the items, and also make the items set not only the active, but also the passive folder.
Note that although the Favorites list maintained by AB Commander works in almost the same way as the Favorite places feature of Windows Explorer, their contents is completely independent on each other: the changes you make to one of them do not impact the other.
Folder History lists
AB Commander maintains the history lists (also known as the Most Recently Visited Folders lists) that keep track of folders you previously displayed in each of the panels. Whenever you display a folder in a panel, its full path is added to the history list, at the current position. If you subsequently decide to go to that folder again, you can do so by displaying the history list for that panel and choosing the folder from this list.
You can display the history list for the active panel using the History command on the Folder menu (available also on the panel control menu and as a toolbar button, both on the panel toolbars and on the main toolbar). The current folder is shown in the list using the bold typeface.
You can also use the Previous and Next commands on the Folder menu to quickly move from one folder to another, according to their positions in the history list.
The default setting for maximum size of each list is 20 items, but you can change this setting to any number between 1 and 100, using the View - Options command.
When you launch a file, by selecting it in one of the panels of AB Commander, and pressing Enter (or double-clicking it), normally AB Commander launches it by passing it on to Windows, letting it open the selected file with whatever application is set up to handle the files of that type. Usually this is exactly what is supposed to happen, but what if you want a different application to open the files of a specific type? For example, you could have more than one text editor, and you want a non-default text editor to handle text files when you launch them from AB Commander, while still being able to open them with the default text editor from File Explorer?
To facilitate such a possibility, AB Commander offers a way to set up an unlimited number of custom launchers. Each such launcher would specify which file types it should apply to, and which application to use to handle the files, when you launch them from AB Commander.
To set up a custom launcher, open the Options - Tools screen of AB Commander and select Launcher in the list of tools:
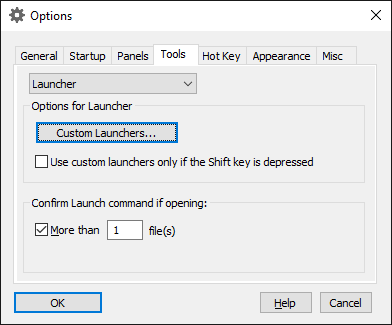
Press the Custom Launchers command and another screen should open displaying the list of the custom launchers you had previously set up. (Of course, if you had not set up a custom launcher yet, the list would be empty.)
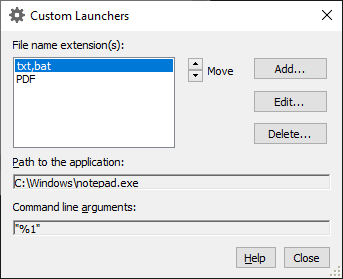
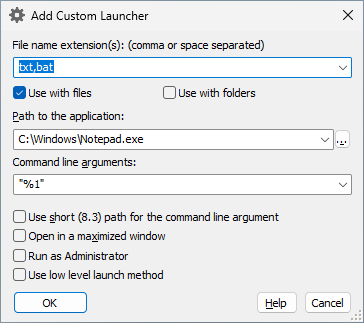
To add a custom launcher, press the Add button and specify the file name extensions this launcher should be used with, as well as the application and the command line arguments to pass on to the application:
After you have set up one (or more) custom launcher, whenever you launch a file, AB Commander would check the file name extension (such as .txt or .pdf) and see if there is a custom launcher for it. If you have not set up a custom launcher for the files of that type, AB Commander will ask Windows to open the file, as usual. However, if it finds a custom launcher, it starts the application you have specified and passes to it the command line arguments you had specified as well, replacing the placeholder %1 with the actual path of the file you are launching.
Note that if at a particular moment you don't want to use a custom launcher to open a file, press the Shift key while launching the file, and that would make AB Commander pass the file on to Windows directly, as if no custom launchers were set up. This gives you the flexibility of choosing to use or not to use the custom launchers, depending on the situation. Note also that you can flip the meaning of the Shift key in this context, by selecting the appropriate option.
AB Commander offers you the option to work with several different folders simultaneously, quickly swithing between them using the tabs:
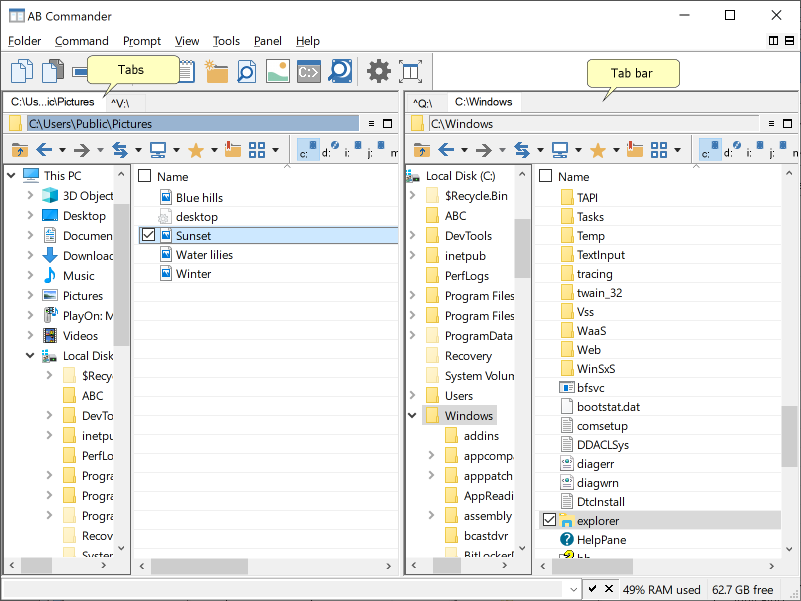
Each of the file panels has it own tab bar, where the tabs are displayed. The tabs may not be visible initially, because to reduce the screen clatter, AB Commander is initially configured not to show the tabs if only one tab is open for each panel. However, you can open an additional tab, by right-clicking on a folder and choosing AB Commander - Open in New Tab command. This will cause AB Commander to create a new tab and display the selected folder in that tab. It will also make the tab bar for that panel visible automatically.
If you've enabled the option Middle click should open a new tab then you can also click a folder with the middle button of the mouse to open that folder in a new tab.
If you no longer want to use a tab, right-click on it, and choose Close tab. (You can also click the label of the tab with the middle button of the mouse to close it.) Or, if you want to keep using only one specific tab, right click on it and choose Close others. If only one tab remains open, AB Commander will hide its label as well as the tab bar itself, unless you want change this behavior by using the Options for tabs screen.
If you've closed a tab accidentally, you can reopen it by right-cliking on the tab bar and choosing Undo close tab from the menu. Keep in mind that the ability to undo the closing of a tab is preserved for a short time only, immediately after you clse a tab. If you manipulate the tabs after the closing, restoring the closed tab in this way may not be possible, and you would need to open a new tab manually.
You can rearrange the order of the tabs by right-clicking on the tab that you want to move, and chosing its new position under the Move tab submenu.
Finally, you can lock a tab to force it display only a specific folder of your choice (and its subfolders). For example, if you have an external drive with the drive letter V:, and you want to dedicate a tab to display the contents of this drive and its sufolders only, you would open the drive V: in a new tab, then right click on that tab, and choose Lock tab root - V:\ from the menu. This will change the label of the tab to start it with the ^ character, to indicate that the tab is locked, as you can see on the image above. It will also prevent you from using the tab to display any folder other than the drive V: and its subfolders. (Of course, you can always browse other folders using other tabs that you did not lock to specific folders.)
Note that when a tab is locked, its label shows its locked root folder, even if you navigate to a subfolder. (You can still see the path to the current folder on the title of the panel, as usual). If a tab is not locked, its label shows the path to the current folder, possibly truncated to fit the limit that you can set using the Options for tabs screen.
If you no longer want the tab to be locked to a specific folder, right click on it, choose Unlock tab root, and that would remove the browsing restrictions from that tab and allow you to use it to browse other folders, as usual.
When you import images from a digital camera into a computer, you have probably noticed that more often than not the importing software chooses some not very descriptive names for the files, for example:

Would not it be better to give your digital images the names of your choosing that better describe what the images are all about?
With AB Commander, you can use the Rename command to quickly rename many files in one step, giving them more descriptive names that make sense to you rather than to your digital camera software.
To do that, first use AB Commander to navigate to the folder when you have imported the digital images or movies, and select the files that belong to the same event. (Remember that you can use the Quick View command of AB Commander to see the images without starting your digital imaging software.) For example, if you want to rename the photos of your cats, select the image files that you want to rename, choose the Rename command, and specify how you want the files to be renamed in the To area:
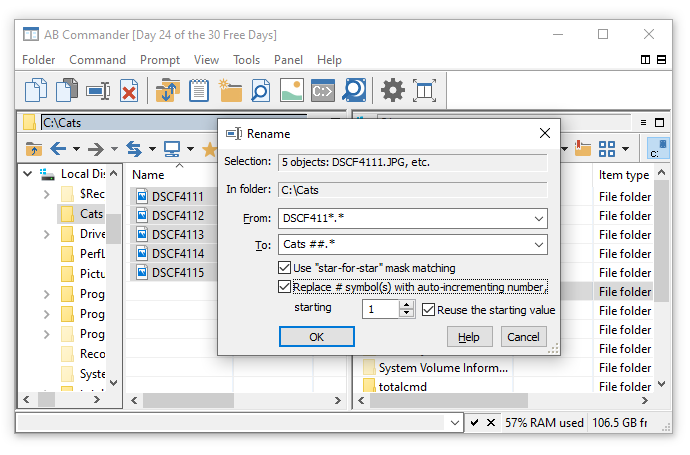
Note the # symbols at the end of the file name in the To area: you can use it as a placeholder for the image number: when renaming the selected files, AB Commander will replace the # symbols with a number, starting with the one you've specified, incrementing it automatically when renaming the next file. (Of course, for this to work, the Replace # symbol(s) with auto-incrementing number option must be selected.)
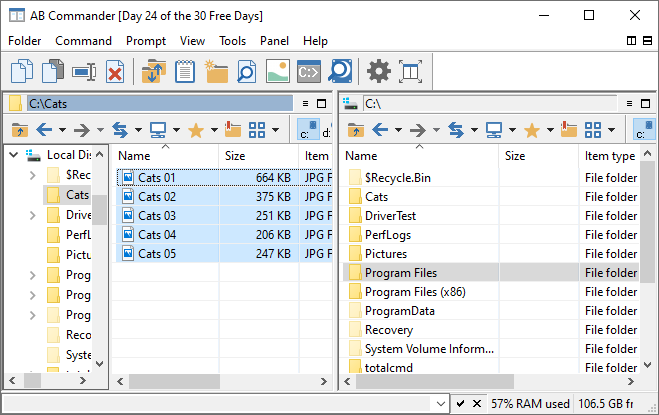
Repeat this procedure for the other images taken during different parts of your vacation and soon your image collection will be nicely organized and easily navigated.
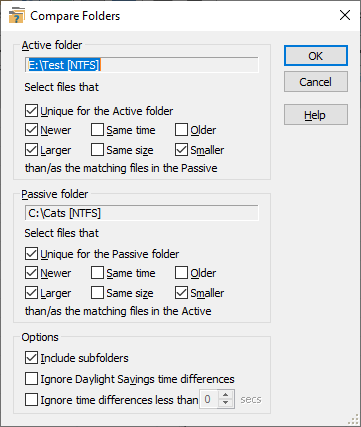
AB Commander offers commands which you may find especially useful if you have two computers, or if you often work with your files on different computers. In such cases, you may often encounter a situation when you have two folders (for example, one on an external USB drive, and another one on the computer's hard disk) that contain almost the same files, but some files in one of such folders have been updated by you.
Instead of manually analyzing the differences between such two folders, you could use the Compare command of AB Commander: simply make the two panels display the two folders you want to compare and choose Compare from the Command menu. When the Compare window is displayed, select the comparison options you want. For example, you can choose to select the newer or unique files that each folder contains. Press OK and AB Commander will compare the dates of the files in each of the folders and highlight the ones that satisfy the comparison criteria you have set.
If you see that one of the folders contains outdated files, and you want both folders to contain the up-to-date information, you can use the Synchronize command on the Command menu: activate the panel that displays the up-to-date folder, and choose Synchronize command from the Command menu. When the Synchronize window appears:
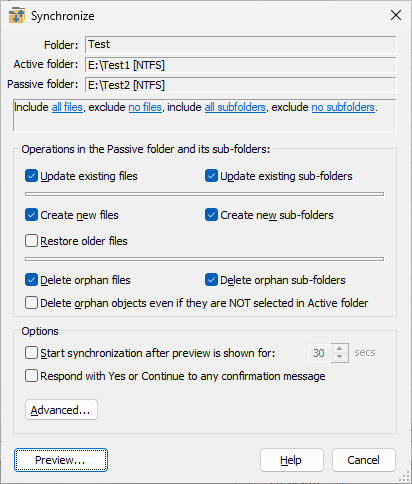
Select the desired synchronizing options, and press the Preview button: AB Commander will display a preview window with the list of the proposed changes. If the changes are what you want, press OK and AB Commander will replace the outdated files with the newer ones, and also delete the "orphan" files, if you have selected that option.
Example
Suppose you are going on a trip, and you want to work on the files that are usually located in the folder C:\My Documents\Letters, while away from your office. You take the files with you by copying them from this folder onto a removable drive (such as a floppy or USB disk), and take the drive with you. While you are away from your office, you work with the files on the removable drive: you might modify some of the files, create new files, and delete some other files you no longer need. When you come back, the removable will contain the updated set of files, and the C:\My Documents\Letters folder will have the outdated set of the same files.
To make the folder on your hard drive contain the updated set of files, you can use the Synchronize command. Simply make AB Commander to display the contents of the removable drive in one of its panels, and the contents of the C:\My Documents\Letters folder in the other panel. Now make the panel that displays the removable drive the active one (this tells AB Commander which of the panels displays the up-to-date information) and choose the Synchronize command from the menu. Select the synchronizing options (such as Copy newer files from Active to Passive folder and Delete orphan files from Passive folder) and press the Preview button. AB Commander will display the list of the proposed changes. If you are satisfied with it, press OK and AB Commander will synchronize the C:\My Documents\Letters folder with the contents of the removable drive.
Using the external comparing and synchronizing tools
AB Commander lets you setup the third-party applications as the external file or folder comparer or synchronizer: it can pass the paths of the selected files or the current active and passive folders to such applications via the command line and thus make it possible to launch such external tools directly from AB Commander.
AB Commander comes with a built-in Quick Editor that you can use to quickly view and edit any text file, not necessarily associated with any particular application. This command is especially useful when working with simple text files (such as the files created with Windows Notepad) that contain no formatting information.
To use the Quick Editor, select the text file you want to open, and choose the Quick Edit command from the Tools menu (or press the Ctrl+Q key combination), and the file will be opened with the Quick Editor for you:
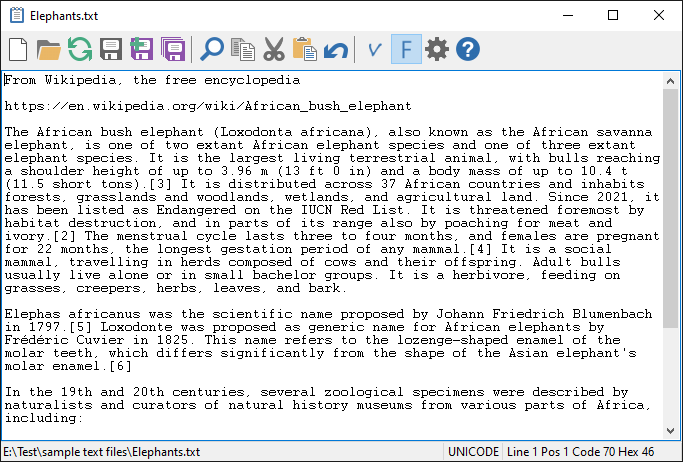
The internal Quick Editor can be used as a complete Notepad replacement within AB Commander. It can be used to edit the regular ASCII text files, as well as the Unix and Unicode files, including those encoded in the UTF-8 format. The binary files can be viewed with the internal Quick Editor, too, although editing them would be disabled.
In addition to the built-in text editor, you can also set up an external text editing application, that you can use to edit the text files, too. When you install AB Commander, the built-in text editor is set up as the preferred quick editor, accessible via the Ctrl+Q key combination, and the external editor is set up as the alternative editor, accessible by pressing the Ctrl+Shift+Q keys. You can change this assignment using the Tools page of the Options window of AB Commander. You can also change the external editor to another application, if desired.
CAUTION: Quick Edit is a powerful command that must be used with care. If you use Quick Editor to modify binary files, or files that contain not only text but also formatting information, you can corrupt the files. For example, if you want to change something in a Microsoft Word document (normally, a file name that ends with the .doc extension), open it with Word, not with Quick Editor, to preserve the formatting of the document. (If you simply want to view the raw contents of a Word document, then Quick Editor can be used.) In general, don't use the Quick Editor to modify non-text files, unless you are sure of what you are doing. When in doubt, make a backup copy of the file before modifying it!
AB Commander includes a built-in image viewer that you can use to quickly view image files without launching a dedicated image viewing application. To use this command, select an image file in the AB Commander file list, and choose the Tools - Quick View command (or press the Ctrl+I keys). This will open the built-in viewer of AB Commander and display the image file you have selected in a separate window:
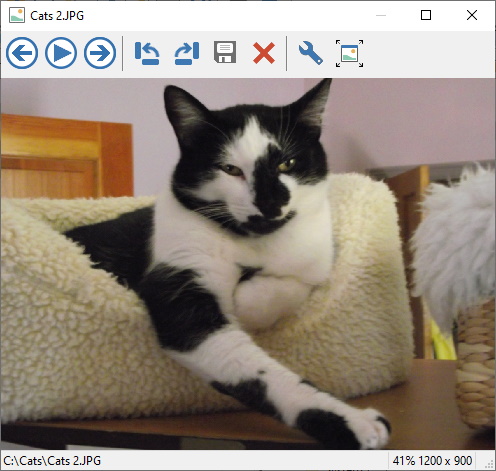
You can use the buttons on the toolbar of the image viewer window to rotate the image, switch to the full-screen mode, or, if you have several images in the same folder, you can view them as a slide show.
In addition to the internal image viewer, you can also set up an external image viewing application for a quick access from AB Commander to view the files that are not supported by the built-in image viewer of AB Commander. When you install AB Commander, the built-in quick viewer is set up as the preferred viewer, accessible via the Ctrl+I key combination, and the external viewer is set up as the alternative viewer, accessible by pressing the Ctrl+Shift+I keys. You can change this assignment using the Tools page of the Options window of AB Commander. You can also change the external viewer to another application, if desired.
AB Commander comes with a built-in Quick Finder that you can use to quickly search for the text files that contain a particular text fragment.
To use the Quick Finder, select the files and folders you want to search, and choose the Quick Find command from the Tools menu (or press the Ctrl+F key combination):
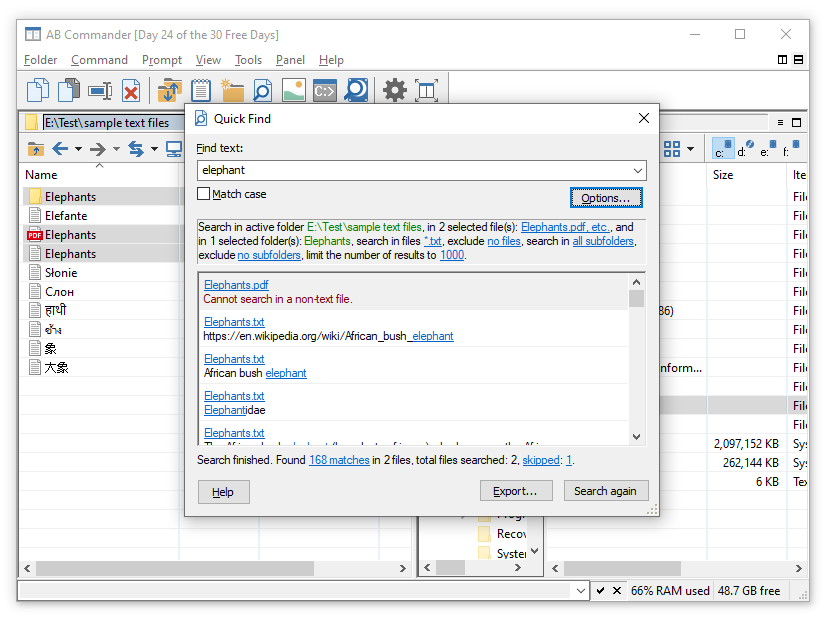
You can choose to search in the subfolders of the selected folder, or specify the types of files to search in and/or the types of files to exclude from the search. Quick Finder will analyze each such file, and display all lines of text found in such files for you to review. You can also save the search results in a text file, using the Export button on the Quick Find window.
In addition to the built-in Quick Finder, you can also set up an external text searching application, such as the standard Windows Search command, for an alternative method of searching for text in files. You can change this assignment using the Tools page of the Options window of AB Commander.
The Find Files command of AB Commander can be used to search for files and folders using a name mask:

You can also use the alternative search command to search for files, by pressing the Ctrl+Shift+F keys. When you install AB Commander, the standard Windows Search command is set up to be used for the alternative search. However, you can designate a third-party search application for that, using the Tools page of the Options window of AB Commander.
A filter is a set of criteria that define which objects should or should not be displayed in a panel. Normally, AB Commander displays all objects of the folders in its panels, according to the system-wide settings (controlled by the Folder Options command of Windows Control Panel). However, AB Commander lets you further restrict the set of objects shown in the panels.
The easiest (and fastest) way to set up a "quick filter" is to enter it directly into the title of the panel by using the Jump command of the Folder menu. For example, to see only the text files with the extension TXT in the folder C:\MyDocs, choose the Folder - Jump command of AB Commander (or just press Ctrl+J) and enter the following into the box:
C:\MyDocs\*.txt
This will make AB Commander to display only the files which names end in .txt. To display the DOC files, choose the Folder - Jump command again and change the text in the Jump box to read:
C:\MyDocs\*.doc
To remove the filter (and make AB Commander to display all files and folders), choose the Folder - Jump command and delete the filter mask *.doc, that is make the text in the panel title bar to read:
C:\MyDocs
AB Commander lets you also specify more complex filters that you can use to include or exclude several file sets, as well as virtual folders, etc. To set up such a filter, use the Set Filter command on the Panel menu.
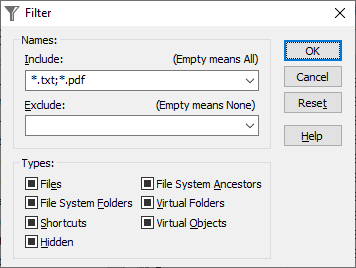
After you have set up such a filter, the title bar of the panel will read:
C:\MyDocs\#
where the # sign indicates that there is complex filter applied to the file listing. To remove such a filter, use the Panel - Remove Filter command, or simply erase the # character from the title bar with the Folder - Jump command.
AB Commander includes a built-in file splitter that you can use to split a large file into several smaller segments.

You may find this command of use, for example, if you have a large file that does not fit on a single floppy disk. You would use the Split command of AB Commander to split the file into smaller segments, each of which would fit on a floppy disk. Later on, you could use the Merge command to combine the segments back into the original file.
To use the Split command, simply select the file(s) you want to split in one of the panels of AB Commander, and then choose Split command from the Command menu to display the Split window. There, specify the folder where you want the segments to be created, the base name for the segments, the desired size of the segments, and press OK. AB Commander will create the segments in the folder you have specified. If the destination folder is the floppy disk, you will be prompted to insert a new disk for each new segment. Each segment will be numbered consecutively, by appending a three-digit numeric extension to the base name. (For example, if the base name of the file is Letter.doc, the segments will be named Letter.doc.001, Letter.doc.002, etc.).
Merging the segments back is just as easy. First, select one (or all) of the segments you want to merge in one of the panels of AB Commander. Note that you don't have to select all segments: if you select just one of them (such as Letter.doc.002 in the example above), AB Commander will be processing the segments in the correct order anyway, starting with Letter.doc.001). Now choose the Merge command from the Command menu to display the Merge window. Specify the destination folder and the base name for the merged file, and click OK. AB Commander will take each segment, one by one, and merge them to produce the original file. If the segments are located on the floppy disk, you will be prompted to insert each floppy, as required to merge the segments correctly.
AB Commander contains the command prompt area at the very bottom of its window that is a convenient tool for running programs that accept command-line switches:
To use the command prompt, first switch the input focus to it (by clicking on the command prompt with the mouse or by pressing the Shift+Esc key combination). Then enter the command you would like to run. Finally, press the Enter key (or click on the Execute button in the status bar), and the command you have entered will be passed to the program for execution.
While constructing the command to execute, you may find it useful to check the commands on the Prompt menu. This menu lets you insert various name and path components of the currently selected object into the command prompt, and thus helps you avoid unnecessary typing. For example, instead of manually typing in the name of a file in the command prompt, you may simply select the file in the panel, and press Ctrl+Ins. AB Commander will type the name of the file into the command prompt for you!
Example
You may learn from the Windows documentation that if you run Windows Notepad with the command line switch /p followed by the name of a file, then Notepad will send the file to the default printer for printing. You can use this property of Windows Notepad to quickly print out text files, without actually opening them. For example, suppose you want to quickly print out a text file named Letter.txt. To do that, type the following into the command prompt:
notepad /p
Now select the file Letter.txt and press Ctrl+Ins: the file name will be added to the command line:
notepad /p Letter.txt
Now press Enter and the file Letter.txt should be printed out!
Notes
Instead of pressing the Ctrl+Ins keys, you can also drag the files from the panels with the mouse and drop them on the command prompt. If you drag-and-drop with the right mouse button, a menu is shown that lets you select the form of the file name or path you want to insert into the command prompt.
While entering the command into the command prompt, you can still use the Tab key to change the active panel, and also the Ctrl+Up Arrow / Ctrl+Down Arrow keys to move the current selection in the active panel.
When executing the command, AB Commander imitates the behavior of the MS-DOS command prompt by setting up the current drive and current directory to match the folder that is currently displayed in the active panel. This lets you avoid typing the names of the files and folders when entering commands into the command prompt. In addition, unless you turned off the Expand drive letters option, you can refer to the current folders on other drives using just the drive specifications (that is, the drive letter followed by a semicolon). For example, if the last visited folder on the drive D: was D:\Temp, and the command prompt contains the text:
notepad /p d:Letter.txt
then the drive specification d: will be replaced with D:\Temp\, and the actual command executed by AB Commander would be:
notepad /p D:\Temp\Letter.txt
no matter which folders are currently displayed by the panels.
Can a command be started "As Administrator" ?
Yes: press the CTRL and SHIFT keys simultaneously while pressing ENTER or clicking on the Execute button, and the command will start elevated (or "As Administrator").
AB Commander lets you customize its appearance and operation to suit your personal working style and preferences. Here is a few examples of what you can do:
Select the single-click or double-click activation
You can select the way of opening files and folders with the mouse by selecting the appropriate options on the Panels page of the Options window.
Change the size of the font used to display file names
You can increase or decrease the size of the font, or select a different font altogether with the Font command of the View menu.
Choose custom colors for the file panels
You can select the colors you like most with the Text Color and Background Color commands of the View menu.
Add and remove buttons to/from the toolbars
Simply right-click on the toolbar you want to change and choose the Customize Toolbar command from the popup menu. Then use the Customize Toolbar window to add or remove buttons to/from the toolbar, or to change the order of the existing buttons.
Disable the "quick rename" feature
Do you find it annoying that Windows always offers you to rename a file when you click on its name, even if all you want to do is select it? Well, with AB Commander you can stop that from happening, by clearing the Allow quick rename option on the Panels page of the Options window.
... and more!
If you have not done so yet, visit our web site now and download a free no-strings-attached-no-obligation installation file of AB Commander and see for yourself how AB Commander can be of use to you:
AB Commander offers the following keyboard shortcuts that you can use instead of choosing the commands from the menus:
| To | Press |
| Open Help for AB Commander | F1 |
| Open the selected folder or file | Enter |
| Run the selected program as administrator (Windows 8/7/Vista only) | Ctrl+Shift+Enter |
| Navigate to the parent folder | Backspace |
| Navigate to the root folder of the current drive | Alt+Backspace, Ctrl+\ |
| Navigate to the Computer folder | Alt+Shift+Backspace |
| Navigate to the Desktop folder | Shift+Backspace |
| Match the panel with the opposite one | Alt+ = |
| Go to the previous folder | Alt+Left Arrow |
| Go to the next folder | Alt+Right Arrow |
| Display the previous folders list | Ctrl+Shift+Left Arrow |
| Display the next folders list | Ctrl+Shift+Right Arrow |
| Display the Favorites list | Ctrl+O |
| Add to Favorites | Shift+F |
| Display the History list | Ctrl+H |
| Display the prompt for the folder to go to | Ctrl+G |
| Enter a folder to jump to in the title | Ctrl+J, Alt+D |
| Display the drive menu | Ctrl+D |
| Display the drive menu for the first panel | Alt+F1 |
| Display the drive menu for the second panel | Alt+F2 |
| Display the Network menu | Ctrl+W |
| Display the Network menu for the first panel | Ctrl+F1 |
| Display the Network menu for the second panel | Ctrl+F2 |
| Open selected folder in a New Tab | Ctrl+T |
| Close the current Tab | Ctrl+F4 |
| Switch to the Next Tab | Ctrl+~ |
| Switch to the Previous Tab | Ctrl+Shift+~ |
| Open the preferred Quick Editor | Ctrl+Q |
| Open the alternative Quick Editor | Ctrl+Shift+Q |
| Open the internal Quick Editor in a new window | Ctrl+Alt+Q |
| Open the preferred Quick Viewer | Ctrl+I |
| Open the alternative Quick Viewer | Ctrl+Shift+I |
| Open the preferred Quick Finder | Ctrl+F |
| Open the alternative Quick Finder | Ctrl+Shift+F |
| Open the preferred Quick Finder | Ctrl+F |
| Open the Find Files window | Ctrl+Alt+F |
| Open the alternative file comparer | Ctrl+Shift+E |
| Open the preferred folder comparer | Shift+O |
| Open the alternative folder comparer | Ctrl+Shift+O |
| Open the preferred synchronizer | Shift+Z |
| Open the alternative synchronizer | Ctrl+Shift+Z |
| Create a new folder | Ctrl+N |
| Create a new junction point | Shift+J |
| Open the Resize Images window | Ctrl+Alt+I |
| Copy files and/or folders | Shift+C |
| Move files and/or folders | Shift+M |
| Rename files and/or folders | Shift+R |
| Delete files and/or folders | Shift+D |
| Display the Delete window | Ctrl+Shift+D, Ctrl+Shift+Delete |
| Create a printable or importable list of objects | Shift+L |
| Copy List to Clipboard | Ctrl+Shift+ L |
| Copy Name to Clipboard | Ctrl+Shift+N |
| Copy Path to Clipboard | Ctrl+Shift+P |
| Copy Path (UNIX-style) to Clipboard | Shift+Alt+P |
| Copy Name Alias to Clipboard | Ctrl+Shift+Alt+N |
| Copy Path Alias to Clipboard | Ctrl+Shift+Alt+P |
| Select files and/or folders by a mask | Shift+S |
| Invert selection | Shift+I |
| Select focused item only | Ctrl+Y |
| Select all items of the active folder | Ctrl+A |
| Deselect all objects of the active folder | Esc |
| Switch to/from the command prompt | Shift+Esc |
| Clear the command prompt | Ctrl+Del |
| Insert the file name into the command prompt | Ctrl+Ins |
| Insert the full path into the command prompt | Shift+Ins |
| Insert the full path (UNIX-style) into the command prompt | Alt+Ins |
| Insert the 8.3 name into the command prompt | Ctrl+Alt+Ins |
| Insert the 8.3 path into the command prompt | Shift+Alt+Ins |
| Undo last insert into the command prompt | Alt+Del |
| Open the Options dialog | Ctrl+P |
| Switch to/from the full-screen mode | Ctrl+S |
| Maximize/restore the main window | Ctrl+M |
| Reduce the main window to a taskbar icon | Ctrl+Break |
| Refresh main window and both panels | F5 |
| Store columns | Ctrl+Alt+U |
| Restore columns | Ctrl+U |
| Set filter for the active panel | Ctrl+L |
| Remove filter from the active panel | Ctrl+Alt+L |
| Maximize/split the active panel | Ctrl+Alt+M |
| Split the panels horizontally | Ctrl+Alt+H |
| Split the panels vertically | Ctrl+Alt+V |
| Swap the panels | Ctrl+Alt+P |
| Refresh the active panel | Ctrl+R |
| Activate the passive panel | Tab |
| Activate the folder bar | Shift+Tab |
| Activate the next window | Ctrl+Tab |
| Activate the previous window | Ctrl+Shift+Tab |
| Cut selected objects to the Clipboard | Ctrl+X |
| Copy selected objects to the Clipboard | Ctrl+C |
| Paste objects from the Clipboard | Ctrl+V |
| Exit AB Commander | Alt+F4 |
| Exit, minimize, or iconize AB Commander
(depending on the selected option) | Ctrl+WINDOWS |
If the Use Norton Commander keys option is selected, then the following keyboard shortcuts may also be used. Note that some of them override the shortcuts listed above.
| To | Press |
| Run the Quick Editor | F4 |
| Copy files and/or folders | F5 |
| Move files and/or folders | F6 |
| Create a new folder | F7 |
| Delete files and/or folders | F8 |
| Exit AB Commander | F10 |
| Display the drive menu for the first panel | Alt+F1 |
| Display the drive menu for the second panel | Alt+F2 |
| Find files | Alt+F7 |
| Display the History list | Alt+F8 |
| Navigate to the root folder of the current drive | Ctrl+\ |
You can control which folders are initially displayed in the panels of AB Commander when it starts up, by supplying appropriate command line arguments to the executable file of AB Commander.
The name of the executable file depends on the edition of Windows:
- abcmdr.exe for the 32-bit versions of Windows;
- abcmdr64.exe for the 64-bit Intel/AMD versions of Windows;
- abcarm64.exe for the 64-bit ARM versions of Windows.
The following examples show the command lines for the 32-bit versions of Windows. They use the following syntax:
[path]abcmdr.exe [path1[,path2]]
where path1 is the fully qualified path to the folder to be shown in the first panel (the left or the top one, depending on the way you split the panels), and path2 is the path to the folder to be shown in the second panel.
If you don't supply path1 or path2, the panels will display the most recently visited folders.
Note that both long and short (8.3) path of a folder can be used for path1 and path2, however if the path contains spaces, it must be enclosed in double quotes. Note also that you can also specify the startup folders via the Startup options of AB Commander.
You can also force AB Commander to display virtual folders in its panels, using the syntax:
::{CLSID1}[\::{CLSID2}[...]]
in place of path1 and/or path2. The CLSID1, etc. should be replaced with the appropriate CLSID of the virtual folder. For example, ::{20D04FE0-3AEA-1069-A2D8-08002B30309D} may be used to refer to the This PC virtual folder.
You can also use the following command line switches to control how the main window of AB Commander should be displayed at startup:
/minimize - the main window should be "minimized" and displayed as a button on Windows Taskbar;
/maximize - the main window should be "maximized" to fill all available screen space
/iconize - the main window should be displayed as an icon in the "Taskbar notification area", next to the system clock.
Note that you cannot combine the /minimize, /maximize, or /iconize switch with the path1,path2 arguments described above. Note also that you can also specify the startup window display via the Startup options of AB Commander.
Example
"C:\Program Files\AB Commander\abcmdr.exe" C:\Temp,"C:\My Documents"
will cause AB Commander to display the contents of the folders C:\Temp and C:\My Documents in its panels.
AB Commander Administrator's Kit is a set of tools designed to help system administrators with deployment and management of AB Commander on a network.
The kit contains the following files:
- The "enterprise build" of AB Commander that does not require license validation over the Internet.
- The client installation packages of AB Commander in the MSI format, to be used with the x86 (32-bit) and x64 Windows clients.
- The Administrative Template file that contains the Group Policies supported by AB Commander.
- The text of AB Commander Volume License Agreement
- The document describing the kit.
You can use the MSI packages to quickly deploy AB Commander within a large number of computers on your network. You should use the x86 file to install AB Commander on the 32-bit clients, and the x64 package (that contains the native 64-bit executables) to install it on the clients with the x64 versions of Windows.
The Administrative Template file can be used to deliver the license key to the client computers, as well as to set up restrictions for AB Commander on the client computers. For example, you can limit the browsing to the specific folders, you can lock various elements of AB Commander user interface, and you can disable virtually any command of AB Commander if its use by your clients is for some reason undesirable.
AB Commander Administrator's Kit is available as a separate download. Please contact us ![]() if you are interested in ordering the kit.
if you are interested in ordering the kit.
The Folder menu of AB Commander offers the following commands that you can use to navigate your computer:
Parent
Navigates to the parent folder (one level up), if possible. This command is not available if the Desktop is the active folder (since the Desktop folder has no parent folder).
Root
Navigates to the root folder of the current drive, if possible. For example, if the panel is displaying the contents of the folder C:\Program Files\WinAbility\AB Commander, then the Root command will cause the panel to display the root folder on the C: drive. The same result can be also achieved by using the Parent command several times in a row.
Desktop
Navigates to the Desktop folder. The same result can be also achieved by using the Parent command several times in a row.
Match
Navigates to the folder that is currently displayed in the passive panel.
Previous
Navigates to the folder that was previously displayed in the active panel.
Next
Navigates to the next folder in the history list.
Favorites
Displays the Favorite Folders list of AB Commander.
History
Displays the Most Recently Visited Folders (History) list for the active panel.
Go to
Displays the Go to Folder window that you can use to type in the path to the folder (or select one of the Windows "special" folders).
Jump
Lets you navigate to a folder by entering its path directly into the panel title.
Network
Displays the Network menu.
Linux
If Windows Subsystem for Linux (WSL) is installed, this command navigates to the root folder of the Linux file system. This command may not appear if WSL is not installed.
Exit
Exits AB Commander.
The Command menu of AB Commander offers the following commands that you can use to manage your files and folders:
Copy
Opens the Copy window that you can use to copy files from one folder to another. This command does NOT copy the selected objects to the clipboard, unlike the Edit - Copy command offered by Windows Explorer.
Move
Opens the Move window that you can use to move files from one folder to another.
Rename
Opens the Rename window that you can use to rename files.
Delete
If the Delete files to Recycle Bin, if possible, without asking to confirm option is checked, AB Commander moves the selected files into Recycle Bin, without asking you to confirm the delete operation. If that option is not checked, or if you keep the Ctrl key pressed while selecting this command from the menu, then AB Commander opens the Delete window that you can use to delete files or move them to the Recycle Bin.
Undo
Reverses the last reversible file operation (such as Rename, Copy, Move, and Delete to Recycle Bin). Note that it can reverse a file operation that was performed by another file management program, such as Windows Explorer. Also, keep in mind that not all operations can be undone.
Split
Opens the Split window that you can use to split large files into several smaller segments.
Merge
Opens the Merge window that you can use to merge file segments back into the original files.
List
Opens the List window that you can use to create a printable list of the files displayed in the active panel.
Stamp
Opens the Stamp window that you can use to change the time stamp of a file.
Copy to Clipboard
Copies attributes of the selected item(s) onto the Clipboard:
- Name - copies the file name of the selected item;
- Path - copies the full path (using the back slashes, Windows-style) of the selected item;
- Path (UNIX-style) - copies the full path (using the forward slashes, UNIX-style) of the selected item;
- Path of location - copies the full path of the parent folder of the selected item;
- Name alias - copies the 8.3 (MSDOS-style) name of the selected item;
- Path alias - copies the 8.3 (MSDOS-style) path of the selected item;
- Time short/long - copies the appropriate time of the selected item;
- Column - copies the appropriate column text for the selected item.
Select
Opens the Select window that you can use to select or deselect groups of files using the "wildcards".
Invert Selection
Inverts selection of objects in the active panel.
Select All
Selects all objects in the active panel.
Deselect All
Deselects all objects in the active panel.
The Prompt menu of AB Commander offers the following commands that you can use to manipulate the command prompt of AB Commander:
Switch to
Switches the input focus to/from the command prompt.
Execute
Executes the command entered into the command prompt.
Clear
Clears the command prompt.
Insert Name
Inserts the file name of the selected object into the command prompt.
Insert Path
Inserts the full path (using the back slashes, Windows-style) of the selected object into the command prompt.
Insert Path (UNIX-style)
Inserts the full path (using the forward slashes, UNIX-style) of the selected object into the command prompt.
Insert Name Alias
Inserts the MS-DOS alias for the file name of the selected object into the command prompt. This is useful if the command you want to execute does not handle the "long" file names.
Insert Path Alias
Inserts the MS-DOS alias for the full path of the selected object into the command prompt. This is useful if the command you want to execute does not handle the "long" file names.
Undo Last Insert
Reverts the last Prompt - Insert ... command.
The View menu of AB Commander offers the following commands that you can use to control the appearance of AB Commander:
Tabs - Open in New Tab
Opens the selected folder in a new tab.
Tabs - Duplicate Current Tab
Opens the current folder in a new tab.
Tabs - Close Current Tab
Closes the current tab.
Tabs - Switch to Next Tab
Switches to the next tab.
Tabs - Switch to Previous Tab
Switches to the previous tab.
Tabs - Options for Tabs
Opens the Options for Tabs screen that you can use to change options related to the tabs.
Tabs - Disable/Enable Tabs
Disables the tabs if they are currently enabled, or enables them if they are currently disabled.
Toolbar - Show
Toggles (shows or hides) the main toolbar.
Toolbar - Customize
Opens the Customize Toolbar window for the main toolbar.
Drive bar - Show
Toggles the Drive bar.
Drive bar - Reset
Resets the Drive bar. Use this command after adding or removing the logical drives, if the Drive bar does not update itself automatically.
Status bar - Show
Toggles the main status bar, that contains the command prompt and the indicators.
Status bar - Indicators
Opens the Status bar Indicators window.
Font - System
Switches to the system font to display file names.
Font - Custom
Selects a custom font to display file names.
Text Color - System
Switches to the system color to display file names.
Text Color - Custom
Selects a custom color to display file names.
Background Color - System
Switches to the system background color to display file information.
Background Color - Custom
Selects a custom background color to display file information. Note that due to the Windows limitations, it does not change the background color of the Name column in the file panels.
Full Screen
Switches the view to/from the full-screen mode.
Maximize/Restore
Switches the main window to/from the maximized mode. This command has the same effect as the Maximize/Restore button in the title bar.
Resize
Allows to specify the size of the AB Commander window in a precise number of pixels.
Iconize
Hides the main window and displays an icon in the taskbar notification area. You can then click on the icon with the mouse to restore the main window in its original position.
Refresh All
Updates the main window and both panels.
Options
Opens the Options for AB Commander.
Import settings
Loads the previously saved settings from a file created with the Export Settings command.
Export settings
Saves the current settings into a file. The settings saved into a file contain all configuration data of AB Commander, including the positions and sizes of the widows, toolbars, colors, history lists, options, and all other customizable aspects of AB Commander. Later you can load the settings back from the file using the Import settings command.
Clear all history
Erases all history lists maintained by AB Commander (such as the list of the recently visited folders, opened files, etc. Note that it only clears the history maintained by AB Commander, and it has no effect on the history lists maintained by Windows and Windows Explorer that may appear within AB Commander.
The Tools menu of AB Commander offers the following commands:
Quick Edit
Opens the selected file with the preferred or the alternative Quick Editor.
Quick View
Opens the selected file with the preferred or the alternative Quick Viewer.
Quick Find
Starts the preferred or the alternative Quick Finder application.
Compare Files
Starts the preferred or the alternative file comparer.
Compare Folders
Starts the preferred or the alternative folder comparer.
Synchronize
Starts the preferred or the alternative synchronizer.
Find files
Opens the Find Files window.
New Folder
Opens the New Folder window.
New Junction Point
Opens the New Junction Point window.
Enable Zip folders
Turns the Zip folders feature of Windows off or on. When the Zip folders are off, Windows treats the Zip files as regular files and does not open them as if they were folders. You may want to disable the Zip folders if you use a separate program for opening the Zip files (such as BitZipper ![]() ). Note that this command has no effect on Windows 7, because the security features of Windows 7 prevent other programs from modifying the system settings such as Zip folders.
). Note that this command has no effect on Windows 7, because the security features of Windows 7 prevent other programs from modifying the system settings such as Zip folders.
Command prompt window
Opens the Command prompt window. If you use Windows Vista, you can press CTRL and SHIFT keys while choosing this command to open the elevated command prompt window.
Restart as Administrator/as Standard User
If you use Windows Vista or a later version of Windows with User Account Control (UAC) enabled, you can use this command to restart AB Commander elevated (with the administrator rights) or restricted (with the standard user rights). This command is not available if you run Windows XP or an earlier version of Windows.
Refresh AB Commander
Reverts all settings of AB Commander to their default values. This command produces virtually the same effect as uninstalling AB Commander while choosing to erase its settings, and then installing it back. Note that this command does NOT change the license registration for AB Commander.
Windows tools
A collection of links to quickly navigate to some tools provided by Windows, such as:
File Explorer Options
Opens the File Explorer Options window. This command has the same effect as the File Explorer Options command of Windows Settings.
Map Network drive
Opens the Map Network drive window.
Disconnect Network drive
Opens the Disconnect Network drive window.
The Panel menu of AB Commander offers the following commands that you can use to control the appearance of the file panels:
Switch to opposite Panel
Activates the passive panel. You can also press the Tab key to activate the opposite panel.
Switch to/from Folders
Activates the folder bar. You can also press the Shift+Tab keys to switch the input focus to the folder bar.
Toolbar
Toggles the panel toolbar of the active panel.
Drive bar
Toggles the panel drive bar of the active panel.
Status bar
Toggles the panel status bar of the active panel. (This command is not available on Windows Vista)
Customize Panel Toolbar
Opens the Customize Toolbar window for the toolbar of the active panel.
Reset Panel Drive bar
Resets the panel drive bar of the active panel.
Store columns
Remembers the current set of the columns displayed in the active panel, for use by the Restore columns command. (This command is available with Windows Vista (and later) only, and only for the file system folders). More information...
Restore columns
Restores the columns of the active panel as they were the last time you used the Store columns command. (This command is available with Windows Vista (and later) only, and only for the file system folders). More information...
Set Filter
Opens the Filter window for the active panel.
Remove Filter
Removes filter from the active panel.
Maximize/Split
Maximizes the active panel; or, if it is already maximized, restores the original split position.
Split Vertically
Tiles the panels vertically.
Split Horizontally
Tiles the panels horizontally.
Swap panels
Swaps the panels so that each panel takes the other's place.
Refresh
Refreshes the contents of the active panel.
The Help menu of AB Commander offers the following commands:
User's Guide
Opens the index to topics on which you can get help.
Welcome
Opens the Welcome screen of AB Commander.
Tip of the Day
Opens the Tip of the Day window.
System Information
Displays the information about the system and computer you are using, such as the Windows version, processor type, physical RAM, etc.
Unhide messages
Brings back the messages for which you have previously selected the Do not show this message again option.
Is this copy legal?
Opens the license check area of the WinAbility.Com web site in your default web browser.
Enter License Key
Displays the license information for your copy of AB Commander.
Buy Now
Opens the Online Store of the WinAbility.Com web site in your default web browser.
Upgrade
Opens the Upgrade Center of the WinAbility.Com web site in your default web browser.
Support
Opens the customer support area of the WinAbility.Com web site in your default web browser.
WinAbility.Com
Opens WinAbility.Com web site in your default web browser.
About AB Commander
Displays the copyright notice and version number of your copy of AB Commander.
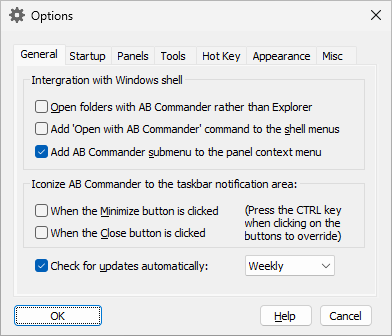
This window is displayed when you choose the Options command from the View menu. You can use this window to customize various aspects of appearance and operation of AB Commander. This window contains the following pages:
This page is displayed when you select the General tab on the Options window. You can use this page to customize various aspects of operation of AB Commander. This page contains the following areas:
Open folders with AB Commander rather than Windows Explorer
Check this option if you want AB Commander to display the contents of the folders when you open them (such as by double-clicking on a folder located on your desktop). If you clear this option, then the folders will open in regular Windows Explorer windows. Note that this option only affects the "real" folders, that is the regular folders that can keep arbitrary files. The virtual folders, such as This PC or Control Panel are not affected by this option, they are always displayed in regular Windows Explorer windows.
Add 'Open with AB Commander' command to the shortcut menus
If checked, this option causes Windows to include the Open with AB Commander command on its shortcut menu (that is, the menu that Windows is displaying when you right-click on a folder with the mouse). Note that this command added to the shortcut menus of the file folders only: if you right-click a virtual folder (such as This PC), this command will not be added. Note also that the shortcut menus displayed both in the AB Commander's panels and in the regular Explorer windows are affected by this option.
Add AB Commander submenu to the panel context menu
If checked, this option causes AB Commander to add its file operation commands (such as Copy, Move, etc.) to the Windows shortcut menu (that is, the menu that is displayed when you right-click on a file or folder with the mouse in AB Commander). The commands are grouped together into a separate submenu, which is added as the very first item of the shortcut menu. Note that if the panel is displaying a virtual folder, or if there are no objects currently selected in the panel, the commands of AB Commander are not added to the shortcut menu. Note also that only the shortcut menus displayed in the AB Commander's panels are affected by this option; if you right-click on a file within a regular Explorer window, the AB Commander commands will NOT be added in such a case.
Iconize AB Commander ... When the Minimize button is clicked
If checked, this option causes AB Commander to be "iconized" instead of being minimized when you use the "Minimize" command. When you "iconize" AB Commander, its main window is removed from the screen, and only a small icon is displayed in the taskbar notification area (the area next to the system clock). When it is "minimized", a bigger button with an icon and a descriptive text is displayed on the taskbar, along with other programs you may be running at that time. If your taskbar is too "crowded", you may wish to select this option to make AB Commander, when minimized, take as little space on the screen as possible. If at any time you want the Minimize command to work as usual, press the CTRL key while clicking on the Minimize button, and the window of AB Commander will minimize as it would normally do if this option was not selected.
Iconize AB Commander ... When the Close button is clicked
Just like the previous option, this option causes AB Commander to "iconize" when you click on the Close button. (Note that the Folder - Exit command is not affected by this option). As with the previous option, if you want the Close command to actually close and exit AB Commander, press the CTRL while clicking on the Close button. If you clear this option, the normal functionality of the Close button will be restored.
Check for updates automatically
If checked, this option causes AB Commander to periodically connect to our web site to check for the availability of a newer version. If this option is not selected, then AB Commander will display a message reminding you to check for the updates manually.
This page is displayed when you select the Startup tab on the Options window. You can use this page to change the way AB Commander performs its initialization. This page contains the following areas:
If AB Commander is already running
You can use this group of options to specify how you want AB Commander to operate when you run it while another instance of AB Commander is already running:
-
Create a new (additional) window
If selected, this option causes AB Commander to create another instance of it, with a separate window (independent on the already running one).
-
Use the existing window
If selected, this option causes AB Commander to switch to the window that already exists, instead of creating a new window.
-
Prompt to create a new window or use to the existing one
If selected, this option causes AB Commander to display a message and ask you how to proceed if it detects that another window of AB Commander already exists:
Navigate to these folders when starting AB Commander
If checked, this option causes AB Commander to always display the specified folders in its panels when starting. If this option is cleared, then AB Commander displays the folders that were displayed when it was closed. Note that you can also specify the startup folders via the command line switches of AB Commander.
Start main window: Minimized | Maximized | Iconized
If checked, this option causes AB Commander to display it window as specified. If this option is cleared, then AB Commander displays its window as it was when it AB Commander was closed. Note that you can also specify the startup window display via the command line switches of AB Commander.
Show Splash screen at startup
If checked, this option causes AB Commander to display its splash screen during startup. If this option is cleared, the splash screen is not shown at startup. When AB Commander is running, you can display the splash screen by pressing the Ctrl key and choosing the Help - About command from the menu, while keeping the Ctrl key depressed. To dismiss the splash screen, simply click on it with the mouse.
Show Re-establishing/Closing Connections messages
This option controls the messages that AB Commander displays when it starts while trying to re-establish connections to slow folders (such as network drives or shares) and the connections take longer than usual. Or, when AB Commander is shutting down and closing connections to the slow folders. Such messages provide visual feedback about the activity. If you would rather not see such messages, clear this option.
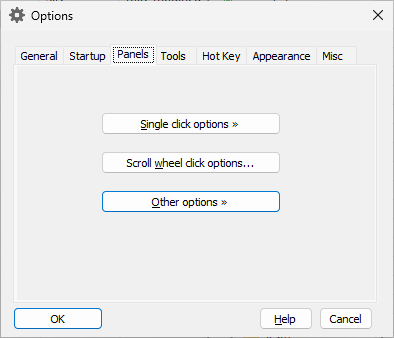
This page is displayed when you select the Panels tab on the Options window. You can use this page to customize various aspects of operation of the panels of AB Commander. This page contains the following areas:
Single click options
Opens a menu with options which control what happens when you single-click an item in a file panel with the mouse. The menu contains the following options:
Select on single click
If selected, this option causes AB Commander to select a folder or a file after you single-click on it in one of the panels. To open the item, you must double-click on it (or press Enter).
Open on single click
If selected, this option causes AB Commander to navigate to a folder or open a file after you single-click on it in one of the panels.
Rename selected item on single click
If selected, this option causes AB Commander rename a file or a folder after you single-click on it. If this option is not selected, you must press the F2 key or use the Rename command on the Command menu to rename files or folders. Note: this option is enabled only when the Select on single click option above is selected.
Underline hot items
If selected, this option causes AB Commander to underline the items as you move mouse over them. Note: this option is enabled only when the Open on single click option above is selected.
Underline cold items
If selected, this option causes AB Commander to underline all the items that can be open by clicking them with the mouse, no matter where the mouse pointer currently is. Note: this option is enabled only when the Open on single click option above is selected.
Scroll wheel click options
Opens the Scroll wheel click options screen that you can use to specify the actions to be taken by AB Commander when you click with the scroll wheel of the mouse.
Other options
Opens a menu with additional options that you can use to change the appearance and behavior of the file panels of AB Commander:
Hover over item to select it
If selected, this option causes AB Commander to select a file or folder in the panel whenever you keep the mouse pointer over the item longer than one second. If this option is not selected, you must click on an item (or use the arrow keys) to select it.
Select full row
If selected, this option causes AB Commander to display the full row of the selected file or folder using a distinct color. If this option is not selected, only the name of the selected file or folder is shown in the distinct color.
Use grey backround for non-primary columns
If selected, this option causes AB Commander to use a grey background for the columns of the file panels other than Name, and also for the folder bars. This option only has effect if the light mode is currently in effect.
Show gridlines
If selected, this option causes AB Commander to display the gridlines separating the rows and columns within the panels. Note: the grid lines may not be clearly visible in the dark mode.
Show info-tips
If selected, this option causes AB Commander to display the info-tips for the partially visible items.
Autoresize folder bars
If selected, this option causes AB Commander to automatically resize the width of the folder bars to maintain it in proportion to the full width of the panel.
Autoresize primary columns
If selected, this option causes AB Commander to automatically resize the width of the first column in each file panel to expand or contract when the panel itself is expanded or contracted.
Invoke Go to Parent command when empty space is double-clicked
If selected, AB Commander will invoke the Go to Parent command when you double-click on empty space within its panel. If this option is cleared, then double clicking on an empty space will have no effect.
Refresh panels after each file operation
Normally, the information in the panels is updated automatically as the changes to the files occur. If, however, the automatic updates are not happening for some reason, and you find yourself pressing the F5 key too often, you can check this option and AB Commander will update the information displayed in its panels after each file operation (such as Copy, Move, Rename, etc.) for you.
Ignore the "Group By" settings for all folders
If selected, AB Commander will prevent Windows from grouping items in all folders, including This PC and Downloads, which will make it display the items as simple lists. Note that you could still use the Group By command of Windows to temporarily enable the grouping of the items, however next time you navigate to the same folder, the grouping will be disabled.
Isolate shell extensions in a separate process
If selected, AB Commander will use a separate process to load the shell extensions that add commands to the Windows shortcut menu (the menu that is shown when you right-click on a file or a folder.) Isolating the shell extensions in a separate process should prevent conflicts between some shell extensions and AB Commander.
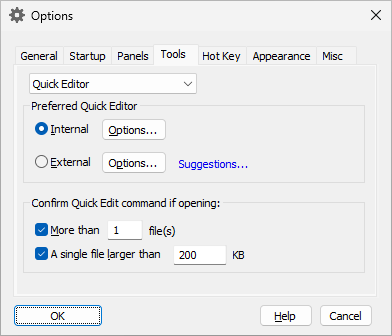
This page is displayed when you select the Tools tab on the Options window. You can use this page to change the options of the internal and external tools used by AB Commander. The content of the page depends on the tool selected in the list at the top of the page. For examle, if the Quick Editor is selected in the list, this page contains the following areas: (other tools will display similar areas)
Preferred Quick Editor
This area lets you select which Quick Editor should be used when you use the Quick Edit button on the toolbar or press the Ctrl+Q key combination. You can chose either the Internal or External Quick Editor to be the preferred one. (The other one would be set up as the alternative Quick Editor, accessible via the Ctrl+Shift+Q key shortcut).
Confirm Quick Edit command if opening
If selected, these options will display a prompt for a confirmation if you attempt to open a large file or several files with Quick Editor. You may find this option of use if you often use Quick Edit command inadvertently.
This page is displayed when you select the Hot Key tab on the Options window. You can use this page to set up a "hot key" to start or activate AB Commander. This page contains the following areas:
Create a "hot key" to start AB Commander:
If checked, this option causes AB Commander to set up a hot key.
Use the WINDOWS+E key combination
If selected, this option lets you instruct Windows to run AB Commander instead of Windows Explorer when you press the WINDOWS+E key combination.
Prompt to choose between AB Commander and Windows Explorer
If selected, this option lets choose between AB Commander and Windows Explorer, when you press the WINDOWS+E key combination.
Use the following key combination:
If selected, this option lets you choose a different key combination to run AB Commander. The WINDOWS+E key combination would still be available to run Windows Explorer.
Use the CTRL+WINDOWS keys to...
If selected, this option enables you to use the CTRL+WINDOWS key combination to quickly exit, minimize, or iconize AB Commander.
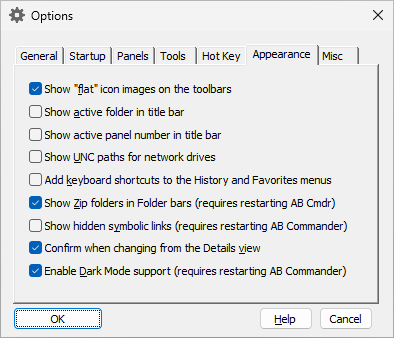
This page is displayed when you select the Misc tab on the Options window. You can use this page to the miscellaneous options of AB Commander. This page contains the following areas:
Show "flat" icon images on the toolbars
If checked, this option causes AB Commander to display the flat-style images on its toolbars and drivebars. If this option is cleared, then the "old" style, non-flat images are displayed instead.
Show active folder in the title bar
If checked, this option causes AB Commander to display the path to the folder currently listed in the active panel on the title bar of its main window.
Show active panel number in title bar
If checked, this option causes AB Commander to display the number of the active panel on the title bar of its main window.
Show UNC paths for the network drives
If checked, this option causes AB Commander to display the UNC path (in the format \\server\share\path) in its title bars when displaying folders located on the network drives. If this option is cleared, the appropriate DOS path (in the format D:\path) is displayed.
Add keyboard shortcuts to the History and Favorites menus
If checked, this option causes AB Commander to add the keyboard shortcuts to the commands displayed on the History and Favorites menus of AB Commander.
Show Zip folders in Folder bars
If checked, this option causes AB Commander to display Zip folders in its Folder bars. You may want to clear this option if you often browse folders that contain a large number of zip files and that causes AB Commander to become slow. Read more...
Show hidden symbolic links
If checked, this option causes AB Commander to display the hidden symbolic links (such as My Documents, My Pictures, etc.) that Windows Vista and 7 create for compatibility with the older programs, but which don't actually serve any useful purpose (clicking on them results in the Access Denied message). You may want to clear this option to hide such symbolic links and stop them from cluttering the file listings. Note that this option only has effect if you have enabled the Windows Folders option to display the hidden files in the file listings.
In full screen, match the split orientation to device orientation
If checked, AB Commander will automatically change the orientaion of the panels between the vertical and horizonal split, depending on the orientation of the screen of your device.
Confirm when changing from the Details view
If checked, AB Commander will ask you to confirm the change of the file panel view from Details to another view (such as List or Tiles). You might find this option useful if you want to prevent accidental changes from the default Details view.
Enable Dark Mode support
This option only appears when the dark mode is supported by the current version of Windows. If this option is selected, and if the dark mode option is selected in Windows Settings, AB Commander will match its appearance to the dark mode colors. If this option is not selected, AB Commander will use the traditional light mode appearance regardless of the dark mode selection in Windows Settings. NOTE: If this option is changed, or if the dark mode slection is changed in Windows Settings, AB Commander must be restarted in order for all changes to its appearance to become effective.
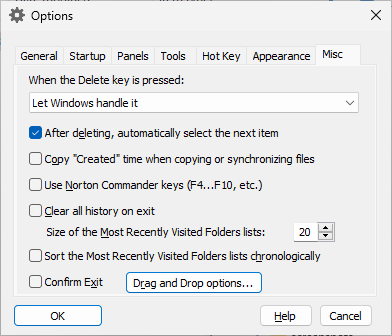
This page is displayed when you select the Misc tab on the Options window. You can use this page to the miscellaneous options of AB Commander. This page contains the following areas:
When the Delete key is pressed:
These options control the action AB Commander should take when the user presses the Delete key:
- Let Windows handle it
Select this option if you don't want AB Commnder to change the result of pressing the Delete key. In such a case, the result will depend on the version of Windows that you are using: some versions prompt you to confirm the operation, others move the selected files to the Recycle Bin without asking for confirmation.
- Delete files to Recycle Bin, if possible, without asking to confirm
This option changes the behavior of the Delete command, as well as the function of the Delete key. If this option is checked, then when you delete files within AB Commander, it checks whether they can be moved to Recycle Bin, and if so, it moves the files there without displaying the Delete window or asking you to confirm the delete operation. If AB Commander determines that the move to the Recycle Bin is not possible (for example, if the files are located on a removable drive), then it displays the Delete window and/or asks you to confirm the delete operation. You can override this option and force the Delete window to appear by pressing the Ctrl+Shift+Delete keys (instead of just Delete), or keeping the Ctrl key pressed while clicking on the Delete buton on the toolbar.
- Always show the delete screen
If this option is selected, then AB Commander will show the Delete window when the user presses the Delete key.
After deleting, automatically select the next item
If this option is selected, then after you have deleted or moved an item with AB Commander, it attempts to automatically select the next item for you. If this option is cleared, AB Commandes does not attempt to select the next item after the 'delete' or 'move' operations.
Copy "Created" time when copying or synchronizing files
This option is available on computers that have Windows Vista or a later version of Windows. If this option is selected, it causes AB Commander to copy the "created" time attribute when copying or synchronizing files. If this option is not selected, then the default Windows behavior is taking place, that is the "created" time of the destination file is set by Windows to the current system time, rather than the "created" time of the source file.
Note that this option has no effect if the copying if performed using the standard Windows drag-and-drop protocol. In order for this option to take effect using the drag-and-drop, you must select the alternative drag-and-drop protocol in the Drag and Drop options window of AB Commander.
Use Norton Commander Keys
If checked, this option causes AB Commander to recognize the keyboard shortcuts used by Norton Commander.
Clear all history on exit
If checked, this option causes AB Commander to delete the contents of its history lists when exiting. Note that it only clears the history maintained by AB Commander, and it has no effect on the history lists maintained by Windows and Windows Explorer that may appear within AB Commander.
Size of the Most Recently Visited Folders lists
The maximum number of items that AB Commander should retain in the Most Recently Visited Folder (History) lists.
Sort the Most Recently Visited Folders lists chronologically
If checked, the the Most Recently Visited Folder (History) lists of AB Commander would have the newly visited folders added to the top of the lists. If not checked, the newly visited folders are placed under their parent folders in the list.
Confirm Exit
If checked, this option causes a confirmation prompt to be displayed before exiting AB Commander.
Drag and Drop options
Press this button to open the Drag and Drop options window of AB Commander.
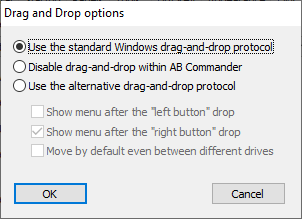
This window is displayed when you press the Drag and Drop options button on the Misc options page. You can use this window to change the way AB Commander handles the drag-and-drop operations. This window contains the following areas:
Use the standard Windows drag-and-drop protocol
If this option is selected, AB Commander will let Windows handle the drag-and-drop operations. That is, the drag-and-drop operations within AB Commander will be conducted in the same way as within Windows Explorer. This is the default option.
Disable drag-and-drop within AB Commander
If this option is selected, you will not be able to drag-and-drop files and folders between the panels of AB Commander, as well as between AB Commander and the regular Windows Explorer windows, or the desktop. You may want to disable the drag-and-drop operations if you prefer to use the keyboard shorcuts or the menu commands to perform the file operations rather than drag-and-drop.
Use the alternative drag-and-drop protocol
If this option is selected, AB Commander itself will handle the drag-and-drop operations, in an attempt to solve the usability problem of the standard Windows drag-and-drop protocol (see below). Note that this option affects only the "real" folders, that is folders located on your hard drive(s) that can contain arbitrary files. The virtual folders, such as This PC or Libraries, will continue to process the drag-and-drop operations, as usual.
If this option is selected, you can also use the following options:
Show menu after the "left button"/"right button" drop
If such an option is selected, AB Commander will show a menu like the one shown below before completing the drag-and-drop operation:
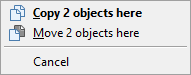
You can use this menu to modify the effect of the operation or even to cancel it.
Move by default even between different drives
Normally, when you drag-and-drop a file from one folder to another folder located on the same hard drive, Windows will actually move the file from one folder to another. If, however, the source and destination folders are located on different drives, Windows will copy the file rather than move it. If you find this confusing, you may want to enable this option, and AB Commander will always default to the move operation, even if the source and destination folders are located on different drives. If you clear this option, then AB Commander will imitate the protocol used by Windows as described above.
What problem does the alternative drag-and-drop protocol solve?
If the standard Windows drag-and-drop protocol is in effect, then when you drop a file on a panel of AB Commander, the target of the drop operation is not necessarily the folder displayed in that panel. For example, if you drop the file on a subfolder, then the file will be moved to that subfolder. Or, if you drop it on an executable file, Windows will launch that executable file (and pass the file being dropped to it) rather than moving the file to the folder! To actually move the file to the folder displayed in the panel, you need to carefully choose the drop target, which often requires scrolling, and cause other inconveniences (such as accidental dropping of the file on a subfolder or a program).
When you select the enhanced drag-and-drop protocol offered by AB Commander, it will always choose the folder displayed in the panel to be the target of the drag-and-drop operation. This way, you don't have to scroll the window to find an empty space in the panel to drop the file on, you can drop it on any point of the panel, and the folder displayed in that panel will be used as a target.
A custom launcher is a set of parameters that describes the action that AB Commander should perform when you launch a file. (A file is launched when you select it in one of the panels of AB Commander and press the Enter key, or when you double-click a file). When you launch a file, AB Commander takes its file name extension (such as .txt or .docx) and attempts to find the custom launcher that you might have set up for this specific extension. If no custom launcher for this extension has been set up, AB Commander passed the selected file on to Windows to be opened as usual. If, however, you had previously set up a custom launcher for the file name extension of the file being launched, AB Commander passes the selected file to the application you've specified in the parameters for the custom launcher.
To create, change, or delete the custom launchers, use the Options command, select the Tools tab, and select Launcher in the list of tools:
This screen offers several options that apply to all custom launchers:
Use custom launchers only if the Shift key is depressed
If this option is NOT selected, then AB Commander uses the custom launchers when you launch a file while the Shift key is not depressed. If the Shift key is depressed while launching a file, then AB Commander does not attempt to find or use a custom launcher for the selected file and passes it directly on to Windows for opening.
If this option IS selected, then the effect of the Shift key is reversed: If the Shift key is NOT depressed while launching a file, AB Commander passes the selected file directly on to Windows for opening. If the Shift key IS depressed, then AB Commander attempts to find and use a custom launcher for the selected file.
Confirm Launch command if opening ... More than ... file(s)
If selected, this option causes AB Commander to prompt for a confirmation if you attempt to launch several files simulteneously. You may find this option useful if you often find yourself launching several files accidentally.
To see or to manage the list of the custom launchers, press the Custom Launchers button, which should open the following screen:
This screen has the following areas:
File name extension(s)
The list of the file name extensions (such as .txt, .docx, or .PDF, without the leading dots) which have custom launchers defined by you. When you select a line in this list, the Path to the application and the Command line arguments of the appropriate custom launcher are displayed in the areas below the list. Note that you cannot change the contents of these areas; press the Edit button to make any changes.
Move
Use this control to change the order of the items in the list, by moving the selected line up or down.
Add
Press this button to add a new custom launcher to the list.
Edit
Press this button to modify the currently selected custom launcher.
Delete
Press this button to delete the currently selected custom launcher.
When you press the Add or Edit buttons, the following screen is displayed:
File name extension(s)
The list of the file name extensions (such as .txt, .docx, or .PDF, without the leading dots) this custom launcher should apply to. This list may contain more than one extension. If more than one extension is in the list, they must be separated with spaces or commas.
Use with files, Use with folders
Use these boxes to specify whether this launcher should be used only with files, only with folders, or both with files and folders.
Path to the application
The application to be used to handle the files with the file name extensions listed above, when you launch them from AB Commander.
Command line arguments
The command line arguments to be passed to the application when you launch a file from AB Commander. This area must contain a placeholder %1, which will be replaced by the actual path of the file being launched. Since many files have spaces in their names, usually their paths must be enclosed in the double quotes when passing them to the application. If the application accepts other options on its command line, you can specify them in this area, as well.
Use short (8.3) path for the command line argument
If selected, this option causes AB Commander to substitute the short DOS alias for the full path of the selected file being launched, in place of the %1 placeholder in the command line. This option is useful if the application you use does not support long file names. If this option is not selected, the regular long path is used.
Open in a maximized window
If selected, this option causes AB Commander to open the application in a maximized window.
Run as Administrator
If selected, AB Commander will attempt to launch the application you've specified above as administrator. Normally there should be no need to use this option, but some applications may not work properly if this option is not selected.
Use low level launch method
If not selected, AB Commander will launch the application you've specified above using the usual methods offered by Windows. In some rare situations such methods don't work well with some applications; in such cases you may want to try to select this option to direct AB Commander to use an alternative low level method of launching the application. Note that this option is not available if the Run as Administrator option above is selected.
AB Commander lets you set up external tools to complement or replace the internal tools offered by AB Commander itself. For example, in addition to the built-in Quick Editor provided by AB Commander, you can also set up an external text editing application to be used to edit the text files. To set up such an external tool, select the Tools page of the Options window, select the tool you want to modify in the list, and finally press the Options button next to the external option. In case of the external Quick Editor, the following window is displayed: (a similar window is displayed for other external tools, as well):

This window contains the following areas:
Path to External Editor
The path to the application you want AB Commander to run whenever you use the external Quick Editor.
Command line arguments
The command line to be passed to the external quick editor. The following character combination, %1, may be used in this field to denote the full path of the file currently selected in a panel. In most cases it should be enclosed in the double quotes, to make sure that if the path contains spaces, it is recognized as a path of a single file rather than several paths separated by spaces.
Use short (8.3) path
If checked, this option causes AB Commander to substitute the short DOS alias for the full path of the selected object, in place of the %1 specification in the command line. This option is useful if the external Quick Editor application you use does not support long file names. If this option is not checked, the regular long path is used.
Open maximized
If checked, this option causes AB Commander to open the external Quick Editor application in a maximized window.
Restore defaults
If checked, this option causes AB Commander to restore the options displayed on this window to their default values, as they were when you first installed AB Commander.
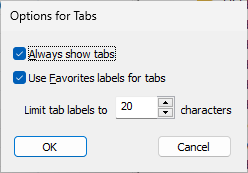
This window is displayed when you choose the Options for tabs command from the View - Tabs menu, or from the rioght-click menu of the tab bar. This window contains the following areas:
Always show tabs
If this option is cleared, AB Commander automatically hides the tab bar when only one tab is open. (The tab bar automatically becomes visible again if you choose top open anothwer tab.) If this option is selected, then AB Commander keeps the tab bar visible even if only one tab if open.
Use Favorites labels for tabs
If this option is selected, and you have set up a label for a favorite folder that is displayed in a panel, this option makes the tab to display that label instead of the path to the folder.
Limit tab labels to ... characters
Use this area to specify how long the tab labels you want to be. If text of the label exceeds the specified number of characters, AB Commander will truncate the label text, using the ellipses (...) to indicate the omitted parts.
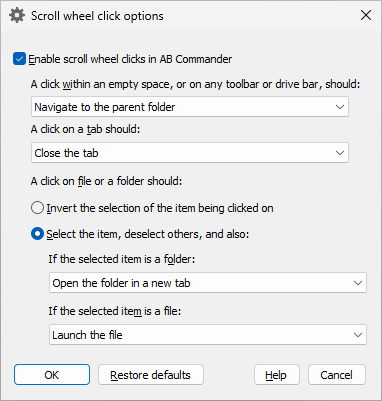
This window is displayed when you press the Scroll wheel click options button on the Panel options page. You can use this window to change the way AB Commander handles the clicks made with the scroll wheel of the mouse. This window contains the following areas:
Enable scroll wheel clicks in AB Commander
If this option is selected, AB Commander will recognize the clicks you make with the scroll wheel and react to them according to other settings available on this window. This is the default option. If you don't want AB Commander to react to the scroll wheel clicks, because, for example, you often press the scroll wheel accidentally, and you don't want the accidental clicks to get in the way, clear this option.
A click within an empty space, or on any toolbar or drive bar, should...
Select the action you would like AB Commander to perform when you click with the scroll wheel on any place other than a file, a folder, or a tab, such as an empty space of the file panel, or on the panel title bar, toolbar, or drive bar. The possible actions are: Navigate to the parent folder, Deselect all, or Do nothing.
A click on a tab should...
Select the action you would like AB Commander to perform when you click with the scroll wheel on a tab. The possible actions are: Close the tab, Activate the tab, or Do nothing.
A click on a file or a folder should...
Select the action you would like AB Commander to perform when you click with the scroll wheel on a file or a folder. The possible choices are:
Invert the selection of the item being clicked on
Choose this option to be able to use the scroll wheel clicks to select or deselect multiple files and folders. It would have the same effect as the standard way of selecting multiple files and folders, by keeping the Ctrl key depressed while clicking on the files and folders with the primary mouse button.
Select the item, deselect others, and also...
Choose this option if you want to use the scroll wheel clicks as an alternative way of navigating folders or opening files. You can fine-tune the actions to be taken when you click on a folder or a file.
What does Launch the file mean?
If you have set up a launcher for a particular type of files, then this option would use that launcher to open the file when you click it with the scroll wheel. If there is no launcher set up, then it would have the same effect as the option Open the file with File Explorer.
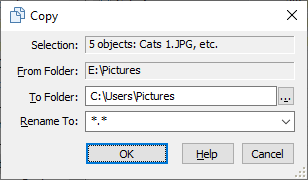
This window is displayed when you choose the Copy command from the Command menu. You can Use this window to copy one or more files and/or folders from the active folder into some other (or the same) folder. This window contains the following areas:
Selection/File/Folder
This read-only area displays information about the objects to be copied.
From Folder
This read-only area displays the full path to the active folder that contains the source files and folders to be copied.
To Folder
The full path to the destination folder. This area is initialized with the path to the passive folder, but you can change it to any other folder. If you clear this area, the destination folder is assumed to be the same as the source folder.
Rename To
The new name or mask to rename the destination object(s) during copying. If this area is empty, or contains the *.* mask, no renaming occurs.

This window is displayed when you choose the Move command from the Command menu. You can Use this window to move one or more files and/or folders from the active folder into some other (or the same) folder. This window contains the following areas:
Selection/File/Folder
This read-only area displays information about the objects to be moved.
From Folder
This read-only area displays the full path to the active folder that contains the source files and folders to be moved.
To Folder
The full path to the destination folder. This area is initialized with the path to the passive folder, but you can change it to any other folder. If you clear this area, the destination folder is assumed to be the same as the source folder.
Rename To
The new name or mask to rename the destination object(s) during the operation. If this area is empty, or contains the *.* mask, no renaming occurs.
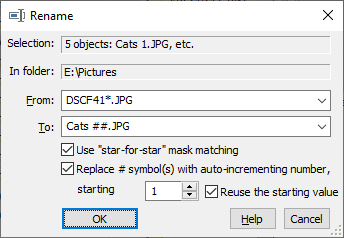
This window is displayed when you choose the Rename command from the Command menu. You can use this window to rename one or more files in the active folder. In order to use this command, first select one or more files you want to rename in the active panel; the renaming will not occur for the files that you did not select. This window contains the following areas:
Selection/File/Folder
This read-only area displays information about the objects to be renamed.
In Folder
This read-only area displays the full path to the active folder that contains the source files to be renamed.
From
The file name or mask that specifies the set of files which should be renamed. The star character (*) means "any character" and can appear in place of the file name, extension, or both. For example, *.doc means "any file with any name and the extension doc". Letter.* means "any file with the name Letter and any extension"; *.* means "any file", and Letter.doc means only one particular file named Letter.doc. Note that the mask applies only to the files you have selected in the active panel before choosing the Rename command from the menu. The the files that you did not select will not be renamed even if their file names match the mask. If you want the mask to apply to all files of the active folder, select all of them before choosing the Rename command from the menu.
To
The new name or mask to rename the destination object(s) during the operation. (See the Remarks section below for more information). If this area is empty, or contains the *.* mask, no renaming occurs.
Use "star-for-star" mask matching
If this option is selected, then the "star-for-star" mask matching is used when renaming the files. If this option is not selected, then the "traditional" mask matching is used. (See the Remarks section below for more information).
Replace # symbol(s) with auto-incrementing number
If selected, this option causes AB Commander to replace the # symbols (if specified in the file name of the To area) with consecutive numbers, starting with the value you have specified. If you enter several # symbols next to each other, AB Commander will pad the resulting value to the left with zeros, as needed, when renaming the files. For example, if the value of the file counter happens to be 15 for a particular file, then ### will be replaced with 015. However if the actial size of the counter exceeds the number of #'s you've specified, the full number will be used.
If this option is not selected, then each # symbol in the destination file name is treated just like any other character.
Reuse the starting value
If this option is selected, then AB Commander will remember the starting value you have specified and use it again the next time you use the Rename command. If this option is cleared, then AB Commander will advance the starting value to the next unused number, ready for use the next time you choose the Rename command.
Remarks
When renaming several files in the same operation, the new name of each file is formed based on the existing name of the file, the masks entered in the From and To area, and whether the "star-for-star" mask matching option has been selected or not. The basic algorithm of making a new name is as follows:
1. The contents of the To mask is separated into two components, the first part is used to produce the new "name", the second one is used to produce the new "name extension" (separated with a dot).
2. In each of the two components, the star character (*) is replaced with the appropriate part of the existing file name component. If the "star-for-star" mask matching option has NOT been selected, then the "traditional" mask matching is performed: the star character is replaced with the whole existing file name component. If the "star-for-star" mask matching option has BEEN selected, then the star character is replaced with the part of the existing file name component that matches the star character in the From mask. (See examples below).
3. The two new "name" and "name extension" components are combined together to make the new "full" file name, which is assigned to the file.
For example, suppose the active panel contains the following two files which you want to rename:
- ABC1.TXT
- ABC2.ASC
and you have entered the following masks into the Rename dialog:
- From: ABC*.*
- To: DEF*GHI.*
If the Use "star-for-star" mask matching option is cleared, the when renaming the file ABC1.TXT, the first star character in the mask DEF*GHI.* is replaced with the whole original "name", ABC1, and the second star is replaced with the existing "name extension" TXT, which produces the new name DEFABC1GHI.TXT. For the second file, ABC2.ASC, the same procedure gives the new name DEFABC2GHI.ASC.
If, however, the Use "star-for-star" mask matching option is checked, then the From mask ABC*.* is applied to the file, ABC1.TXT, and the first star in that mask gets the value of 1, while the second star gets TXT. These values are substituted in place of the stars of the To mask, making the new name for this file to be DEF1GHI.TXT. When the same From mask is applied to the second file, ABC2.ASC, the stars get the values 2 and ASC, appropriately, which, after being applied to the To mask, produce the new name for the second file: DEF2GHI.ASC
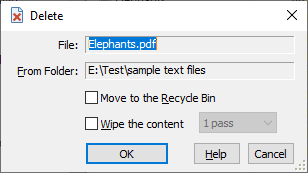
This window is displayed when you choose the Delete command from the Command menu. You can use this window to delete one or more files and/or folders from the active folder. This window contains the following areas:
Selection/File/Folder
This read-only area displays information about the objects to be deleted.
From Folder
This read-only area displays the full path to the active folder that contains the source files and folders to be deleted.
Move to the Recycle Bin
If this option is checked, then the file is moved into Windows Recycle Bin (which you can use to recover the deleted files in case you need them later on, unless the Recycle Bin has been emptied, of course). If this option is not selected, then the file is actually deleted, bypassing the Recycle Bin. Please be very careful when clearing this option, because if you delete a file without moving it to the Recycle Bin, it may be impossible to recover it!
Keep in mind also, that Windows maintains the Recycle Bin on the hard drives only. If you delete a file from a removable or a mapped network drive, it will NOT be moved to the Recycle Bin even if you select this option!
Wipe the content
This option is available (and has an effect) only if the Move to the Recycle Bin option is not selected. If the Wipe the content option is selected, then in addition to deleting the selected files and/or folders, AB Commander will erase their contents, by writing fixed bit patterns into each file to be deleted, before actually deleting them. The bit patterns written to the files depend on the number of passes selected next to this option:
- 1 pass Causes the content of each file to be replaced with zero bytes (0x00)
- 3 passes Causes each file to be overwritten 3 times: The first time its content is replaced with the bit pattern 01010101 (0x55), the second time with the bit pattern 10101010 (0xAA), and the third time with the zero bytes (0x00). Note that this option takes approximately three times longer to complete than the 1-pass option.
You may want to use the Wipe the content option to make it much more difficult to extract the contents of the files after they have been deleted. If you don't select this option, there is a possibility to reconstruct the original contents (or their parts) by using the undelete software utilities. Keep in mind, however, that as with most things, wiping the contents of the files is not an absolute guarantee of their complete destruction: it all depends on the specific implementation details of all components involved. For example, if you have enabled the NTFS compression for a file, then wiping it out may not achieve the desired effect, because when recording the bit patterns to the file, Windows may create a new compressed file from scratch rather than reuse the existing file. Or, most modern SSD drives may use the wear-leveling techniques that could prevent overwriting the existing data with the bit patterns. Remember that the only way to be absolutely sure that the files cannot be recovered, is to physically destroy the drive!
This window is displayed when you choose the Split command from the Command menu. You can use this window to split the selected files into file segments of smaller size. This window contains the following areas:
Selection/File
This read-only area displays information about the selected file(s) that will be split by this command.
From Folder
This read-only area displays the full path to the active folder that contains the source file(s) to be split.
To Folder
The full path to the destination folder. This area is initialized with the path to the passive folder, but you can change it to any other folder. If you clear this area, the destination folder is assumed to be the same as the source folder.
Rename To
The new name or mask to rename the file segments. If this area is empty, or contains the *.* mask, no renaming occurs. Note that the numeric three-digit extension will be added to the name of each segment automatically.
Delete source file(s) when done
If this option is checked, the original files would be deleted after they have been split into the segments.
Segment size
Enter the size of the segments you want the file(s) to be split into. If only one file is selected for splitting, the area below this box will display the number of the resulting segments and the size of the last segment.
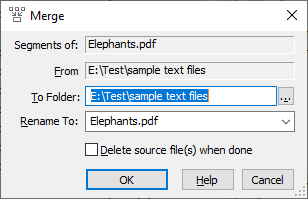
This window is displayed when you choose the Merge command from the Command menu. You can use this window to merge the selected file segments back into the original file(s). This window contains the following areas:
Segments of
This read-only area displays information about the selected segments that will be merged by this command.
From Folder
This read-only area displays the full path to the active folder that contains the source file segments to be merged.
To Folder
The full path to the destination folder. This area is initialized with the path to the passive folder, but you can change it to any other folder. If you clear this area, the destination folder is assumed to be the same as the source folder.
Rename To
The new name or mask to rename the destination file(s) to. If this area is empty, or contains the *.* mask, no renaming occurs. Note that the three-digit numeric extension that was appended to the names of the segments will be removed from the name of the merged file automatically.
Delete source file(s) when done
If this option is checked, the original file segments would be deleted after they have been merged into the file.
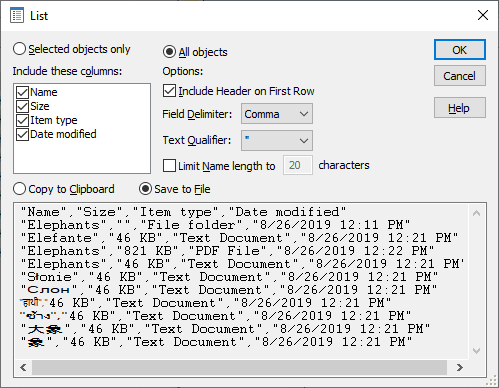
This window is displayed when you choose the List command from the Command menu. You can use this window to create a printable or importable list of the objects shown in the active folder. This window contains the following areas:
Selected objects only
If selected, this option causes only the objects currently selected in the active panel to be included in the list.
All objects
If selected, this option causes all objects shown in the active panel to be included in the list.
Field delimiter
Lets you choose the character that should be used to separate fields in the list.
Include Header on First Row
If selected, this option causes the names of the fields to be added as the first row of the list.
Text Qualifier
Lets you select the character to be used as the text qualifier.
Limit Name length to ... characters
If selected, this option causes the names of the objects to contain no more than the number of characters entered. (If the name of an object is longer, it is truncated).
Copy to Clipboard
If selected, this option causes the list of the objects to be copied to the Windows Clipboard. You can then paste the list into a word processor or text editor for further formatting or printing.
Save to File
If selected, this option causes the list of the objects to be saved in a file. You can later import the list form the file into your spreadsheet or database application, or print it out.
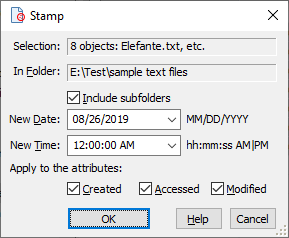
This window is displayed when you choose the Stamp command from the Command menu. You can use this window to to change the time stamp of the files and/or folders selected in the active folder. This window contains the following areas:
Selection/File/Folder
This read-only area displays information about the objects to be stamped.
In Folder
This read-only area displays the full path to the active folder that contains the objects to be stamped.
Include subfolders
If this option is checked, and a subfolder is selected, then the files that belong to the subfolder will be stamped as well.
New Date
Enter a new date to be used when modifying the time stamp of the selected objects. If you don't want the date to be modified, clear this area.
New Time
Enter a new time to be used when modifying the time stamp of the selected objects. If you don't want the time to be modified, clear this area.
Apply to the attributes
Check the attributes to which you want the new date and/or time to be applied.
Notes
- It may seem that the Stamp command does not modify the Accessed time correctly. However, the reason for that is that the Accessed time is updated by Windows when you view the properties of the file. So, if you view the properties of the file after having used the Stamp command, its Accessed time would already be updated by Windows.

This window is displayed when you choose the Select command from the Command menu. You can use this window to select or de-select a group of files and/or folders (based on a mask) in the active panel. This window contains the following areas:
Mask
The mask that specifies the file names of the objects to select or de-select. The mask can contain the "wildcards". (This area is not used with the Select All and Deselect All commands).
Apply to Files
If checked, this option causes the selected operation to be applied to files. (This area is not used with the Select All and Deselect All commands).
Apply to Folders
If checked, this option causes the selected operation to be applied to folders. (This area is not used with the Select All and Deselect All commands).
AB Commander includes a built-in text editor that you can use to view or edit text files:
This window is displayed when you choose the Quick Edit command from the Tools menu to open a file with the internal quick editor of AB Commander. You can use this window to view and edit the contents of text files without launching a separate text editor.
The toolbar of this window contains buttons that you can press to perform the usual file operations such as open and save the file, to cut, copy and paste information to/from the Windows Clipboard. You can also change the font used to display the text of the currently open file to a variable width font or to a fixed width font by pressing the V and F buttons on the toolbar, respectively. You can press the Options button to open the Options for Internal Quick Editor dialog box that you can use to customize the appearance and operation of the Quick Editor window. Finally, you can search and, optionally, replace text in the file being edited:
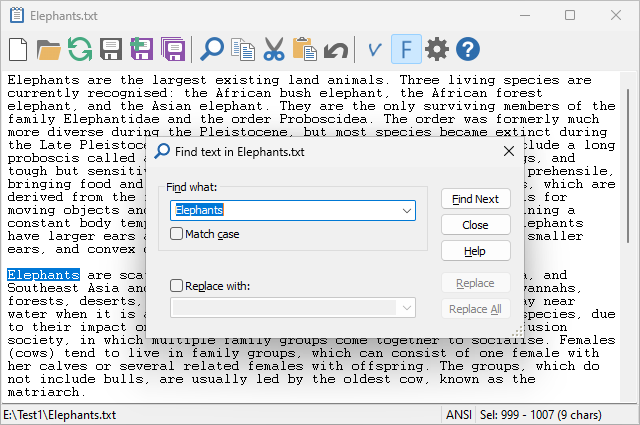
When providing the text to search for (or replace with), in addition to the regular characters, you can also specify several common special characters commonly used in text files, as follows:
| To specify: | Use: | |
| new line | \n | |
| carrige return | \r | |
| tab | \t | |
| back slash | \\ |
Quick Editor is designed to be used primarily with the files located in the real folders. It can also be used with files in some virtual folders, too. For example, some external devices, when connected to the PC, appear in the This PC folder without a drive letter. (Windows Phone is an example of such a device.) Another example is the Zip archives: they appear as virtual folders to Windows Explorer and AB Commander. You can use Quick Editor to view the text files located in such virtual folders. Note that the implementions of the virtual folders are often incomplete. For example, while it might be possible to view a text file, the virtual folder may not be designed by its software vendor to allow saving of the files directly back to it. To work around such a limitation, it could be possible to save the modified text to a temporary file in a real folder, and then move that file to the destination virtual folder using the usual drag-and-drop method.
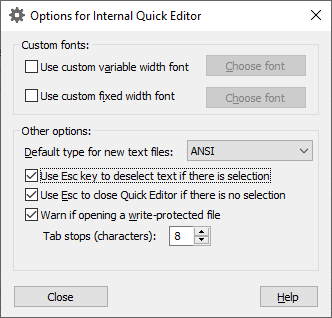
This window is displayed when you press the Options button on the toolbar of the Quick Editor window. You can use this window to change the appearance and operation of the internal Quick Editor of AB Commander. This window contains the following areas:
Custom fonts
Lets you choose the custom fonts (both the variable and fixed width) that should be used to display the contents of the files with the internal Quick Editor.
Default type of the new text files
Lets you specify the default type of the files created when you use the New command of the internal Quick Editor.
Use Esc key to deselect text if there is selection
If selected, this option lets you press the Esc key to deselect text if there is a selection. If this option is not selected, then the Esc may close Quick editor (if the following option is selected) even if there is a selection of text.
Use Esc key to close Quick Editor
If selected, this option lets you press the Esc key to close the currently open window of the internal Quick Editor (which would have the same effect as the Close command). Note that if the previous option is selected, and there is a text selected, then pressing Esc would remove the selection instead of closing Quick Editor. Pressing Esc the second time (after the selection has been removed) would close Quick Editor.
Warn if opening a write-protected file
If selected, this option causes AB Commander to display a message if it detects that the file you are opening with the internal Quick Editor if write-protected. The message may prompt you to restart AB Commander as administrator, or to simply warn you about the situation, if AB Commander is already restarted as administrator. If you clear this option, then AB Commander will not display such a warning. In any case, AB Commander adds the text Write-protected to the title bar of the Quick Editor window if it detects that the file is write-protected.
Tab stops (characters)
The number of character to indent the text for each tab character. The default is 8 characters.
AB Commander includes a built-in image viewer that you can use to quickly preview image files without starting dedicated image applications. To use the image viewer, select the image file in a panel of AB Commander and choose the Quick View command from the Tools menu (or press Ctrl+I):
The toolbar of this window contains buttons that you can press to display several images located in the active folder as a slide show, to change the orientation of the current image, to display the image in the full screen mode. You can also press the Options button to display the Options for Internal Quick Viewer window.
Note that when you use the image rotation buttons, the command changes the orientation of the image without modifying the image itself. In other words, the image file remains in its original state even if you use the image rotation buttons.
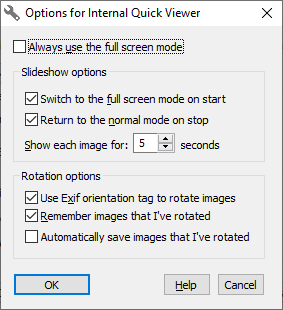
This window is displayed when you press the Options button on the Viewer page of the Options window, or on the toolbar of the Quick Viewer window. You can use this window to change the operation of the internal Quick Viewer of AB Commander. This window contains the following areas:
Always use the full screen mode
If selected, this option causes Quick Viewer to switch to the full screen mode immediately on its use. If this option is not selected, then the image is initially displayed in a resizable window.
Switch to the full screen mode on start
If selected, this option causes Quick Viewer to switch to the full screen mode automatically when you choose the Run slideshow command.
Return to the normal mode on stop
If selected, this option causes Quick Viewer to switch from the full screen mode back to the normal mode automatically when the slideshow ends.
Show each image for ... seconds
Lets you specify how long each image should be shown in the slideshow mode.
Use Exif orientation tag to rotate images
If checked, this option causes AB Commander to look for the Exif orientation tag in the image properties, and, if found, to display the image rotated according to the tag.
Remember image rotation information
If checked, this option causes AB Commander to remember the orientation of the images that you have rotated, so that when you view them next time with the Quick Viewer command, they would be displayed with the orientation you have chosen last time. If you clear this option, then AB Commander will not store such information, and it will also erase such information for the previously viewed images, if any.
NOTE: AB Commander keeps the image rotation information in the file abcmdrir.ini, located in the Application Data folder (such as C:\Users\User\Application Data). You may want to add this file to your backup set of files, to preserve the image rotation information.
Automatically save the images I've rotated
If checked, this option causes AB Commander to save the images that you have rotated, without prompting you to confirm that you want to save them. If this option is cleared, then AB Commander does not save the rotated images automatically; however, you can still save them manually using the Save rotated image button on the toolbar of the Quick Viewer window.
AB Commander offers the Quick Find command that you can use to search for a specific text in the arbitrary text files:
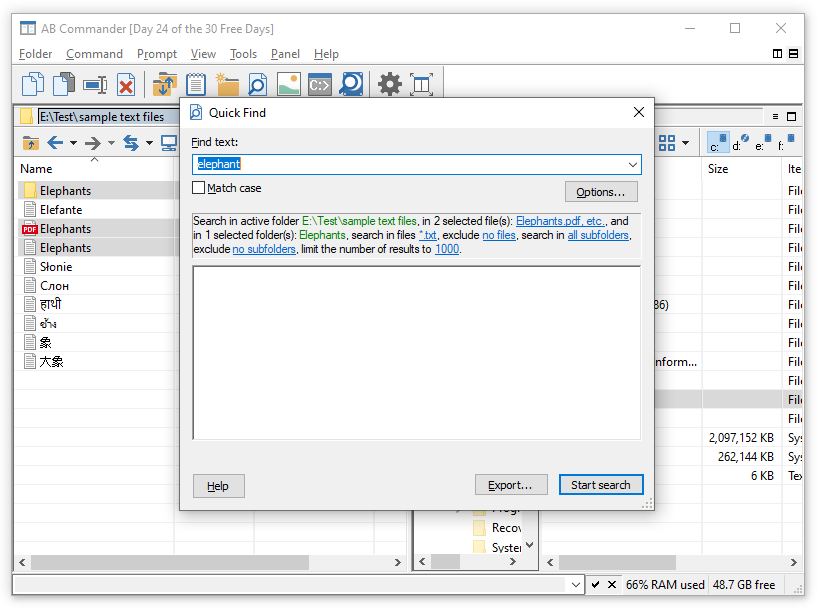
To use this command, first select the files and/or folders in the active panel of AB Commander in which you want to search for the text, and choose the Quick Find command from the Tools menu (or press the Ctrl+F keys) to display the Quick Find window. In that window, specify the text you want to search for. You can also review and adjust the search options, displayed in the middle portion of the Quick Find window, such as the types of the files to seach in or to exclude from the search, whether to search in the subfolders, and the maximum number of the search results to display.
To begin the search, press the Start Search button on the Quick Find window and AB Commander will examine each file in turn, trying to find the text you are interested in. If it finds the text, it adds it to the search results, in the same window. (If the file contains several matches, each match is added to the results on a separate line.)
Note that Quick Find command is designed to find text in the text files only (such the files created with Windows Notepad, with Quick Editor of AB Commander, or with similar text editors. If during the search AB Commander detects that the file contains the non-textual information, it stops searching that file and adds an error message to the results instead. In the example above, you can see that the file Elephants.pdf could not be searched, because the PDF files are non-textual: besides the text, they contain the font information, images, formatting, etc., which prevent AB Commander from searching for text in them. To search in such non-text files, open them with the appropriate application, such as the PDF reader application, and use the Find Text or a similar command within that application to seach for the text in that file.
Each search result displayed in the Quick Find window contains the name of the file where the search was found, and well as the line of text that contains the text fragment being searched for. If you click on the file name, AB Commander will navigate to that file in its active panel. If you click on the text fragment, AB Commander will open that file in its Quick Editor and highlight the text fragment for you.
You can repeat the search in the original set of the selected files and/or folders by changing the text to find, and/or the search options and then pressing the Search again button. This will repeat the search using the updated search parameters. Note that when the Search again button is used, the search will be performed on the files included in the original search, not on the currently selected files, which might change since the original search was performed. If you want to change the set of files to search, close the Quick Find window, select the new set of files, and then open a new Quick Find window to start a new search.
Finally, you can save the search results in a text file by clicking on the Export button and specifying the location and name for the file to save the search results.
Which files are being searched in?
There are several factors that influence whether a particular file is included in the search or not. Here are the rules:
If a file is selected in the active panel of AB Commander, it will be searched no matter what. If a folder is selected, it will be included in the search even if its name matches the exclude subfolders mask (see below).
If a folder is selected in the active panel of AB Commander, the files it contains may or may not be searched, depending on the search in files and exclude files options specified on the Quick Find window. If the search in files mask is specified, then only files matching that mask will be searched. For example, if the mask is specified as *.txt,*.bat then only the files with the file name extensions .txt and .bat, located in the selected folders, will be included in the search. However, if the exclude files mask is specified and a file name matches it, that will be excluded from the search, even if it otherwise matches the search in files mask.
The files in the subfolders of the selected folders are searched only if their names match the include subfolders mask and do not match the exclude subfolders mask. The files in the subfolders are searched according to the search in files and exclude files options.
If no files or folders are selected in the active panel of AB Commander, then only the files matching the search in files mask will be searched, unless excluded by the exclude files mask. The files in the subfolders of the active folders are searched only if the names of the subfolders match the include subfolders mask and do not match the exclude subfolders mask.
Besides searching for text in files, the Quick Find command can be used to search for the files of particular type(s), as well. To do that, leave the Find text area empty and only specify the types of files to search for and which types to exclude:
In the example above, the search was done for the *.txt files. However, you can specify several file types separated by the commas or semicolons. For example, to search for *.bat, *.txt, and *.cmd files you can specify the mask as: *.bat;*.txt;*.cmd. Note that if you specify the exclude files mask as well, then the files matching the exclude mask will be excluded from the search even if they match the search in files mask.
AB Commander offers the Find Files command that you can use to search for arbitrary files located in a specific folder and its subfolders, using a file name mask:
To use this command, navigate to the folder in which you want to search for files, and choose the Find Files command from the Tools menu (or press the Ctrl+Alt+F keys) to display the Find Files window. In that window, specify the mask for the file names you want to search for. For example:
To search for all files which names start with the word Orange:
Orange*
To search for all files which names end with the word Orange:
*Orange
To search for all files which names contain the word Orange:
*Orange*
To search for the text files (that is, the files with the file name extension TXT) which names start with the word Orange:
Orange*.txt
To search for the Word and Excel files (that is, the files with the file name extensions DOC, DOCX, XLS, XLSX) which names start with the word Orange:
Orange*.doc*;Orange*.xls*
As you can see in the examples above, the start character * is used as a placeholder for the arbitrary characters that may be present in the file name. You can also review and adjust the search options, displayed in the middle portion of the Find Files window, such as the files to exclude from seach, include or exclude subfolders from the search, etc.
In addition to searching files by their names, you can also optionally limit the search by the date of the last file modification. If you select the Modified since option, then only the files modified on the selected date or later would be included in the results. If you select the Modified until option, then only the files modified prior to the specified date (NOT including that date itself) would be included in the results. Note: the Modified conditions only take effect when searching for files within real folders, they are ignored when you search within virtual folders.
Use the Find folders as well option is you want the results to include folders. If you clear this option, then only files will be included in the search results.
To begin the search, press the Start Search button on the Find Files window and AB Commander will examine each file name in turn, trying to determine whether the file name matches the mask you specified. If it finds the match, it adds it to the search results, in the same window.
Each search result displayed in the Find Files window contains the path of the file found, relative to the folder from which you started the search. If you click on the file name, AB Commander will navigate to that file in its active panel.
Note that unlike the Quick Find command that searches for text in the selected files and folders, the Find Files command searches in all files and folders present in the active panel, without regard to whether they are selected or not. Note also that if you specify the exclude files mask as well, then the files matching the exclude mask will be excluded from the search even if they match the Find Files mask.
Finally, you can save the search results in a text file by clicking on the Export button and specifying the location and name for the file to save the search results.
AB Commander includes an internal file comparer that can compare two files selected in the same or in the opposite panels:
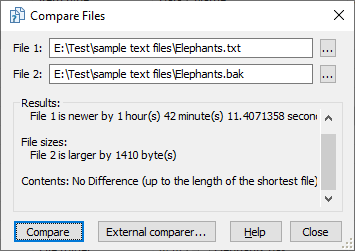
This window is displayed when you choose the Compare Files command from the Tools menu. You can use this window to quickly determine whether two files are actually the same even though they have different names. This window contains the following areas:
File 1
File 2
The files to compare. If you select two files in the active panel and then choose the Compare Files command, then the File 1 and File 2 areas will contain the show the two files selected. Alternatively, if there is one file selected in the active panel, and another file selected in the passive panel, then AB Commander will set up the File 1 and File 2 areas to compare those files for you. You can also press the buttons with the dots ... to choose other files to compare.
Results
When you press the Find Differences button, AB Commander compares the date and time of the last modification of each file, their sizes, and their contents and displays information about the differences found in this area.
External comparer
If you have set up an third-party application as the external comparer, you can use this button to launch the external comparer and pass it the two files via the command line.
AB Commander includes an internal comparer that can compare the folders displayed in the opposite panels and select the files and folders on both panels that satisfy the comparison criteria you've setup:
This window is displayed when you choose the Compare Folders command from the Tools menu and select the internal comparer. You can use this window to compare the contents of the folders shown in the opposite panels. The results of the comparison are displayed by selecting the files and folders that match the comparison criteria you set.
This window contains the following areas:
Active folder
Displays the path to the folder currently opened in the active panel, as well as the type of the file system of the volume where the folder is located. This area also contains options that you can use to specify which files should be selected in the active panel after the comparison is done.
Passive folder
Displays the path to the folder currently opened in the passive panel, as well as the type of the file system of the volume where the folder is located. This area also contains options that you can use to specify which files should be selected in the passive panel after the comparison is done.
Include subfolders
If selected, this option makes AB Commander to compare the appropriate subfolders of the active and passive folders. If not selected, only files are compared.
Ignore Daylight Savings time differences
If selected, this option causes AB Commander to ignore the difference of exactly 3600 seconds (1 hour) in the last modification time of the files that have the same name and size and treat such files as if they have been modified at the same time. You may want to select this option if your computer is configured to adjust its clock automatically when entering and leaving the Daylight Savings time period.
Ignore time differences less than...
If selected, this option causes AB Commander to ignore the specified difference in the last modification time of the files that have the same name and size and treat such files as if they have been modified at the same time. You may want to use this option if you are storing the copies of the files on a server, and the server for some reason changes the last modification time of the files by a few seconds or a fraction of a second (servers do that in some cases, they probably have good reasons for that).
AB Commander includes a built-in file synchronizer that you can use to perform a one-way synchronization of the contents of the folder shown in the passive panel (the outdated folder) with the contents of the folder shown in the active panel (the up-to-date folder):
This window is displayed when you choose the Synchronize command from the Tools menu and select the internal synchronizer. You can use this window to set up the synchronization settings. This window contains the following areas:
Active folder
Displays the path to the folder currently opened in the active panel. This folder is supposed to contain the up-to-date set of files.
Passive folder
Displays the path of the folder currently opened in the passive panel. This folder is supposed to contain the outdated set of files.
Include/exclude files/sub-folders
You can use this area to restrict the set of files and/or subfolders that should be subject to the synchronization. For example, if the active and passive folders contain a mixture of files of different types, but you only want to synchronize the image files that have the file name extension JPG, then you could specify the include files mask as *.JPG, and all other files would be ignored during the synchronization, as if they were not present at all. Note that the exclude masks take precedence over the include masks.
Create new files
If selected, this option causes AB Commander to copy the newly created files from the active to the passive folder. If this option is not selected, then the files that don't already exist in both the active and the passive folders will not be synchronized.
Create new sub-folders
If selected, this option causes AB Commander to copy the newly created sub-folders (and all files they might contain) from the active to the passive folder. If this option is not selected, then the subfolders that don't already exist in both the active and the passive folders will not be synchronized.
Update existing files
If selected, this option causes AB Commander to synchronize the files that already exist in both the active and the passive folders. If the passive folder contains older versions of the files from the active folder, they will be replaced with their newer versions from the active folder. If this option is not selected, then the files that exist in both the active and the passive folders will not be synchronized.
Update existing sub-folders
If selected, this option causes AB Commander to synchronize the sub-folders that already exist in both the active and the passive folders. If the passive folder contains older versions of the files from the active folder, they will be replaced with their newer versions from the active folder. If this option is not selected, then the subfolders that exist in both the active and the passive folders will not be synchronized.
Restore older files
This option has the effect opposite to the Update files option: you can use it to restore the older versions of the files, if for some reason you want to discard the updates made to them since the last backup. If selected, this option causes AB Commander to synchronize the files that already exist in both the active and the passive folders: if the passive folder contains newer versions of the files from the active folder, they will be replaced with their older versions from the active folder. If this option is not selected, then the files that exist in both the active and the passive folders will not be synchronized.
Delete orphan files
If selected, this option causes AB Commander to delete those files from the passive folder, which do not exist in the active folder (the orphan files). If this option is not selected, such files will not be deleted from the passive folder.
Delete orphan sub-folders
If selected, this option causes AB Commander to delete those sub-folders (and all files they might contain) from the passive folder, which do not exist in the active folder (the orphan sub-folder). If this option is not selected, such sub-folders will not be deleted from the passive folder.
Delete orphan objects even if they are NOT selected in the Active folder
If this option is selected, it causes any file or folder that does not exist in the active folder (but not in its subfolders) to be deleted from the passive folder.
Auto-start the synchronization if the preview is not canceled within ... secs
If selected, this option makes AB Commander start the synchronization automatically after displaying its Ready to Synchronize window for the specified number of seconds. If this option is not selected, then AB Commander will start the synchronization only after you give an explicit command, by pressing the Synchronize button on the Ready to Synchronize window.
Respond with Yes or Continue to any confirmation message
If this option is not selected, then in certain situations Windows may ask you to confirm a file operation, such as to overwrite or delete an existing file, etc. If such situations are expected, you may want to select this option and Windows should confirm such prompts automatically for you.
Advanced...
Press this button to review or change several advanced options that affect the operation of the Synchronize command:.
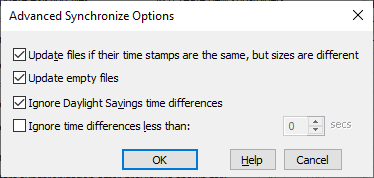
Update files if their time stamps are the same but sizes are different
If selected, this option causes AB Commander to synchronize the files that already exist in both the active and the passive folders that have the same last modification times, but different file sizes. Such a situation can occur, for example, after you use the Resize Images command: while resizing or rotating the image files, it preserves their time stamps. Select this option to make sure that such image files get synchronized properly.
Update empty files
If selected, this option causes AB Commander to synchronize the files that are empty (that is, their file size is zero). As a result, the time stamps for the destination files will be updated to match the time stamps of the source files. If this option is not selected, then ABC ommander will skip the zero-size files and not update their time stamps in the passive folder.
Ignore Daylight Savings time differences
If selected, this option causes AB Commander to ignore the difference of exactly 3600 seconds (1 hour) in the last modification time of the files that have the same name and treat such files as if they have been modified at the same time. You may want to select this option if your computer is configured to adjust its clock automatically when entering and leaving the Daylight Savings time period.
Ignore time differences less than...
If selected, this option causes AB Commander to ignore the specified difference in the last modification time of the files that have the same name and treat such files as if they have been modified at the same time. You may want to use this option if you are storing the copies of the files on a server, and the server for some reason changes the last modification time of the files by a few seconds or a fraction of a second.
Preview
Press this button to cause AB Commander to analyze the files and folders in both the active and the passive folders, prepare the list of objects that require synchronization, and display such a list in a Ready to Synchronize window for your review:
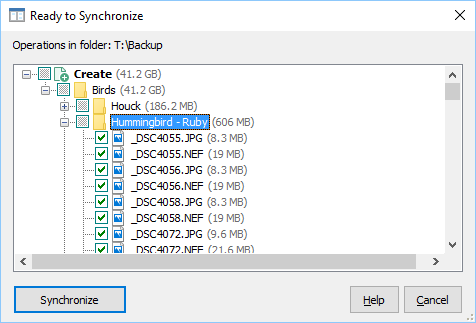
Note that while this window is displayed, no actual synchronization is performed yet, and no files or folders have been copied, updated, or deleted. You can review the proposed operations listed in the Delete, Create, and/or Update groups to see exactly which the files and sub-folders are going to be synchronized. You can exclude some of the file and/or sub-folders from the synchronization by clearing the check marks displayed next to each item in the list. Also, while comparing the files and folders, AB Commander skips some system files and folders (such as the Recycle Bin and System Volume Information folders) and excludes them from synchronization automatically for you.
Note that each file has its size displayed next to the file name. For each folder, the size displayed includes the cumulative size of all files and subfolders that belong to that folder.
When you press the Synchronize button on the Ready to Synchronize window (or, if you selected the Auto-start the synchronization... option and the specified number of seconds has passed), the actual synchronization process starts. First, AB Commander verifies that it has the appropriate access rights to the source and destination files that need to be synchronized. If it discovers, for example, that one of the files that need to be updated is locked by the operating system, it displays such information in a separate Synchronization Errors window for your review, before starting to delete or copy any files:
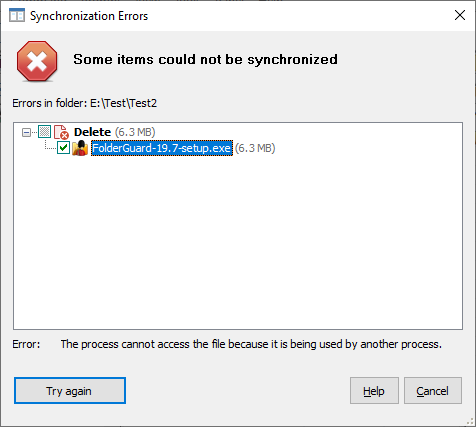
Note, however, that not all such error conditions can be determined in advance: some errors only manifest themselves when the actual file operation is attempted. Also, if an error happens while the synchronization is in progress, it may prevent other items from synchronizing successfully. If you encounter the synchronization errors, we recommend to always repeat the synchronization, to make sure that all files and subfolders get synchronized properly.

This window is displayed when you choose the New Folder command from the Tools menu. You can use this window to create a new folder in the active panel. This window contains the following areas:
Current folder
This read-only field displays the full path to the active folder.
Create subfolder
The name for the folder to be created. The path entered here is treated as a relative path in respect to the active folder. If an absolute (full) path is entered here, then the contents of the Current folder area are ignored.

This window is displayed when you choose the New Junction Point command from the Tools menu. This command is available only if your computer is running Windows Vista or a later version. It is not available on Windows XP, You can use this window to create a new junction point in the active panel. This window contains the following areas:
Current folder
This read-only field displays the full path to the active folder.
Create junction point
The name for the junction point to be created.
Target folder
The path to folder that the junction point should point to. By default it points to the folder displayed in the passive panel of AB Commander. The target folder can only be a real (rather than a virtual) folder on a local drive.
Notes:
A junction point creates an alternative path to the target folder. A junction point can only be created on a local NTFS drive and point to target on a local NTFS drive, too. Any operation on files in the target folder is reflected in the view provided by the junction point, and vice versa. For example, if you delete a file using the junction point, the file will be deleted in the target folder, as well (because it's the same file, actually.)
If you copy or move a junction point, it loses its junction point properties: instead of moving, consider creating a new junction point and then deleting the old one.
You can delete a junction point by, for example, selecting it in an AB Commander panel and pressing the Delete key.
AB Commander offers the Resize Images tool that you can use to reduce the resolution of a large number of digital images in one command, and either save the smaller images into a different folder, or replace the original images. This command can also optionally adjust the orientation of the images according to their Exif orientation tags:
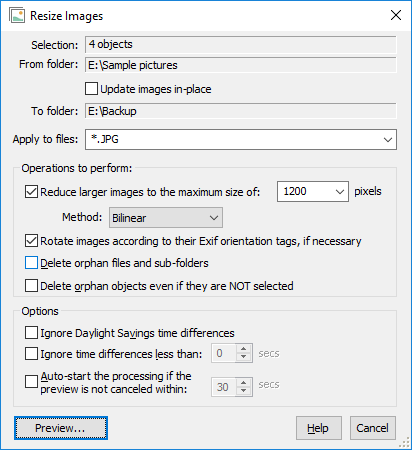
This command can resize and rotate the image files of the following types: JPG, PNG, BMP, TIF. When resizing or rotating the JPG images, this command maintains the image quality factor of the original.
The Resize Images command uses the same processing engine as the Synchronize command: when used to save the processed images into a different folder, it takes care not to overwrite the existing files in the destination folder, if they are newer than the originals, or if their resolution is already smaller than or equial to the requested resolution. If it encounters an image of a type that it cannot resize or rotate, or if a file does not contain an image at all, this command just copies it over to the destination folder without processing it, just like the Synchronize command does.
The Resize Images window is displayed when you choose the Resize Images command from the Tools menu. This window contains the following areas:
From folder
Displays the path to the folder currently opened in the active panel. This folder is supposed to contain the origianal set of images that you want to resize to a smaller resolution and/or to rotate them.
Update images in place
If this option is selected, then AB Commander will save the processed images back to the same files, replacing the original images. If this option is not selected, then the processed images will be saved into the folder currently displayed in the passive panel of AB Commander. You should select this option only if you have a backup copy of the original images stored elsewhere, to avoid losing them should an error occur. Note that AB Commanmder may pre-select this option for you and prevent you from deselecting it if it detects that the passive folder cannot be used to store the processed images.
To folder
Displays the path of the folder where the converted images are to be stored.
Apply to files
You can use this area to specify the mask of the files that should be processed by this command. For example, if the source folder contains a mixture of the files of different types, but you want to resize only the image files of the JPG type, then you can specify the mask as *.JPG. You can enter several masks specifyng different types, separating them with a semicolon. For example, if you weant the command to apply only to the JPG, PNG, and BMP files, eter the mask as:
*.JPG;*.PNG;*.BMP
Reduce larger images to the maximum size of ... pixels
If this option is selected, then this command will attempt to resize the images so that their maximum size would not exceed the specified number of pixels. When resizing the images, this command will attempt to maintain the original aspect ratio and the compression rate (if applicable). For example, you have entered the maximum number of pixels as 1000, and the dimensions of the original image are 4000x3000, it will be resized to 1000x750 pixels, while an image that has the dimensions of 3000x4000 pixels will be resized to 750x1000 pixels. If the dimensions of original image are already equal or smaller than the requested maximum size, such an image will not be resized and it will be copied over as it is.
Method
The method of resizing the images: fast, bilinear, or bicubic. The latter two methods usually produce smoother images, but they are much slower than the fast method.
Rotate images according to their Exif orientation tags, if necessary
If this option is selected, and an image contains the Exif orientation tag with the value larger than 1, then this command will attempt to rotate the image to its natural orientation, according to the tag. You may want to use this command if you want to display the image on a device that does not recognize the Exif orientation tags. If the image or another file does not contain the Exif orientaiton file, such a file image will not be rotated and it will be copied over as it is.
Delete orphan files and sub-folder
If selected, this option causes AB Commander to delete those files from the passive folder, which do not exist in the active folder (the orphan files). It will also delete the orphan sub-folders, if they are empty. If this option is not selected, such files will not be deleted from the passive folder. Note that this option is not used if the Update images in place option is selected.
Delete orphan objects even if they are NOT selected in the Active folder
If this option is selected, it causes any file or folder that does not exist in the active folder (but not in its subfolders) to be deleted from the passive folder. Note that this option is not used if the Update images in place option is selected.
Ignore Daylight Savings time differences
If selected, this option causes AB Commander to ignore the difference of exactly 3600 seconds (1 hour) in the last modification time of the files that have the same name and treat such files as if they have been modified at the same time. You may want to select this option if your computer is configured to adjust its clock automatically when entering and leaving the Daylight Savings time period.
Ignore time differences less than...
If selected, this option causes AB Commander to ignore the specified difference in the last modification time of the files that have the same name and treat such files as if they have been modified at the same time. You may want to use this option if you are storing the copies of the files on a server, and the server for some reason changes the last modification time of the files by a few seconds or a fraction of a second.
Auto-start the processing if the preview is not canceled within ... secs
If selected, this option makes AB Commander start the processing and synchronization automatically after displaying its Ready to process window for the specified number of seconds. If this option is not selected, then AB Commander will start the processing only after you give an explicit command, by pressing the Process images button on the Ready to process window.
Preview
Press this button to cause AB Commander to analyze the files and folders in both the active and the passive folders, prepare the list of objects that require processing and/or synchronization, and display such a list in a Ready to Process window for your review:
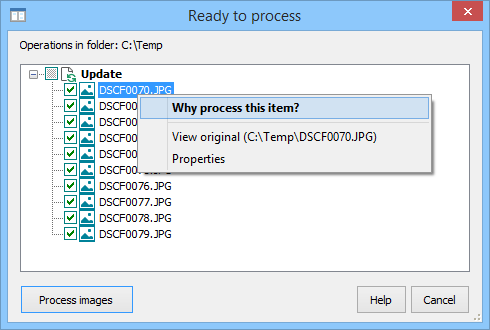
Note that while this window is displayed, no actual processing or synchronization is performed yet, and no files or folders have been copied, updated, or deleted. You can review the proposed operations listed in the Delete, Create, and/or Update groups to see exactly which the files and sub-folders are going to be synchronized. You can exclude some of the file and/or sub-folders from the synchronization by clearing the check marks displayed next to each item in the list. You can right-click on an item and use the commands on the shortcut menu to see why that item was selected for processing or synchronization.
When you press the Process images button on the Ready to process window (or, if you selected the Auto-start the synchronization... option and the specified number of seconds has passed), the processing of the image files starts. First, AB Commander verifies that it has the appropriate access rights to the source and destination files that need to be processed. If it discovers, for example, that one of the files that need to be updated is locked or used by another program, it displays such information in a separate Processing Errors window for your review, before starting to delete or copy any files:
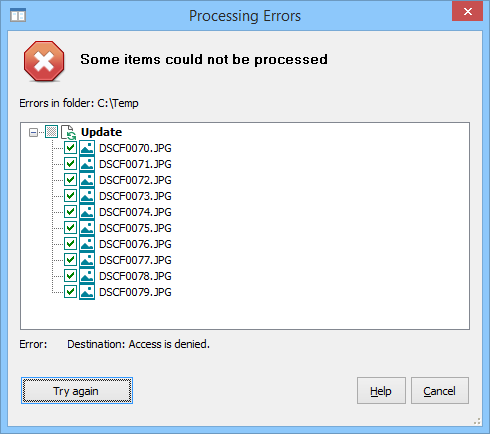
Note, however, that not all such error conditions can be determined in advance: some errors only manifest themselves when the actual file operation is attempted. Also, if an error happens while the synchronization is in progress, it may prevent other items from synchronizing successfully. If you encounter the synchronization errors, we recommend to always repeat the synchronization, to make sure that all files and subfolders get synchronized properly.
This window is displayed when you choose the Set Filter command from the Panel menu. You can use this window to specify the types of objects that should and/or should not be displayed in the panel. This window contains the following areas:
Names
The masks for the names of objects that should be displayed in the panel. An object is displayed in the panel only if its name matches the include mask, unless it matches the exclude mask. Each mask may contain zero, one, or several name specifications, separated with a semicolon (;). Each name specification may contain the star character (*) to denote zero or more arbitrary characters a name may contain. For more information see Notes below.
Types
Specifies the types of objects that should be included in or excluded from the listing. Each type criterion is represented with a checkbox that may be in one of the following three states:
|
The types of objects that can be filtered upon are as follows:
|
Reset
Press this button to reset all filtering criteria. This will make the panel to display all objects.
Note: The system-wide filtering settings of Windows take precedence over the filters used by AB Commander. For example, if your system is set up so that no hidden files should be shown, they will not be shown by AB Commander even if the Hidden checkbox on the Filter window is checked. To change the system-wide settings, use the View - Options command of My Computer.
Note: If a filter is set for a panel, then the following rules are used to determine whether an object should be included in the listing:
- First, the type of the object is determined (according to the classification given above) and the type is matched against the criteria set in the Types area. If the type of the object matches one of excluded types (represented by the cleared checkboxes), the object is excluded from the listing. If the type matches one of included types (represented by the checked checkboxes), the object is included in the listing.
- If the type does not match any of the types for which the appropriate checkboxes are not grayed, then the name of the object is matched against the masks set in the Names area. If the name matches the exclude mask, or does not match the include mask, the object is not included in the listing. The character comparison is NOT case sensitive.
- If an object matches both the include and exclude criteria, the exclude criterion takes precedence (that is, the object is excluded from the listing).
Example 1
Names
- Include: *.txt;*.doc
- Exclude: a*;b*;c
Types
- All checkboxes are grayed
The above filter makes the panel to display only objects which have the TXT and DOC name extensions, unless their names begin with A, B, or C.
Example 2
Names
- Include:
- Exclude: *
Types
- File System Folders - checked
- All other checkboxes - grayed
The above filter makes the panel to display only the real folders. All other objects will be excluded from the listing.
Example 3
Names
- Include: a*;*.txt
- Exclude:
Types
- File System Folders - checked
- Virtual Folders - checked
- All other checkboxes - grayed
All real folders are included in the listing. All virtual folders (other than the file system ancestors) are excluded from the listing. All other objects are listed only if their names begin with A, or have the extension TXT.
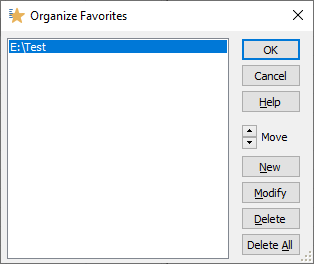
This window is displayed when you choose the Organize Favorites command from the Favorites menu. You can use this window to modify the Favorites menu of AB Commander. This window contains the following areas:
Move
Use these buttons to move the currently selected item up or down in the list.
New
Press this button to create a new command to be added to the Favorites list. The new command is inserted directly above the currently selected item. You can modify the properties of the newly created item with the Create Favorite Item window.
Edit
Press this button to modify the properties of the currently selected item. This command will open the Edit Favorite Item window for the selected item.
Delete
Press this button to delete the currently selected item.
Delete All
Press this button to delete all items from the current Favorites list.
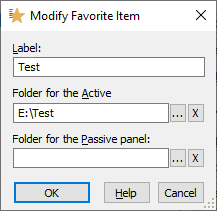
This window is displayed when you press the New or Edit buttons on the Organize Favorites window of AB Commander. This window contains the following areas:
Label
Enter the text you want to be displayed on the Favorites menu for this item. If you leave this area empty, the path entered in the Folder for the Active panel area would be displayed on the menu.
Folder for the Active panel
Enter the path to the folder you want to be displayed in the active panel when you choose this command from the Favorites menu. If a virtual folder is set up for this area, you would not be able to edit it directly; in this case, use the Browse button (the button next to this area with the dots ... on it) to locate the folder you want. You can also press the X button to reset this folder to the Desktop folder.
Folder for the Passive panel
Enter the path to the folder you want to be displayed in the passive panel when you choose this command from the Favorites menu. If a virtual folder is set up for this area, you would not be able to edit it directly; in this case, use the Browse button (the button next to this area with the dots ... on it) to locate the folder you want. You can also press the X button to clear this area; in this case the passive folder would not be set by this command.
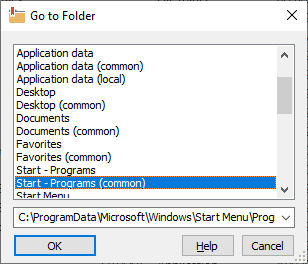
This window is displayed when you choose the Go to command from the Folder menu. You can use this window to type in a path to the folder you want to navigate to, or to quickly navigate to one of the special folders of Windows. A special folder is a folder used by Windows for special purposes. For example, the Desktop folder is used to store the items displayed on the Desktop, the Start Menu folder is used by Windows to keep the shortcuts that appear on the Start Menu, and so on. Note that the content of the list depends on the version of Windows that you use, as well as on the configuration of the user's accounts that you have set up.
If you don't want the list to display all available folders, you can choose to hide some (or all) folders in the list. To hide a folder, right-click on it in the list and choose the Hide command. If later on you change your mind, you can unhide the hidden folders by right-clicking on any folder in the list and choosing the Unhide command from the menu.
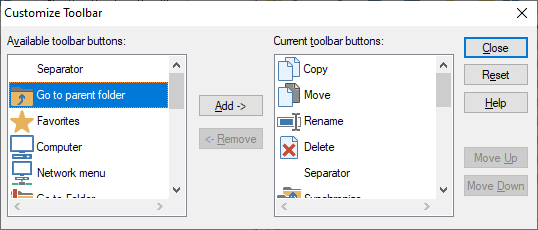
This window is displayed when you choose the Toolbar - Customize command from the View menu. You can use this window to change the set of buttons displayed on the main toolbar or on the panel toolbars. This window contains the following areas:
Available toolbar buttons
The list of buttons that can be placed on the toolbar.
Current toolbar buttons
The list of buttons that the toolbar currently contains.
You can use the mouse to drag buttons between these lists. Pressing the Reset button restores the toolbar to its original state, as it was when you first installed AB Commander.

This window is displayed when you choose the Status bar - Indicators command from the View menu. You can use this window to change the set of indicators displayed on the Status bar. This window contains the following areas:
Keys (CAPS, NUM, SCRL)
These indicators show the current state of the CAPS, NUM, and SCRL keys.
Memory usage
This indicator shows the percentage of physical RAM (Random Access Memory) used by all currently running processes, including AB Commander and the operating system itself. If it shows 100% (or close to 100%) while you perform your regular tasks, you may want to add more RAM to your computer.
Free space
This indicator shows the amount of free space on the storage partition of the active folder. If the folder currently shown in the active panel is not a real folder, this indicator does not report anything.
File size (exact)
This indicator shows the exact total size of the currently selected files in bytes.
File size (adaptive)
This indicator shows the approximate total size of the currently selected files in units dependent on the resultant value (bytes, KB, MB, etc.)
Number of objects
This indicator shows the total number of objects currently displayed in the active panel). If more than one object is selected in the panel, then this indicator shows the number of the selected objects.
Date
This indicator shows the current date, using the system-wide format, as defined by the Control Panel.
Time
This indicator shows the current time, using the system-wide format, as defined by the Control Panel.
Use compact indicators
If this option is selected, then the values of the indicators are displayed in such a way as to take as little space as possible. If this option is cleared, some additional information is displayed with the values of the indicators.
How do I enter the License Key?
AB Commander prompts you to enter your license key when you run it: simply press the Enter License Key button on the Welcome screen and enter your licensing information into the form.
Alternatively, you can run AB Commander, and choose the Help - Enter License Key command from its main menu.
IMPORTANT: When entering your license information, make sure you enter your name and the license key exactly as they are shown on your order receipt, including all capitalization and punctuation. Otherwise, AB Commander may not accept the license key or may not register your information properly. You may wish to copy and paste the name and the key from our message into the form, to avoid typos.
Can I use the same license key to install AB Commander on several computers?
Yes, you can use the same license key, provided that you are installing it on no more computers than included in your license. Please refer to the file License.txt (installed along with other files of AB Commander) for the detailed description of the terms of using this software on more than one computer. For information on our site license and quantity discounts, please visit our Online Store ![]() .
.
How do I backup settings of AB Commander?
Use the Export settings command on the Tools menu to save all current settings into a file. (You can then backup that file as you usually backup the rest of your important files). Later on, if you want to restore the settings from the file, use the Import settings command.
Can I run AB Commander from a removable drive (for example, a flash drive)?
Yes, you can! After you have installed AB Commander on your computer, simply copy the files abcmdr.exe and abcmdr32.dll (or, if you use the x64 edition, copy the files abcmdr64.exe and abcmdr64.dll) from the installation folder to the removable drive, and then run abcmdr.exe (or abcmdr64.exe ) from there. If you want to have the User's Guide on the removable drive as well, copy the file abcmdr.chm to the removable drive, too.
How do I change the sorting order of the objects in the panels?
You can do it in the same way as with Windows Explorer, by clicking on the appropriate headers of the columns of the panels. For example, to sort the files by size, click on the Size column header. Clicking on the same column header again reverses the sorting order from ascending to descending and back.
Another method of changing the sorting order is by right-clicking within an empty area of a panel with the mouse, and choosing the Arrange Icons By... command from the shortcut menu.
How do I run AB Commander As Administrator?
If you have not disabled the User Account Control (UAC) of Windows 10/8/7/Vista, then when you run AB Commander, it starts executing with the restricted (standard user) rights, just like most other programs do. If at some point you need to perform an operation that requires the administrative privileges, you can use the Tools - Restart as Administrator command of AB Commander to restart it with the full administrative rights. When the administrative rights are no longer needed, you can return to operating back in the restricted mode by using the Tools - Restart as Standard User command.
If you require AB Commander to run elevated all the time, then you may want to modify the properties of the shortcut that you use to run AB Commander, to specify that the Run as administrator option should always be used when starting AB Commander. Note that if you run AB Commander as administrator, you will see Administrator in its title bar.
How do I run programs As Administrator?
You can do it by pressing the CTRL and SHIFT key simultaneously while double-clicking on the program to execute (or while pressing the Enter key to run the program). It would have the same effect as if you would have right-clicked on the program and selected Run as administrator from the shortcut menu.
What are the virtual folders?
Let's discuss the real (non-virtual) folders first. The real folders can be navigated to by entering a file system path into the address bar of File Explorer. The folders located on the hard drive of your computer have file system paths that start with a drive letter. For example, C:\Program Files is a file system path that points to a real folder. If you attach an external drive, it will have a file system path, too, but starting with a different drive letter. Or, if you connect to another computer on a network, you can navigate to the shared folders using the file system path in the format: \\server\share\folder\.... All such folders are the real ones.
There are folders, however, that do not have a file system path. The obvious examples of such folders are This PC, Libraries or Network. Even though you can open them in File Explorer or AB Commander and they look like other folders, they don't have file system paths, and therefore they are not real folders. They are virtual ones.
In some cases the same physical folder can appear as a real or a virtual folder depending on the way the device is connected to your computer. For example, if you connect your smart phone to the USB port of your computer, the contents of the SD card inside the phone could appear as a virtual folder. However, if you remove the SD card from the phone and insert it into the card reader (if your computer has one, of course), then the SD card could appear as a real folder, with its own drive letter.
Why does it matter? Because even though the real and virtual folders look similar, the way they function underneath is very different. For example, the Synchronize command of AB Commander can only work with the real folders, it cannot be used to synchronize files if one of the folders involved is a virtual one. Similar limitations exist for many other commands.
So, if you encounter a situation when a command of AB Commander suddenly does not do what you would expect, check that the folder you are trying to work with is not a virtual one. For example, you may need to remove the SD card from your phone and insert it into the card reader to make it appear as a real folder, to be able synchronize files with it.
Windows keeps rearranging the columns, help!
AB Commander tries hard to keep the columns of the file panels the way you've set them up. Sometimes, however, Windows takes control of them and rearranges them the way it thinks is better. For instance, if you connect a removable drive and navigate to it with AB Commander, suddenly Windows may change the columns to display "Date taken", "Resolution", etc., even though the removable drive contains no digital images. (That's a good illustration of a situation when computers are trying to be smarter than they need to be).
Anyway, if you are tired of manually rearranging columns after Windows messes them up, you may find the Store/Restore columns commands on the Panel menu of AB Commander of help. First, arrange the columns one last time the way you want them to be: hide the ones you don't need, unhide the ones you want, put them in the order that makes most sense to you. When you are done, choose the Panel - Store columns command to make AB Commander remember your columns. Later on, when you need to restore the columns the way you've set them up, just choose Panel - Restore columns (or press Ctrl+U), and your favorite columns will be instantly restored.
Keep in mind that the Store/Restore columns commands are available only if you run Windows Vista (or later). Also note that these commands can be used only with the file system folders (that is, folders that display the contents of your hard drives, removable disks, etc.) If you navigate to a virtual folder, such as Control Panel, or My Computer, the Store/Restore columns commands will not be available, because virtual folder often have different set of columns than those of the file system folders.
How do I synchronize the My Documents folder?
If you attempt to synchronize the My Documents folder with another folder on your computer, you may see the Nothing to do message, even though the My Documents folders contains documents that need to be synchronized.
The difficulty in synchronizing the My Documents folder is caused by the fact that it's not a "real folder", it's more of a virtual shortcut to another folder on your disk. That is, although it appears as a subfolder of the Desktop folder, its actual location is different: on Windows XP, for example, it could be C:/Documents and Settings/User/My Documents or similar.
To synchronize the contents of the My Documents folder you need to synchronize the actual folder where the content is stored (as explained in the paragraph above).
To quickly navigate to the actual My Documents folder, choose the Go to command from the Folder menu, select Documents in the list, and press OK: AB Commander will display the actual My Documents folder in its active panel.
How do I use AB Commander with Zip folders?
AB Commander supports working with the compressed files (such as Zip and CAB files) as long as the underlying operating system provides support for such files. For example, Windows XP provides "native" support for the Zip and CAB files that allows you to view the contents of such files as if they were folders. If you have not disabled such support (as described below), AB Commander will provide this capability as well.
Keep in mind that support for the compressed files provided by Windows is limited: although you can view the contents of such files in the panels as if they were folders, they are NOT real folders, and some operations (such as List/Synchronize/etc. commands of AB Commander) cannot work with files inside the compressed folders. You can, however, copy and move files between the compressed and regular folders using the drag-and-drop technique or the Cut/Copy/Paste commands, just like with Windows Explorer. You can also use the shortcut menu commands provided by Windows Explorer for the files within the compressed folders. AB Commander also lets you use the Copy and Move commands with the Zip folders, too, by simulating the Cut/Copy/Paste commands and using the Clipboard to transfer the files.
To use other programs to work with the zip files (such as BitZipper ![]() , etc.), you would need to right-click on the zip file and select the "Open with BitZipper" (or similar) command from the shortcut menu.
, etc.), you would need to right-click on the zip file and select the "Open with BitZipper" (or similar) command from the shortcut menu.
Zip folders is a great feature as long as the number of the zip files and the zip files themselves are not too large. The problem is, the built-in Windows code for handling the zip files is not optimized for the large zip files. As a result, when browsing folders filled with zip files, AB Commander may become slow to respond, while Windows attempts to open and analyze each zip file.
If you experience slow performance of AB Commander when browsing folders with large amount of zip files, you have the following options:
- Prevent AB Commander from showing the Zip folders in its Folder bar. To do that, clear the Show zip folders in folder bars option. You would still be able to navigate inside of the Zip folders by opening them from within the file panels of AB Commander.
- Disable the Zip folders feature of Windows altogether, by unchecking the Enable Zip folders option on the Tools menu of AB Commander. Note that this option has the global effect: it affects not only AB Commander but also Windows Explorer. Note also that if you don't have a separate utility for opening zip files, then Windows may re-enable the Zip folders feature back when you attempt to open a zip file. To keep the Zip folders feature turned off, you need to associate Zip files with another program (such as BitZipper ).
Not all files are displayed by AB Commander. Why?
One reason could be because you have set up a filter for the panel, that limits the kind of objects that should be displayed in the panel. Another reason could be that Windows itself is set up not to display the hidden files to the user. To modify this setting, choose Tools - Folder Options command of AB Commander (or open Windows Control Panel and use its Folder Options command).
I see a message that the contents of Windows Clipboard is not preserved. What does it mean?
Some commands of AB Commander use Windows Clipboard. For example, when you copy a file out of a Zip folder, the file transfer is performed through the Clipboard. As a result, if you have previously copied something onto the Clipboard (using the Copy or Cut commands most Windows programs have), then you won't be able to Paste that information after the file operation of AB Commander is complete. To alert you about a possible loss of the information you've put on the Clipboard, AB Commander displays that message.
May I give a copy of AB Commander software to a friend?
Yes, you may give the installation files of our programs to your friends and associates. However, you may NOT share your license key, if any, with anybody else. Please remember that the license key we provide you with are for your own use only. If your friends like our programs, please let them purchase their own license keys. To avoid possible confusion, please give out the original installation files that you may download from our web site.
There are several other simple, but important conditions which we impose on further redistribution of our products. Please refer to the file License.txt in the folder where you have installed AB Commander for the complete description of our distribution requirements.
How can I get a printed version of this guide?
This user's guide is available online in the printer-friendly format:
https://www.winability.com/abcommander/users-guide-printable.htm ![]()
Simply open the link above in your web browser and use the web browser's Print command to print it out on your printer.